
Spec Sheet 1
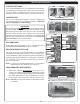


22
INSTALLATION (cont.)
CAUTION: BURN HAZARD! Logs will remain hot for some time after use. If you need to reposition
any log to maintain the proper layout, use heat-resistant gloves or allow logs adequate time
to cool before handling.
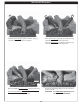
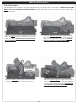
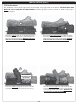
Place the rear log (log #1) as shown. The holes
found on the underside of the log should align over
the pegs found on the burner. ENSURE THE LOG
RESTS FLAT ON THE BURNER.
1
LOG SET AND EMBERS PLACEMENT
You must position and maintain the log layout as shown here to ensure optimal operation of the burner system.
Do not add any additional embers to this log set. Any additional embers may cause unsafe operation.
Locate and follow the appropriate section specifi c to your log set style and size.
Place the right front log piece (log #2) as shown. The
holes found on the underside of the log should align
over the pegs found on the burner. ENSURE THE LOG
RESTS FLAT ON THE BURNER.
Place the
right front log piece
g
g
p
(log #2) as shown. The
h
h
h
h
h
h
l
l
f
f
f
f
d
d
d
d
d
d
d
d
d
t
t
t
t
h
h
h
h
h
h
h
h
d
d
d
i
i
d
f
f
th
l
h
ld
li
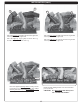
FTO-18 Placement
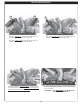
The underside of the bottom logs have holes that align over pegs found on the burner. THE BOTTOM LOGS
MUST BE FULLY SEATED ON THE BURNER. Certain logs have notches on them to allow for the logs to
interlock in place.
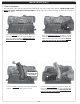
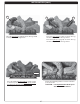
Place the middle log (log #3) as shown. It should
lock in place on the burner and over the rear log.
Place the left front log piece (log #2) as shown. The holes
found on the underside of the log should align over the
pegs found on the burner. ENSURE THE LOG RESTS
FLAT ON THE BURNER.
2A
3
2B
REST MIDDLE
LOG IN BRACKET
ON BURNER