
Spec Sheet 1


21
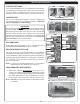
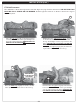
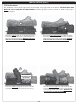
Fig. 21-4 Secure burner to fl oor (if required)
Anchor hole
(both sides)
INSTALLATION (cont.)
CONTROL SETTINGS
It is recommended that before you install the decorative media,
you familiarize yourself with the control valve layout. This will
assist you when operating the burner system. See Fig. 21-1
through 21-3 for the control positions of your specifi c model.
LIGHTING TEST
Prior to proceeding with installation, perform a lighting test
(see lighting instructions for lighting your burner). Allow the
unit to completely cool after testing.
GAS PRESSURE
At this stage, the gas pressure is to be checked. Reference
the CHECK GAS PRESSURE section for details.
SECURE BURNER TO FLOOR
Two anchoring holes are provided on the base of the burner
assembly for securing it to the fi replace fl oor in a mobile home,
or if the installation or inspector require it in other circumstances.
Using the appropriate hardware for your fi replace construction
(not included), secure the burner system into the fi replace
fl oor (see Fig. 21-4).
Note: If you have a manufactured fi replace, check with the
manufacturer before drilling holes in the fl oor.
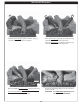
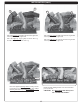
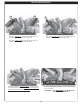
LAVA GRANULES (DECORATIVE)
1. Spread the supplied lava granules on the fl oor of the
fi replace; around the front and sides of the burner system
(see Fig. 21-5). The lava granules may be placed around the
wood chip and remote receiver (as applicable). Leave the
front and top of the components clear for control access.
Note: DO NOT place any lava granules on the burner system,
or behind it.
Fig. 21-5 Place lava granules
12 model shown
12 model shown
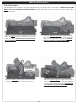
Fig. 21-1 12 valve operating positions
OFF PILOT ON
Read settings here
OFF IGNITION PILOT ON
OFF
PILOT ON
ON
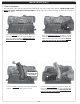
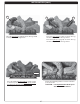
Fig. 21-2 15 valve operating positions
Fig. 21-3 01V valve operating positions
Flame control
turned OFF
Valve switch
set to O
Flame control
turned OFF
Valve switch
set to I
Flame control
turned ON
Valve switch
set to I
IMPORTANT
For all valves, the air MUST be purged from the gas line before
the pilot will light and burn properly. The time needed to purge
will depend on the length of the gas line to the unit and the
amount of time since the unit or gas line was last used. It
may take several minutes before all the air is purged and the
pilot will light and burn properly. Reference the LIGHTING
INSTRUCTIONS section in this manual.