
Spec Sheet 1


20
INSTALLATION (Cont.)
INSTALL REMOTE - 12 AND 15 MODELS ONLY (if
equipped)
Note: For 01V models no remote installation is needed. Simply
install the batteries in the remote transmitter. See
INSTALL/REPLACE BATTERIES section, then proceed
to the following section.
For 12 and 15 models:
1. At this stage the remote system batteries are to be installed.
Reference the INSTALL/REPLACE BATTERIES section
for details.
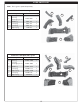
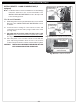
2. Locate the wires coming off of the remote receiver, and
connect them to the two male prongs found on the valve
(see Fig. 20-1).
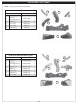
3. Place the remote receiver at the front left corner of the
fi replace. Place as far from the burner system as possible.
See Fig. 20-2.
4. Place the plastic cover over the remote receiver with the
open side facing forward to allow access to the receiver
controls. Then place the decorative heat shield. See Fig. 20-2.
CAUTION: THE WOOD-CHIP/REMOTE RECEIVER WILL BE
HOT DURING AND AFTER OPERATION.
Fig. 20-2 Place remote receiver
Fig. 20-1 Connect remote receiver to valve
Receiver (w/ plastic cover
and heat shield)
Connect wires
to male prongs
on valve
12/15 model only
(12 shown)
Connect wires
to male prongs
on valve
12 model
15 model