
Installation guide
5
Site Survey
It is advisable to carry out a survey to establish a good radio path prior to installation.
This will help with the positioning of the equipment and choice of antenna. Your
distributor should be able to assist with information and may be able to provide a
Survey Kit and antennas for this purpose.
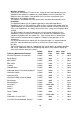
Before commencing a survey, measure or estimate from a map, the straight-line
distance between the two sites. From the tables on page 9, check which type of
antenna would be needed to cover the required distance. Visit the sites to see if there
is a suitable location for equipment and the antennas, normally on the roof of the
building. It should also be possible to see if there is a reasonable line-of-sight
between the two locations or if there are any significant obstructions. (See Technical
Notes). A pair of field glasses may be useful if the sites are some distance apart.
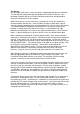
Make a temporary installation of a camera and transmitter. Note: battery-operated
equipment is available for this purpose. Position the antenna and leave the equipment
running. At the receive site, set up the receiver and monitor. Position the antenna
and adjust its position to get the best signal strength indication on the receiver unit (up
to three GREEN LED's). If the picture quality is not good, or the signal strength is low,
try moving the antenna to other locations. Performance will be affected by
obstructions or metal objects nearby. Even the antenna mounting pole can cause a
problem if the antenna is not correctly mounted clear of the pole. For longer
distances, it may be necessary to use a high gain antenna on the receiver site.
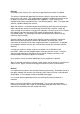
Note: High gain antennas are directional and must be aimed at the transmission site
and then adjusted by rotating until maximum signal strength is achieved. The
POLARISATION of both antennas must match. For example, if the transmitting
antenna is vertical then the receiving antenna must also be vertical.
If the signal strength is too low it may be increased by raising the height of the transmit
antenna, receive antenna or both. Care must be taken, however, because there will
be a loss of signal in the cable and connectors. For the actual installation, a good
quality low-loss cable should be used between the antenna and the VideoWave units
(i.e.LMR400). Alternatively, the VideoWave unit, which is housed in a weatherproof
enclosure, can be mounted on the pole near the antenna to keep cable lengths to a
minimum.
If the picture quality is poor, even with reasonable signal strength, this may be due to
interference. Remember that this is a license free band and other users could be
transmitting in the area. If interference is suspected, try turning off the transmitter and
checking the LED signal strength meter on the receiver. Only the first red LED should
be on to indicate 'power on'. If the amber or any of the green LED's are on or
flickering, this indicates the presence of another signal. Try moving the antennas, or
changing to another channel.