EC7000i and EC7500i Series Scanners User Guide July 2014
EC7000i and EC7500i User Guide Compliance statements Copyright ©2014 by RDM Corporation. All rights reserved. No part of this publication may be reproduced, stored in a retrieval system, or transmitted, in any form or by any means, electronic, mechanical, photocopy, recording, or otherwise, without the prior written permission of RDM Corporation.
EC7000i and EC7500i User Guide Compliance statements Compliance statements FCC Compliance Statement This equipment has been tested and found to comply with the limits for a Class A digital device, pursuant to Part 15 of the FCC rules. These limits are designed to provide reasonable protection against harmful interference when the equipment is operated in a commercial environment.
EC7000i and EC7500i User Guide Contents Contents Compliance statements................................................................................................................................. 3 FCC Compliance Statement ..................................................................................................................... 3 Contents ........................................................................................................................................................
EC7000i and EC7500i User Guide Contents EC7500i light signals and beeps ............................................................................................................. 17 Start up ................................................................................................................................................ 17 Document scanning and processing ...................................................................................................
EC7000i and EC7500i User Guide Introduction Introduction The RDM EC7000i and EC7500i series scanners provide affordable functionality in a compact and efficient design. Featuring RDM’s industry leading Progressive MICR Method and imaging technology the EC7000i and EC7500i series scanners deliver optimum MICR read rates and image quality. In addition, all EC7000i and EC7500i series scanners include a franker cartridge to comply with various payment industry guidelines.
EC7000i and EC7500i User Guide Introduction EC7000i and EC7500i models and features The EC7000i and EC7500i series scanners are available in several optional model configurations. All models ship with a franker cartridge. All scanner models can also be licensed to perform optical character recognition (OCR) on documents with machine printed text (remittances, pay stubs). This can be used with different applications such as walk-in bill payment.
EC7000i and EC7500i User Guide Introduction Model and serial number To locate the model and serial number of your scanner, carefully turn your scanner over to view the label affixed to the bottom. Note: this guide is for EC series scanners with serial numbers beginning with 24 and higher. If your scanner’s serial number begins with 23 or lower, you should download the appropriate guide from RDM’s website, www.rdmcorp.
EC7000i and EC7500i User Guide Setting up the EC7000i or EC7500i Setting up the EC7000i or EC7500i To set up the EC7000i and the EC7500i, follow these steps. Choose a location Locate your scanner in a place that: • Has a flat surface, such as a countertop or table. • Is convenient for the scanner operator. • Offers adequate ventilation and protection from elements such as heat, dust, oil, or moisture. • Is close to a telephone line (depending on your unit) and power connections.
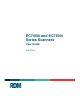
EC7000i and EC7500i User Guide Setting up the EC7000i or EC7500i Type A Type B Printer Document insertion slot Document insertion slot Scanner status LED light ©2014 RDM Corporation Magnetic stripe reader (MSR) Scanner status LED light Page 10
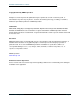
EC7000i and EC7500i User Guide Setting up the EC7000i or EC7500i Inside EC7000i and EC7500i series scanners Cover latch Outside cover in raised position Image frame in raised position Image sensor Document sensors Document feed plate. To access the franking printer assembly, you must remove this plate. Connection ports The EC7000i and EC7500i have different configurations of connection ports based on optional features.
EC7000i and EC7500i User Guide Setting up the EC7000i or EC7500i EC7000i ports The following table describes the scanner ports, from left to right: Power (Red) Connect the power adaptor to this port. USB (Orange) Use this port to connect to a PC. AUX (Yellow) Use this port to connect optional peripheral devices such as a pass through printer. COM (Green) Use this port to connect to a PC or terminal. TEL (Purple) Use this port to connect to a telephone line.
EC7000i and EC7500i User Guide Setting up the EC7000i or EC7500i Access the printer assembly 1. Press the cover latch and lift the cover to access the imaging frame. 2. Lift the imaging frame to access the feed plate. 3. Locate the blue tab on the right side of the plate. Note the black tab in the same place on the left side of the plate. You will use the black tab to open the printer assembly. a. Push the black tab to the left, away from the feed plate. b.
EC7000i and EC7500i User Guide Setting up the EC7000i or EC7500i Connect the power cord 1. Insert the round end of the power cord into the power port on the back of the scanner. Align the flat side of the power connector facing up. 2. Plug the power cord into an electrical power outlet. 3. When you connect to power, the LED lights up. Your unit is now powered on.
EC7000i and EC7500i User Guide Operating the scanner Operating the scanner Preparing checks To reduce the possibility of errors and damage to the unit, you should: • Remove all folds and creases in the check. • Remove any paper clips and staples from the check. • Make sure that checks are dry Feeding checks The scanner unit is ready to accept checks when the LED is green. Insert the check in the following way: • Flush to the right side of the scanner. • Information-side facing up.
EC7000i and EC7500i User Guide Status signals for EC7000i and EC7500i Status signals for EC7000i and EC7500i The scanner’s status is shown through a single, multi-state LED (light-emitting diode), which is the light on the top, front, right-hand side of the unit. Additionally, the scanner beeps to provide more information. The tables below describe typical status signals and their meanings. EC7000i light signals and beeps The following tables are for EC7000i scanners with serial number 24x and higher.
EC7000i and EC7500i User Guide Status signals for EC7000i and EC7500i EC7500i light signals and beeps Start up Signals Meaning / What to do Red-green flashing cycle Or, red-red-green-green flashing cycle The scanner is being configured by the application. Green solid The scanner is configured but idle. You can start a task by using the check scanning application on your computer. Red solid An error occurred during startup.
EC7000i and EC7500i User Guide Maintaining your scanner Maintaining your scanner Your scanner performs best when all working surfaces are clean and free of foreign material. Cleaning the scanner CAUTION: • • Always disconnect the power to the scanner before cleaning it. Solvents or harsh cleaners may damage or discolor the cabinetry. To clean the outside cabinetry, use a damp cloth and mild soap. To clean the inside of the unit: 1. Press the latch and lift the cover to access the imaging frame. 2.
EC7000i and EC7500i User Guide Maintaining your scanner Cleaning the imaging camera glass If there are horizontal lines in the image of the scanned document, you should clean the imaging camera glass. To locate and access the imaging camera glass: 1. Press the latch and lift the cover to access the imaging frame. 2. Lift the imaging frame to access the document sensors. 3. Use a lens-cleaning tissue or a damp, lint-free cloth to remove any ink or dust from the imaging camera glass.
EC7000i and EC7500i User Guide Troubleshooting Troubleshooting In the course of everyday operations, you may encounter minor malfunctions in your scanner. Before calling for service, review the troubleshooting steps below. Scanner does not respond Ensure that the scanner’s cable is still properly connected to the correct port on the back of the unit (according to instructions provided by your distributor or reseller). If the problem persists, contact your distributor or reseller.
EC7000i and EC7500i User Guide Troubleshooting The check feeder does not function properly Ensure that you are inserting the check properly: flush to the right side of the scanner, information-side facing up, with the MICR line to the right. If the problem persists, contact your distributor. Remove any debris by following the directions below: 1. Press the latch and lift the cover to access the imaging frame. 2. Lift the imaging frame to access the document feed plate. 3.
EC7000i and EC7500i User Guide Specifications Specifications EC7000i and EC7500i Specifications Unit size Without MSR 8.6” long x 6.1” wide x 4.4” high 21.9 cm long X 15.4 cm wide X 11.3 cm high With MSR 8.6” long x 6.1” wide x 5.3” high 21.9 cm long x 15.4 cm wide x 13.5 cm high With Printer 11.8” long x 6.1” wide x 5.3” high 30.1 cm long x 15.4 cm wide x 13.5 cm high Unit weight EC7000i: 3.4 lbs. / 1.5 Kg EC7504f with printer: 6.0 lbs / 2.
EC7000i and EC7500i User Guide Specifications Software and support Supported operating systems Windows XP, Windows 7 (32/64-bit), Windows 8 (32/64-bit), Windows 8.1 (32/64-bit) Development software RDM EC Scanner Application Development Kit (ADK) includes API components, USB driver, Redistributable Installation Packages and Sample Applications Modem Specifications (Optional) Supports V.34bis, V.34 V.F.C, V.32bis, V.32, V.22bis, V.22A/B, V.23, V.21, Bell 212A and 103 Error correction V.
EC7000i and EC7500i User Guide Specifications Additional parts Options and accessories RDM Part Number Replacement franker cartridge – “Electronically Presented” - red ink 6000-6050 Replacement thermal paper roll, 2.25” x 50’ (58 mm x 15 m) Standard thermal roll paper available from office supply stores Replacement power adapter (EC7000i, EC7500i) 302843 Optional Aux to PC serial cable, mini-DIN9 to DB9 – (EC7000i models) 5000-40012 USB Cable, Type A to A (EC7000i models) 5000-40091 USB 2.
EC7000i and EC7500i User Guide Appendix A Appendix A This appendix describes the EC7000i series scanners’ LED and beep signal patterns for serial numbers 23x and lower. Startup Signals Meaning / What to do Red/Green/Amber flashing cycle The scanner is starting up and performing diagnostics. Wait for the scanner to finish. Solid red The scanner failed a start-up test. Check the computer’s display for instructions. If you need more help, contact your distributor (reseller).
EC7000i and EC7500i User Guide Warranty Information Warranty Information LIMITED WARRANTY: The RDM EC7000i and EC7500i units are warranted against defects in materials and workmanship under normal use and service for a period of two years. This warranty is extended only to the original purchaser.
EC7000i and EC7500i User Guide Warranty Information WARRANTY SPECIFICS: This warranty only covers failures due to defects in materials or workmanship, which occur during normal use.