
Installation Guide


8
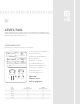
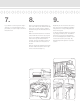
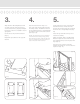
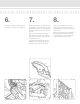
Slide the rail up or down until the bal-
uster hole spacing is even on each end
(Fig. 3).
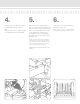
Trace the post onto the rail and mark
1/8" short at each end to allow for ex-
pansion (Fig. 4).
Now cut the rail to t (Fig. 5).
Tip:
If using a power saw, a carbide tip blade
of at least 60 teeth is recommended.
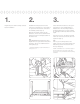
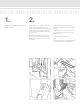
1.
Prepare all posts and mounting surfaces
before installation.
2.
Temporarily secure a plank on the noses
of the stairs between the posts onto
which you are installing the stair rail. (Fig.
1) The thickness of the plank will deter-
mine the space between the stairs and
the bottom rail.
Place the Bottom Rail, baluster holes
facing up, on the plank with the sticker
reading “this end at the top” at the top
post (Fig. 2).
(Fig. 1)
(Fig. 3)
(Fig. 2) (Fig. 5)
(Fig. 4)