
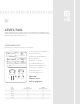
Installation Guide


3
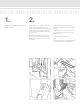
2.
Establish the level placement of the
lower rail so that there is no more than a
4" space* from the bottom of the rail to
the standing surface (Fig. 1).
Mark the mounting surfaces at this
dimension, minus 3/4" to determine the
placement of the mounting brackets for
the bottom rail.
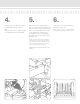
Tip:
Standard Original Rail measures 36" in
height with a 2" space below the bottom
rail. Use 2" blocks to establish bottom
rail height (Fig. 2).
* Southern Building Code maximum bot-
tom space is 2".
(Fig. 1)
(Fig. 3)
(Fig. 4)
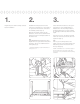
1.
Prepare all posts and mounting surfaces
before installation.
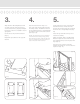
3.
Place the Bottom Rail across the open-
ing where it is to be installed (Fig. 3).
Measure from the mounting surface to
the rst baluster hole on each end (Fig.
4), and adjust until these dimensions are
equal.
Trace the post onto the bottom rail and
mark 1/8" short at each end to allow for
expansion (Fig. 5).
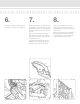
Tip:
If all of your mounting surfaces are
plumb, transfer your measurements and
baluster layout from the bottom rail to
the top rail (Fig. 6).
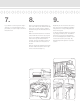
NOTE: A minimum of 1" from the edge of
the rst baluster to the end of the rail is
necessary to accommodate the mounting
brackets.
(Fig. 2)
(Fig. 5)
(Fig. 6)