
Installation Guide

10
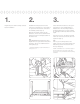
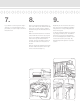
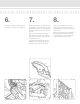
7.
Pull the bracket back from each end ap-
proximately 1/4" from the end. Trace the
retaining pin channel onto the rail sleeve,
and mark 5/16" from the end of the rail
(Fig. 14).
Make sure the aluminum T-channel is
ush with the end of the vinyl and drill
(7/32" bit) through both ends of the top
rail and the T-channel.
Insert aluminum retaining pin into the
drilled hole. (Fig. 15) Slide the bracket
over the dowel to the end of the rail.
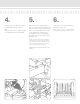
8.
Insert a Square Baluster in each rout
of the bottom rail. Each kit contains 2
crimped balusters; space them evenly in
each section.
Set the top rail in place by inserting the
rst baluster (at the upper post) in the
corresponding rout of the top rail, and
work toward the bottom (Fig. 16).
(Fig. 13)
(Fig. 14)
(Fig. 15)
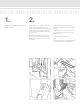
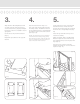
6.
Leave the mounting brackets taped in
place and cut the top rail to t (Fig. 13).
(Fig. 16)