
User's Manual


8
Basic Setup
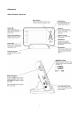
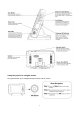
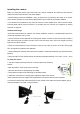
Step 1 of 2: Powering on the camera
Connect the power adapter to a power outlet and to the camera.
Step 2 of 2: Powering on the Video Monitor
1. Connect the power adapter to a power outlet, and to the video monitor directly or charging cradle
(ensure the video monitor firmly rests on the cradle). The video monitor’s charging LED indicator glows
red to indicate charging is in progress.
NOTE: It requires 6 hours to fully charge the rechargeable batteries.
2. Slide the power switch to ON position. The video monitor will automatically scan for cameras in range.
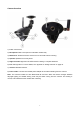
Testing your setup
It is recommended that you test your camera setup before permanent installation so that you get the best
picture and sound quality from your video monitor.
Test the camera and video monitor reception:
1. Place the camera and video monitor in two different rooms.
2. Have one person monitor the signal strength on the video monitor.
3. If the signal strength is low, have a second person move the camera to different locations of the room
to find the optimal placement location.
Test the camera volume level:
1. Have a person with the video monitor press and hold the TALK button to confirm the volume level
from the camera. Have the other person adjust the volume dial on the camera as required.
2. The person holding the video monitor can determine if the camera needs to move to a different
location of the room for better sound clarity.