
Instruction Manual

Deutsche Version:
siehe Vorderseite
Residual current monitoring device
RCM 201-ROGO
Installation instructions
Item no.: 33.03.386 Doc no. 2.353.054.0.j 05/2022
Installation
Device settings
Janitza electronics GmbH
Vor dem Polstück 6 | 35633 Lahnau, Germany
Support phone +49 6441 9642-22 • E-mail: info@janitza.de • www.janitza.de
2
Safety
Safety instructions
The installation instructions do not include a complete list of all safety measures
necessary for operating the device.
Special operating conditions may require additional measures. The installation
instructions contain notes that must be observed for your personal safety and
to prevent property damage.
Symbols used:
The additional symbol indicates an electrical danger that can
result in serious injuries or death.
The general warning symbol calls attention to possible risks
of injury. Observe all the instructions listed under this symbol
in order to prevent injuries or even death.
Safety instructions in the installation instructions are highlighted with a warning
triangle and are presented as follows depending on the level of risk:
DANGER
Warns of an imminent danger that will result in serious or fatal injuries
in the event of noncompliance.
WARNING
Warns of a potentially dangerous situation that can result in serious injuries
or death in the event of noncompliance.
CAUTION
Warns of an imminently dangerous situation that can result in slight or minor
injuries in the event of noncompliance.
ATTENTION
Warns of an imminently dangerous situation that can result in property damage
or environmental damage in the event of noncompliance.
INFORMATION
Indicates a method that does not include a danger of injuries and property
damage.
Safety measures
When operating electrical devices, specific parts of these devices inevitably
carry dangerous voltage. As a result, serious injuries or property damage can
occur if they are not handled correctly:
• Before connecting the device, ground it at the ground wire connection
if available.
• Dangerous voltages may be present in all circuit parts connected
to the power supply.
• There may still be dangerous voltages present in the device even after
it is disconnected from the supply voltage (capacitor storage).
• Do not operate equipment with open current transformer circuits.
• Do not exceed the threshold values specified in the user manual and
on the rating plate. This must also be observed during inspections and
commissioning.
• Observe the safety instructions and warning notices in the usage information
that accompanies the devices and their components!
• Opening or modifying the device is not permitted. Only the manufacturer
may make any repairs.
WARNING
Danger due to noncompliance with warning and safety instructions.
Noncompliance with warning and safety instructions on the device itself and
in the information on using the device and its components can lead to injury or
even death!
Observe safety instructions and warning notices on the device itself and in
the usage information associated with the devices and their components.
1
General information
Disclaimer
It is essential that the information products for the devices are observed
to ensure safe operation and achieve the specified performance features and
product features. Janitza electronics GmbH assumes no liability for personal
injuries, property damage and financial losses resulting from the failure to observe
the application information. Make sure that your information products are clearly
legible and easily accessible.
Additional usage information, such as the user manual, can be found on our web
site
www.janitza.de under Support > Downloads.
Copyright notice
© 2019 - Janitza electronics GmbH - Lahnau.
All rights reserved. Any duplication, processing, distribution and any other kind of
use, even in part, is prohibited.
Subject to technical changes.
• Make sure that the installation instructions match your device.
• First, make sure you have read and understood the usage information
belonging to the product.
• Keep the usage information accompanying the product accessible through
its service life and hand it over to the subsequent owner where applicable.
• Please refer to www.janitza.de for information concerning device revisions
and the associated adjustments to the usage information accompanying
the product.
Disposal
Please observe the national regulations. Dispose of individual parts, where
necessary, depending on the properties and existing country-specific regulations,
e.g. as:
• Electronic waste
• Batteries and accumulators
• Plastics, metals
or commission a certified disposal company with the scrapping.
Relevant laws, applied standards and directives
Please refer to the Declaration of Conformity on our web site (www.janitza.
de) for the laws, standards and directives applied by Janitza electronics GmbH
for the device.
Qualified personnel
To prevent personal injuries and property damage, only qualified personnel with
electrical engineering training may work on the base unit and its components.
They must also have knowledge
• of the national accident prevention regulations.
• of safety technology standards.
• in the installation, commissioning and operation of the device and
the components.
WARNING
Risk of injury due to electric voltage or electrical current!
When handling electrical currents or voltages, serious personal injuries or death
can occur due to:
• Touching live exposed or stripped cores.
• Device inputs that are dangerous to touch.
Before starting work on your system:
• Disconnect it from the power supply!
• Secure it against being switched back on!
• Verify disconnection from power!
• Ground and short circuit!
• Cover or block off neighboring parts that are under voltage!
Intended use
The device
• intended for installation in switching cabinets and small installation
distributors. The device can be installed in any mounting position (please
observe section 3 “Assembly”).
• not intended for installation in vehicles! Using the device in mobile equipment
is considered an unusual environmental condition and is only permissible by
special agreement.
• not intended for installation in areas exposed to harmful oils, acids, gases,
vapors, dust and radiation, etc.
• designed as an indoor amplifier.
Incoming goods inspection
The prerequisites for trouble-free and safe operation of the devices and their
components include proper transport, storage, setup and assembly, as well as
careful operation and maintenance.
Exercise caution when unpacking and packing the device, without using force
and only using suitable tools.
Check:
• Devices and components by performing a visual inspection to ensure a
flawless mechanical condition.
• The scope of delivery for completeness before beginning the installation of
your devices and components.
If you assume that safe operation is no longer possible, shut down your device
with the components immediately and secure it from being unintentionally started
back up again.
It can be assumed that safe operation is no longer possible, when, for example,
the device with its components:
• has visible damage,
• no longer functions despite an intact power supply,
• was subjected to extended periods of unfavorable conditions (e.g. storage
outside of the permissible climate thresholds without adjustment to the room
climate, condensation, etc.) or transport stress (e.g. falling from an elevated
position, even without visible external damage, etc.).
3
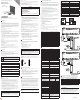
Short device description and Installation
The residual current amplifier RCM 201-ROGO is designed for use with
coordinated current sensors (Janitza Rogowski coils) for universal measurement
of residual currents.
Properties:
• Residual current amplifier for Rogowski coil
• Mounting on DIN rail
• Compact construction in plastic housing
• Standardized output signal of 0 ... 40mA
• Measuring ranges 0.1... 125 A
• Power supply: 24 V DC
ATTENTION
Property damage due to noncompliance with the assembly instructions
Noncompliance with the assembly instructions can damage or destroy your
device.
• Ensure sufficient air circulation in your installation environment and,
where applicable, sufficient cooling with high ambient temperatures.
• You can find more detailed information on the functions, data and
assembly in the user manual.
Mount the measurement device in switch cabinets or small distributor cabinets
according to DIN 43880 (any installation position) on a 35 mm DIN rail as follows:
Step A: Hang the device with the DIN rail device on the top of the DIN rail
Step B: Press the device in the lower section to the DIN rail until it snaps in
4
General requirements
• Only connect to the amplifier unit designed to match the Rogowski coil by
Janitza!
• There must be no indication of damage to the insulation on the Rogowski coil
and on its supply line.
• A connection between the input or output signal and an external voltage is
not permitted and may lead to the destruction of the device.
• The power pack must be sized sufficiently
• The supply voltage mass (-24 V) must be grounded (GND)
• The device should not be used in the vicinity of strong high-frequency fields
(distortion of measured value)
5
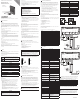
Installation of the Janitza Rogowski coil
The Rogowski coil is preferably used for installation into existing systems
(optionally on busbars lines/power cables). Subsequent installation is possible
since the coil can be separated. For this purpose, the bayonet lock is opened
on the current sensor with a left-hand turn, the coil wire is installed around
the conductor to be measured and the bayonet lock is then closed again (right-
hand turn) until the end of the measuring coil snaps in with an audible click).
Then, the signal line of the Rogowski coil must be connected to the monitoring
device (see connection diagram).
• Make sure that the current sensor is neither in contact with the busbar
to be measured nor with an adjacent one, because the maximum permissible
temperature of the signal line is +80 °C.
• Attach the current sensor to the primary conductor. For this purpose, use
a cable tie that you lead through the fixture provided on the housing.
• If necessary, seal the bayonet lock to ensure it is tamper-proof.
6
Commissioning RCM 201-ROGO
The supply voltage level for your device can be found on the rating plate or
in the technical data. Connect the supply voltage pursuant to the device label.
After the supply voltage is connected, all LEDs briefly light up one by one (from
top to bottom) and the device performs an initialization. During this time (approx.
15 sec.), the Red LED “ERROR” is illuminated continuously and the output
is inactive. The device is ready for operation once the red LED goes out.
Programming of the measuring range (using the key)
• Start the programming mode by pressing the "PROG” key (for approx.
3 seconds). The yellow “PROG” LED lights up.
• Adjust the desired current measuring range by repeatedly pressing
the “PROG” key. The corresponding green LED shows the corresponding
active range.
• Around 5 seconds after pressing the key the last time, the yellow LED goes
out and the measuring range is permanently stored.
• Factory setting of the measuring range: 125 A
TEST of the outputs (using the key)
If the “PROG” key is pressed for longer than 6 seconds, the transistor outputs
(signal and alarm output) turn on for test purposes. Letting go of the key shuts
them down again.
Alarm triggering
If the red ERROR LED is flashing, this signals that an active error. After a set delay
time (10 seconds), the ERROR LED becomes a continuous light, while the alarm
output is activated at the same time.
Error list (combined fault):
• Residual current level via a set value
• Rogowski measuring loop: Interruption
• Overtemperature
• Undervoltage (24V)
• Internal error
The event can be exported via Modbus!
Warning output
If the residual current level exceeds a set value, the warning output is activated
after a delay time (5 seconds) has expired.
Programming via Modbus
The following functions can be realized via the Modbus protocol:
Function Set up Export
Measuring range X X
Signal output X X
Signal level X X
Signal delay X X
Alarm output X X
Alarm level X X
Alarm delay X X
Hysteresis X X
Modbus address X X
Baud rate X X
Key lock X
Hardware and software version X
Device ID X
7
Technical data
Rogowski coil Technical data
Diameter 120, 200, 290, 390, 580 mm
Cable length connection line 3.0 m
Lock Bayonet
Operating temperature -30 °C to +80 °C (-22 °F ... 176 °F)
Storage temperature -40°C to +80°C (-40 °F ... 176 °F)
Secondary voltage 100 mV/1kA @ 50 Hz
Overvoltage category
1000 Veff CAT III
600 Veff CAT IV
Protection class IP67
Differential amplifier
RCM 201-ROGO
Technical data
Dimensions
22.5 x 100 x 110 mm ( W x H x D)
0.89 x 3.94 x 4.33 in (w x h x d)
Weight Approx. 0.2 kg (0.44 lb)
Power supply
external, potential separated DC voltage
24 V
DC
/ 0.1 A
Transport and storage
- Storage temperature
- Relative humidity
-40 °C to +80 °C (-40 °F ... 176 °F)
0 to 90% RH (without condensing)
Ambient conditions during operation
- Operating temperature
- Relative humidity
-20 °C to +60 °C (-4 °F ... 140 °F)
0 to 75% RH (without condensing)
Operating height 0 .. 2000 m (1.24 mi) above sea level
Pollution degree 2
Protection class IP30
Connections Screw terminal (max. 2.5 mm² )
Rogowski loop connection Mini-Din 4-pole
Rated response differential current
measuring ranges
2.5 A - 125 A
0.5 A - 25 A
0.2 A - 10 A
0.1 A - 5 A
Current measuring range setting
Manually using the key (> 3 sec) or
Modbus (measuring range selection via
micro-controller and PGA)
Signal and alarm output test
Manually using the key (> 6 sec) or
Modbus
Operation and
measuring range display
Measuring range display:
Measuring range selection:
Signal output:
Alarm output:
LED green
LED yellow
LED yellow
LED red
Nominal input voltage 100 µV / A
Current output 0 - 40 mA ~
max. current output
for load = 0 Ω
70 mA ~
Overload current (duration) 50 kA
Overload current (max. 1 sec) 100 kA
Transmission error
40 Hz … 60 Hz < 2%
60 Hz … 5 kHz < 5%
Rated frequency 40 Hz - 5 kHz
Load (40 mA output) 0 - 10 Ω
Operating lock via Modbus
Alarm output potential-free (Opto)
(Programming via MODBUS)
Transistor output 24 V
DC
/ 100 mA
Output
Alarm normal (NO)
Alarm inverted (NC), factory setting
Alarm functions
Residual current level
Measurement loop circuit
Overtemperature
Undervoltage (24 V)
Internal error
Response differential current
Alarm output
100% (10% - 100% / 0.5% steps)
Hysteresis response differential
current level
5% (0 - 30%)
Response time alarm output 10 sec (1 sec - 255 sec)
Alarm output potential-free (Opto) Transistor output 24 V
DC
/ 100 mA
Signal output functions
Residual current level normal (NO,
factory setting)
Residual current inverted (NC)
Response residual current
Signal output
100% (5% - 100% / 0.5% steps)
Signal output hysteresis 5% (0 - 30%)
Signal output response time 5 sec (1 sec - 255 sec)
Interface RS485 (electrically isolated)
Communication protocol MODBUS RTU
Baud rate
9600 - 250000;
programmable via Modbus;
Default setting: 9600 bps
(8 data bits/1 stop bit)
Address
1 - 255; programmable via Modbus;
Default setting: 1
B
A
ALARM, 24 V
RS485
Interfaces
+−
MESSAGE, RCM OUT
Rogowski coil
Connection examples to an UMG 512-PRO
125A
25A
10A
5A
TxD
- 3s -
PROG
MESSAGE
ERROR
PROG
RCM 201-ROGO
ALARM 24 V
24 VAlarm
-
+
Warnung / Warning
+−
RCM OUTMESSAGE
Connecting
Rogowski coil
UMG 512-PRO
RS485
8 9 10
Temp.
4 5 6 7
RCM
I
5 I6
11 12 13
Digital
Outputs
14 15 16
Digital
Inputs
Ethernet
10/100Base-T
RJ45
Spannungsmessung 1-4
Voltage Input 1-4
Strommessung 1-4
Current Input 1-4
S1 S2
I1
19 20
S1 S2
I2
21 22
S1 S2
I3
23 24
S1 S2
I4
25 26
V1
V2
V3
V4
27 28 29 30
V
N
31
Hilfsenergie
Auxiliary Supply
17 18
L/+ N/-
PE
Profibus
DSUB-9
2 3
A B
1
k l
Janitza
®
Rogowski-Stromwandler
Janitza
®
Rogowski current transformer
Janitza
®
RCM 201-ROGO
I
P
B
A
Data GND
C
A
B
Funktionserde
Functional earth
RS485-Bus
UMG 512-PRO
RS485
8 9 10
Temp.
4 5 6 7
RCM
I
5 I6
11 12 13
Digital
Outputs
14 15 16
Digital
Inputs
Ethernet
10/100Base-T
RJ45
Spannungsmessung 1-4
Voltage Input 1-4
Strommessung 1-4
Current Input 1-4
S1 S2
I1
19 20
S1 S2
I2
21 22
S1 S2
I3
23 24
S1 S2
I4
25 26
V1 V2 V3 V4
27 28 29 30
V
N
31
Hilfsenergie
Auxiliary Supply
17 18
L/+ N/-
PE
Profibus
DSUB-9
2 3
A B
1
125A
25A
10A
5A
TxD
- 3s -
PROG
MESSAGE
ERROR
PROG
RCM 201-ROGO
ALARM 24 V
24 V
-
+
+−
RCM OUTMESSAGE
k l
Janitza
®
RCM 201-ROGO
Connecting
Rogowski coil
I
P
B
A
Data GND
C
A
B
Funktionserde
Functional earth
RS485-Bus
www.janitza.de
8
Setting the Current transformer ratios on the measuring device
The following table shows the CT ratios to be set on the UMG, each in relation
to the maximum output current (40 mA) that the RCM output of the RC201-Rogo
outputs (e.g. to a UMG 512-PRO, see figure above):
Measuring range Setting the CT ratio on the measuring device
5 A (5 : 0,04) 125/1
10 A (10 : 0,04) 250/1
25 A (25 : 0,04) 625/1
125 A (125 : 0,04) 3125/1
Please note:
The higher the measuring range, the less precise the measurements in lower
ranges, e.g. in the 125 A measuring range, measurements function reliably from
2.5 A (in the 5 A measuring range - measurements from 100 mA)!
INFORMATION
A firmware update is possible starting from device firmware 2.5 via the GridVis
software. Connect your device e.g. with a UMG (master) or an interface con-
verter RS485-USB to a computer. Add the device in the GridVis software with
the appropriate connection parameters, check the connection and install the
firmware update. For more information, see the GridVis online help.
INFORMATION
The supplied Rogowski coil ensures double insulation to the mains voltage.