Pro 2000® Auto Index PROGRESSIVE RELOADING PRESS PRODUCT INSTRUCTIONS
WARNING Before using the RCBS Pro 2000 Auto Index Progressive Press, read these instructions carefully to fully learn how to safely operate the related reloading equipment. Failure to properly operate the related reloading equipment can result in severe personal injury and/or equipment damage. If you have any questions while assembling or operating this tool, Call us at 1-800-533-5000 or 1-530-533-5191 Monday – Thursday 6:30 am – 4:00 pm Pacific Time (hours may vary) Or email us at rcbs.tech@atk.
PRIMERS AND POWDER • Store primers and powder beyond the reach of children and away from heat, dampness, open flames and electrical equipment. Avoid areas where static electricity is evident. • DO NOT use primers of unknown identity. • Dispose of unknown primers in accordance with applicable regulations. • Keep primers in the original factory container until ready to use. Return unused primers to the same factory packaging for safety and to preserve their identity.
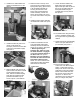
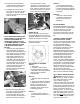
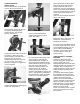
2. Select an area with approximately one foot of clearance on each side of the Pro 2000 Auto Index Press. Install with two 3/8" bolts, see photo 1, length to be determined by the thickness of your reloading bench (mounting hardware not included). The Auto Index Cam Bracket assembly has been pre-installed and adjusted for your convenience. PRESS ASSEMBLY 1. Select a solid bench on which to mount the Pro 2000 Auto Index Press. You must use the two slots for mounting holes (use casting as a template).
3. Install the Pro 2000 handle and tighten the handle and nut. See photo 2. 6. Raise the Ram to the top of the press stroke and install the Return Spring Plate, Spring, Spent Primer Tube and Bottle assembly by securing the setscrew at the bottom side of the Shell Plate Holder Assembly. NOTE: The Return Spring Plate must rest on top of the Press Frame. See photo 4. 9. Loosen the 5/64” SHSS in the Shell Plate Holder Assembly.
13. Thread in the Case Activated Powder Measure assembly into Station 3 of the Press Frame. 14. Install Die Plate and lock into place with the two Die Plate Pins. See photo 11.The two outside holes are for pin storage when Die Plate is removed. Pull the Index Bar counterclockwise to the left and bring the Upper Return Cam bracket left to firmly touch the Index Arm. Secure the two SHCS. Remove and store the #1 Gage Pin. See photo 13. Station 5: 1. Seat die or seat/crimp die 2.
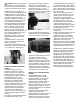
BULLET SEATING WITHOUT CRIMPING CAUTION: Do not adjust the Seater Die down against the shell plate as it will distort or crush the case. These instructions are for seating the bullet without crimping. To adjust the Seater Die, place a sized case (no primer or powder, this case becomes a “dummy” or “setup” round), into the Shell Plate at Station 5 and run it to the top of the press stroke. Thread the Seater Die down into the press until you feel it touch the mouth of the case.
Lower and then raise the handle to run the cartridge back into the Seater Die. Check the crimp. If more crimp is desired, repeat the preceding step by adjusting the die downward another 1/8 of a turn. This is a “trial and error” operation. Typically, you will not lower the Roll Crimp Seater Die body down more than one-half a turn for proper crimp. After you are satisfied with the amount of roll crimp, tighten the Die Lock Ring. Insert the “setup” cartridge back into Station 5 and lower the handle.
CAUTION: DO NOT leave powder in the measure, as it will deteriorate and may clog and jam the measuring cylinder and etch the powder hopper. Included with the Pro 2000 Auto Index is a small and large Micrometer Adjustment Screw for the Uniflow Powder Measure. To allow alignment of the linear scale index, in any position the operator chooses, three thin washers are included. The only way to determine the number of washers needed is by trial and error.
Should the Powder die hit the Shell Plate before the powder measure stroke is achieved, back off the Powder die nine turns and install the spacer on top of the powder bushing. Thread the Powder die down until full stroke on the powder measure is achieved. Lower the ram and attach the Return spring. See photo K. POWDER MEASURE INSTALLATION Slip the slotted portion of cylinder link over the drive pin. See photo E.
PRESS OPERATION We recommend that several cases be completely reloaded one at a time before proceeding with full operation. This will help you to become familiar with the loading process. NOTE: Place bullets in bullet tray and empty cases in the ammo bin on the left front of the bullet tray. Loaded rounds will fall into the ammo bin on the right front of bullet tray. See photo L. Step 2: Place a case into Station 1, and lower the handle. See photo O.
PRO 2000 AUTO INDEX OPERATING PROCEDURE Now that you have read the instructions and are familiar with your Pro 2000 Auto Index, you are ready to reload! Based on our experience, we will explain the most efficient way to use your new Pro 2000 Auto Index. You may choose to change your technique as you become more accustomed to the function of this tool, but for now, we strongly suggest you use the following operating procedure. Place your bullets in the bullet tray and your empty cases in the left ammo bin.
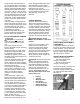
Key # 1 Part # 102505 QTY 1 2 109509 1 Description PRO 2000 PRIMING PLATE 8-32 x 1/4 SET SCREW 3 109604 1 1/4-28 HEX NUT 4 109700 1 PRO 2000 PUSHER BRKT LEFT 5 186264 1 APS HPT STRIP PUSHER 6 186265 2 APS HPT DETENT 7 187202 1 PRO 2000 CAM GUIDE 8 187206 4 CASE RETENTION SPRING 9 187207 1 CASE RETENTION BRKT 10 187208 1 STATION #1 SPRING 11 187215 4 6-32 x 3/8 FLAT SHCS 12 187217 1 8-32 X 3/8 BHCS 13 187218 3 8-32 x 3/8 FLAT SHCS 14 187220 1 1/4-28 x 1 H
22 25 5 7 7 6 4 15 3 37 24 17 23 32 14 32 26 36 1 29 13 35 10 30 16 20 18 33 9 21 19 27 31 8 11 11 2 34 12 - 14 - 28
PRO 2000 AUTO INDEX PRESS Key # 1 2 3 4 5 6 7 8 9 10 11 12 13 14 15 16 17 18 19 20 21 22 23 24 25 26 27 28 29 30 31 32 33 34 35 36 37 Part # 109121 109136 109278 109468 187152 187236 187159 187177 187204 187209 187212 187219 187221 187231 187239 187680 188109 709120 709127 709128 787178 788009 788682 788683 788840 788901 788902 788903 788905 788907 788912 788917 788918 788919 788932 788958 788964 Qty 1 1 2 2 1 1 2 1 2 1 2 1 2 1 2 2 2 1 1 1 1 1 1 1 1 1 2 1 1 1 1 2 1 1 1 1 1 Description RC PRESS HANDLE BAL
KEY # 1 2 3 4 4 5 6 6 7 8 9 10 11 12 13 14 15 16 17 PART # 7709025 7109026 7109030 7709006 7709005 7798903 7798907 7798904 7798905 7198906 7181015 7181004 7788947 7788945 7788946 7788949 7788916 7788944 7187210 DESCRIPTION UPM MAIN CASTING UPM HOPPER UPM HOPPER CAP UPM MEASURING CYLINDER SMALL UPM MEASURING CYLINDER LARGE MICROMETER SCREW BODY METERING SCREW SM METERING SCREW LG METERING SCREW THIMBLE COMPENSATION WASHER "O" RING SET SCREW CAPM PIVOT LINK CAPM DRIVE LINK CAPM LONG LINK CAPM BACK BRACKET C
Accessories for your Pro2000 (not included) 9634 Die Lock Ring Wrench 88877 Die Plate 82350 Bullet Feeder 87540 Lock Out Die 98927 RangeMaster 750 - 17 - 87590 Powder Check Die
PRECISIONEERED RELOADING EQUIPMENT We think that we make the very best reloading equipment in the world. If you agree, please tell your friends. If you disagree, tell us we want to do something about it! Customer Service 1-800-533-5000 (US or Canada) or 530-533-5191 Hours: Monday - Thursday, 6:30am - 4:00pm Pacific Time (hours may vary) e-mail: rcbs.tech@atk.com or visit our website at www.rcbs.com RCBS 605 Oro Dam Blvd East.