MINI GRAND SINGLE STAGE SHOTSHELL RELOADING PRESS PRODUCT INSTRUCTIONS
IMPORTANT IMPORTANT Before using the RCBS Mini-Grand Shot Shell Press, read these instructions carefully to fully learn how to safely operate the related reloading equipment. Failure to properly operate certain reloading equipment can result in severe personal injury and/or equipment damage. If you have any questions while assembling or operating this tool, call us at 1-800-533-5000 or 1-530-533-5191 Monday – Thursday 6:30 a.m. to 3:00 p.m.
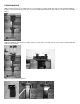
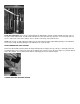
PRESS MOUNTING Step 1 Mount your press to a solid bench. Presses mounted to a weak or flexible bench are a safety hazard and will not produce a consistent round. Select an area of your bench with approximately one foot clearance on either side of the Mini Grand. Step 2 Install Hopper/Charge Bar assembly onto press frame. Place assembly onto top of press frame and attached with Thumbscrews provided.
Insert the Primer Cup Assembly into Station 2 Insert Wad Guide at Station 4 Install Wad Holder Cap. Place cap on the Wad Holder and turn counter clockwise to lock in place.
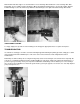
PRESS FUNCTION BY STATION The Mini Grand is a single stage shotshell reloader. Hulls must be moved from station to station manually. Station 1 Sizing and removal of spent primer. Station 2 Priming: Primers are inserted manually, the hull is placed in the station and primers are seated by “feel”. Full cycling of the handle is not achieved at this station.
Station 3 Powder Charge: Powder is dispensed into the hull by sliding the Charge Bar Handle to the right. Station 4 Wad Seating and Shot Charge: Insert wad into Wad Guide and cycle handle to the down position. The wad is seated into the hull. Slide the Charge Bar Handle to the left to dispense the shot charge.
Station 5 Start Crimp: An 8 point crimp starter is installed from the factory. A 6 point crimp starter is included in the accessory bag. Station 6 Crimp Station 7 Empty, allows for the installation of an optional Taper Crimp die assembly.
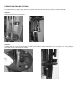
FILL POWDER AND SHOT HOPPERS Remove the Powder Hopper Cap and fill with desired powder, replace Cap. Capacity is approximately ½ pound of smokeless powder. Remove the Shot Hopper Cap and fill with desired shot, replace Cap. Capacity is 12 ½ pounds of shot. PRESS OPERATION STEP ONE (Resize and Deprime) Insert a hull into Station 1. Be sure that the shell plate holder captures the rim of the hull. Completely cycle the Handle. The hull has been sized and deprimed.
Crimp Start adjustment: This is an up or down adjustment. Adjusting the amount of crimp start will control the “hole” in the center of the loaded round. Too little crimp start will leave a hole that shot may spill out of. Too much crimp start can cause a “swirl” in the center of the crimp or cause a “buckle” near the top of the loaded round. Crimp: This is an up or down adjustment. Adjust to your desired finished crimp depth. Adding spring pressure will flatten out a concave crimp.
Drain Powder and Shot Hoppers as described above. Unscrew Charge Bar Handle from center of Charge Bar. Slide Charge Bar out of assembly. Replace Bushing(s). When reinstalling the Charge Bar, be sure that the smaller diameter Powder Bushing is to the left and the larger diameter Shot Bushing is to the right. Reinstall the Charge Bar Handle. SPENT PRIMER CATCHER To empty, simply raise up and off of the mounting screws. Empty into appropriate waste receptacle and replace.
Hole in the middle of the crimp – not enough crimp start. Adjust Crimp Start die down in ¼ turn increments until desired crimp is achieved. Concave crimp – not enough spring pressure. Adjust nut above the spring to increase spring pressure at station 6. Peaked crimp – wad not seated deeply enough or too much spring pressure at station 6. Inconsistent shot charges or shot dispenses when the Charge Bar Handle is cycled to the left. This is a bridging issue. Typically too large a size shot is being used.
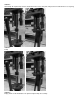
STEEL SHOT CONVERSION UNIT The Steel Shot Conversion unit consists of a larger inner diameter wad seating/shot drop tube. This larger inner diameter allows for the dispensing of large diameter steel shot (#5 and greater). This unit replaces the installed assembly which accommodates #5 shot or smaller. Installation of Steel Shot Conversion Unit. To prevent a messy mishap, first, remove and empty the Hopper assembly.
3” and 3 ½” hulls To load 3” and 3 ½” hulls, no adjustments are necessary at Stations 1, 2 or 3. Seat wads according to the Component Adjustment section. The Crimp Start (Station 5), Crimp (Station 6) and Taper Crimp (Station 7, if installed) dies need to be raised up to accommodate the longer hulls. Loosen the Jamb Nut and adjust as necessary. MAINTENANCE Lubricate the Main Shaft and pivot points of the Handle with a light machine oil or grease.
This page intentionally left blank
This Page intentionally left blank
PRECISIONEERED RELOADING EQUIPMENT We think that we make the very best reloading equipment in the world. If you agree, please tell your friends. If you disagree, tell us we want to do something about it! Customer Service 1-800-533-5000 (US or Canada) or 530-533-5191 Hours: Monday - Thursday, 6:30am - 3:00pm Pacific Time (hours may vary) e-mail: rcbs.tech@atk.com or visit our website at www. rcbs.com RCBS 605 Oro Dam Blvd.