TM APS PRIMING TOOL APS Bench-Mounted Priming Tool P R O D U C T APS Press-Mounted Priming Tool I N S T R U C T I O N S
IMPORTANT Promptly and completely clean up any powder spills. • Reload only when you can give your undivided attention. Do not reload when fatigued or ill. Develop a reloading routine to avoid mistakes. Don’t rush – load at a leisurely pace. • Always wear adequate eye protection to protect your eyes from flyi n g p a r t i c l e s . Yo u a s s u m e unnecessary risk when reloading without wearing safety glasses.
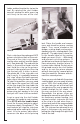
are designed to connect to each other for continuous feed. See photo #3. • This product is intended for use by persons familiar with proper handloading practices and their own loading equipment. If you are uncertain as to the operation of any of your equipment, contact the equipment manufacturer for additional assistance.
that the primer plug has disappeared down inside the body of the tool. If that happens, you’ll need to disassemble the tool to retrieve the primer plug. To do this, remove the four flat head screws on the top cap. Lift off the top cap and the top plate and then remove the plug. Reinstall the top plate correctly for clearance and safety and replace the top cap and the four flat head screws. And the next time, remember to lower the operating handle before installing the primer plug.
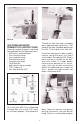
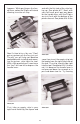
holder and bushing into the slot on the tool. By rotating the shell holder counter-clockwise while pressing unit firmly to the rear of the slot. Photo #7 Photo #6 Peel a strip from the package of APS primers and take a look at the ends. One end of the strip is cut square and the other end has two little hooks on it. See photo #6. The end with the hooks is the end that feeds into the tool. Hold the strip so the primers are anvil-side-up and insert the strip into the tool until it clicks in place.
Photo #8 Photo #9 APS PRESS-MOUNTED PRIMING TOOL INSTRUCTIONS Thread the tool into your reloading press approximately seven turns. The ramp on the tool should be pointing to the left. Then tighten the lock nut.
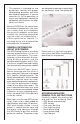
to tell which is the large bushing and which is the small. Just remember the small bushing has a seam, the large bushing is smooth. These bushings center the primer when the primer rod pushes a primer up through the shell holder. seating small primers and a large primer plug for seating large primers. Each primer plug has a shoulder on it and is bigger on one end. See photo #11.
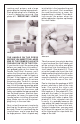
Photo #13 Photo #14 designed to connect to each other. So for continuous primer feeding, just connect another strip onto the end of the strip in the tool when there is at least one inch of the ramp available to support the new strip. See photo #15. The strip can be removed at any point in the process by pushing or pulling the strip through the right-hand side of the tool. Insert a case into the shell holder and lower the handle slowly and carefully.
The tape covering CCI strips of APS primers is an important safety feature of the packaging. The tape serves to prevent the detonation of a single primer from causing detonation of other primers in close proximity. Always cover loaded primer strips, not in use, with APS tape. Never store quantities of loaded primer strips without covering them with tape. Covering the primers with APS tape also serves to protect them from contamination during storage.
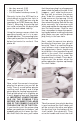
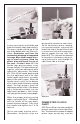
and with the flat side of the strip facing up. See photo #17. Now, with your left hand, push part way down on the handle lever until the 25 pins are just flush with the bottom of the primer channel. See photo #18. At the happens. While pushing on the handle lever, notice the 25 pins will retract allowing insertion of strip. Photo #16 Now it’s time to try a “dry run.” Don’t put any primers on the tray just yet.
in and out of the tool and keep in mind that the goal is to align the holes in the strip with the pins. Practice these steps until you’re comfortable with the process. the handle lever up or down until the strip feeds into the loader. Slide the strip into the loader leaving about 1'' of the strip out of the tray. Do not release the lever. Attach another strip by inserting the hooks of the strip into the square end of the first strip. See photo #20.
• Be sure there is a primer in each hole of the strip. • Press down on the handle lever (apply firm, even pressure). See photo #25. Next, tilt the strip loader away from you until there is a primer in each hole of the strip (you may need to rock the tool to the left and right to move the primers into position.) See photo #23. Then tilt the tool towards Photo #25 • Do not release the pressure on the handle lever.
Photo #27 Photo #28 If the primer strip does not come out check to be certain the primers are seated deep enough. If primers are not seated to flush or below, they will not function in the APS tools. If you have any questions or are having difficulty, don’t struggle, ask the folks who built it. Call 1 (800) 5335000. Helpful hints… Continue this process until you have filled all the strips you need. Return any unused primers to their original factory packaging. 1.
PRECISIONEERED ® RELOADING EQUIPMENT We think that we make the very best reloading equipment in the world. If you agree, please tell your friends. If you disagree, tell us - we want to do something about it! Customer Service 1-800-533-5000 (US or Canada) or 530-533-5191 Hours: Monday - Thursday, 6:30am - 3:00pm (hours may vary) e-mail: rcbs.tech@atk.com • www.rcbs.com RCBS • 605 Oro Dam Blvd.