
User guide
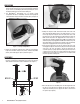
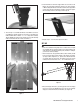
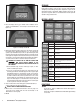
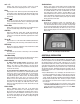
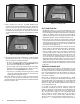
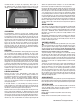

Figure 6
5. The next step is to assemble the Diffusers. Each Diffuser consists of
one middle piece and two end pieces. The notches on the diffuser are
numbered with either a number “1” or “2” to help aid in assembly.
Take the middle piece and one of the end pieces, line up the matching
numbers and simply slip into position (See Figure 7).
Figure 7
6. Insert the Diffuser’s tab into the Support Arm’s slot so the ribs on the
Diffuser are facing down toward the Skyscreen as shown in Figure
8. While holding the Diffuser horizontal, install the other Support Arm
onto the opposite side of this Diffuser and then connect this Support
Arm to the Skyscreen the same way you did in Step #4.
Figure 8
7. Repeat steps 4 – 6 for the other Skyscreen location.
SET-UP
ALWAYS WEAR EYE AND HEARING PROTECTION.
1. Place the assembled chronograph unit on a stable surface or tripod
(not included). Ensure the Chronograph is level and oriented in the
same direction as the bullet/projectile’s path, otherwise it could give
you erroneous velocity readings.
2. The Front Skyscreen, for typical rie calibers (.308 or smaller), should
be at least 10 feet away from the muzzle of the weapon (See Figure
9). Larger calibers, magnums, etc., produce more muzzle blast that
can falsely trigger the Skyscreen and produce erroneous velocity
readings. Increase the distance to 16' - 18' to eliminate this issue.
Figure 9
3. Bring the Display Unit back to your ring position. Turn the Display
Unit on by pressing the On/Off button. You will see the following
display for a moment while the unit initializes (See Figure 10).
RCBS AmmoMaster
®
Chronograph Instructions 3
1 0 '
4 "