
User guide

UNPACKING
1. Detach the Keypad/Display Unit from the chronograph’s body by
depressing the locking tab on top of the unit and pulling straight off.
Try not to twist or bend Display Unit while performing this action.
The display will be kept near the shooter during use.
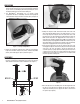
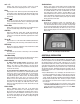
2. The AmmoMaster
®
Chronograph has an internal storage
compartment. The base or ‘headstamp’ end of the chronograph has
a removable door. Depress the tab to remove the door (See Figure 2).
Figure 2 - Storage Compartment
3. Remove the peripheral equipment from inside the chronograph’s
body. There should be 2 Skyscreens (Item 7), 2 Diffuser Assemblies
(Item 6), and 4 Side Supports (Item 5) shown in Figure 1.
ASSEMBLY
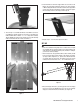
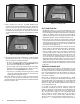
1. Attach the chronograph base unit to any camera tripod (not included)
that uses a standard 1/4"-20 mounting screw or place the unit on a
stable and level surface like a table or workbench (See Figure 3).
Figure 3
Figure 4
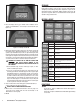
2. Unwrap the Skyscreen cable and locate the label at the end of the
cable, which will be labeled “Start” for the Start Skyscreen, or “Stop”
for the Stop Skyscreen. Plug the end of the cable, from each of the
two Skyscreens, into the backside of the Display Unit (See Figure 4).
Make sure the Skyscreens are plugged into the correct socket, i.e.,
Start Skyscreen should be plugged into the RGA Jack marked “Start”
and the Stop Skyscreen plugged into the RGA Jack marked “Stop”. The
chronograph will not record velocities accurately if the Start and Stop
Skyscreens are plugged into an incorrect jack.
(See Figure 4).
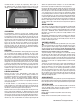
3. Place the Start Skyscreen in the rst slot located in the front of the
chronograph’s body/case. Place the Stop Skyscreen in the slot located
at the rear of the case (See Figure 3 and 5). The Skyscreens are
secured in place by a spring clip. Once installed, give the skyscreens
a slight pull to ensure they are securely locked into place. Velocity
readings may be inaccurate if the Skyscreens are not fully inserted
into their respective mounting slots.
Figure 5
4. Once the Skyscreens are installed, place one Side Support Arm onto
the side of each Skyscreen by aligning the ball into the keyhole-
shaped slot and then press the support arm down to lock the arm
into position (See Figure 6).
2 RCBS AmmoMaster
®
Chronograph Instructions