VR618HF USER’S GUIDE VIDEO CASSETTE RECORDER
Introduction Important Information WARNING To reduce the risk of fire or shock hazard, do not expose this VCR to rain or moisture. WARNING RISK OF ELECTRIC SHOCK DO NOT OPEN TO REDUCE THE RISK OF ELECTRIC SHOCK, DO NOT REMOVE COVER (OR BACK). NO USER SERVICEABLE PARTS INSIDE. REFER SERVICING TO QUALIFIED SERVICE PERSONNEL. This symbol indicates Òdangerous voltageÓ inside the product that presents a risk of electric shock or personal injury.
Introduction Table of Contents Important Information Slow Motion______________________ 17 Warnings______________________________ i Automatic Tracking _______________ 17 Cautions ______________________________ i Manual Tracking__________________ 17 Note to Cable TV Installer _______________ i DISPLAY Button __________________ 18 Product Registration ____________________ i Time Counter_____________________ 18 Commercial Scan _________________ 19 Hooking Up the VCR Index Search ____________________
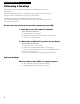
Hooking Up the VCR Choosing a Hookup The hookups on pages 3 through 5 are divided into two hookup types: Basic (A) and Advanced (B). The basic hookups show the backs of TVs that have only an antenna/cable connection. It is the easier of the two and additional accessories may not be needed. The advanced hookups show the VCR hooked up to a monitor/receiver (TV with audio and video jacks). This connection may improve the picture quality as well as convenience of operation.
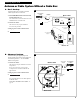
Hooking Up the VCR Antenna or Cable System Without a Cable Box A. Basic hookup. A Use this hookup for a simple connection which requires fewer accessories. From Antenna or Cable 300/75 Ohm Adapter 1. Set the CH3 CH4 switch on back of VCR to either channel 3 or 4. Back of VCR IN You will tune the TV to this channel and use the TV•VCR button to watch the VCR. MONO L OR FROM ANTENNA L R VIDEO R IN IN OUT OUT OUT 2. Connect as shown.
Hooking Up the VCR Cable System With Cable Box to Unscramble All Channels A. Basic hookup. A Use this hookup for a simple connection which requires fewer accessories. From Cable 1. Set the CH3 CH4 switch on back of VCR to either channel 3 or 4. Back of VCR RF Coaxial Cable You will tune the TV to this channel and use the TV•VCR button to watch the VCR. IN OUT IN MONO L 2. Connect as shown. Cable Box FROM ANTENNA L VIDEO R R This connection may require additional accessories not provided.
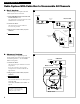
Hooking Up the VCR Cable System With Cable Box to Unscramble Pay Channels (such as HBO, Showtime, Pay-Per-View, etc.) A. Basic hookup. A Use this hookup for a simple connection which requires fewer accessories. From Cable 1. Set the CH3 CH4 switch on back of VCR to either channel 3 or 4. Back of VCR Cable Box You will tune the TV to this channel and use the TV•VCR button to watch the VCR. IN RF Coaxial Cable IN MONO L OUT FROM ANTENNA L VIDEO R R IN IN 2. Connect as shown.
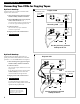
Hooking Up the VCR Connecting Two VCRs for Copying Tapes Option A hookup. Use this hookup for a simple connection which requires fewer accessories. A Playback VCR From Antenna, Cable or Cable Box 1. Select a hookup from pages 2 through 5 and then modify with this connection. IN MONO L FROM ANTENNA L VIDEO R R IN 2. Set the CH3 CH4 switch on the playback VCR to either channel 3 or 4. IN CH AUDIO You will tune the recording VCR to this channel to receive the signal from the playback VCR.
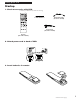
Setting Up the VCR Startup 1. Check accessories with VCR. Contact your dealer if any items are missing. POWER TV VCR TV•VCR 1 2 3 4 5 6 7 8 9 INPUT 0 PREV CH VOLUME MENU CLEAR DISPLAY MUTE CHANNEL 2 “AAA” Batteries RF Coaxial Cable (Stock No. 221396) PROG TRACKING SLOW REW PLAY FF RECORD STOP PAUSE SPEED F.ADV SEARCH Power Cord (Stock No. 218104) Remote (Stock No. 233583) 2. Attach power cord to back of VCR. 1st 2nd 3. Insert batteries in remote.
Setting Up the VCR Startup 4. Turn on the TV. A. Turn on the TV. B. If you used one of the basic hookups, tune the TV to the channel selected with the CH3 CH4 switch on back of VCR. If you used one of the advanced hookups, tune the TV to the TVÕs video input. (See TV ownerÕs manual for details.) 5. Turn on the VCR. A. Press VCR on the remote. 6. Place channels in the VCR’s memory.
Setting Up the VCR Startup 7. Add or remove channels from the VCR’s memory. You may want to add or remove channels if some of the channels are not active, have weak signals, or you do not want to watch them. We recommend channels be placed in memory using the Auto Channel Search feature described on the previous page before adding or removing channels. Channels 2-13 and L1 were placed in memory at the factory. 1 2 3 4 VCR MAIN MENU VCR Plus+ Timer Recordings Set Clock Channels CHANNELS A.
Setting Up the VCR Startup 10. Use TV•VCR button. Skip this step if you used one of the advanced hookups. When using one of the basic hookups, the TV•VCR button lets you switch between the picture coming from the VCR or the picture from the TV channel. This button lets you record a program on the VCR while watching another channel on the TV. Details are on page 21. A. Press VCR to set the remote to control the VCR. B. Press TV•VCR to see the picture from the VCR.
Using the Remote Control Controlling a TV The VCRÔs remote is preprogrammed to control the basic functions of a compatible RCA, ProScan, or GE TV. The remote can also be set up to control other manufacturerÔs brands. To program the remote, use the remote buttons that correspond to your brand. Program the Remote for a TV 1. Turn on the TV. 2. Point the VCRÕs remote at the TV. 3. Hold the TV button and press two number buttons for your brand.
Using the Remote Control Buttons Component Buttons Press one of the buttons to set the remote to operate that component. TV VCR TV•VCR 1 2 3 4 5 6 7 8 9 INPUT 0 PREV CH POWER CHANNEL VOLUME TV Turns on a compatible RCA, ProScan, or GE TV and sets the remote to control the TV. VCR Turns on a compatible RCA, ProScan, or GE VCR and sets remote to control the VCR. Used with POWER button to turn on another brand of TV, other than RCA, when the remote is programmed to control that TV.
Using the Remote Control Buttons VCR Function Buttons (continued) RECORD Starts VCR recording. SLOW – / + Used for slow-motion playback. Used for express recording (XPR). See page 27. SPEED (Tape Speed) Selects a recording speed (SP, LP, or SLP). REW (Rewind) Rewinds the tape when the VCR is stopped. Searches the picture in reverse motion during playback. SEARCH Displays INDEX, GO-TO, and BLANK SEARCH menus on TV. Lets you advance tape 60 or 120 seconds during playback.
Playing a Tape Operating Instructions To Play a Tape 1. Turn on the TV and tune it to channel 3, 4, or TVÕs video input to see the picture from the VCR. 2. Insert a tape in the VCR. VCR automatically turns on. The cassette-in indicator lights, and the VCR indicator lights if the Auto TV/VCR feature is set to ON. The tape automatically begins playback if the safety tab on the cassette has been removed and the auto play feature is turned on. POWER PLAY EJECT STOP PAUSE RECORD Safety Tab 3.
Playing a Tape Using the Playback Features Tape Playback: HI-FI/LINEAR/MIX Feature The VCR records the same audio on both the Hi-Fi and linear tracks on the tape. The Hi-Fi sound is recorded on separate left and right stereo channels. Monaural sound is recorded on the linear track. To enjoy Hi-Fi sound, connect your VCR to a stereo television or amplifier/receiver using the audio/video jacks. The Tape Playback: HI-FI/LINEAR/MIX feature lets you select which audio you play back. To Select Playback Sound 1.
Playing a Tape Using the Playback Features Pause for Stop Action This feature stops the tape in action and allows you to examine the details of the scene. Stop action works best for tapes recorded in the SP and SLP speed. 1. Press PAUSE during playback to stop the action. STILL appears in the VCRÕs display panel. 2. Press TRACKING up or down to reduce any jittering of the picture. 3. Press PAUSE or PLAY to return to playback.
Playing a Tape Using the Playback Features Slow Motion You can view the picture in slow motion during play or play pause. SLOW – and + allow you to change the speed. Sound is turned off during slowmotion playback. Slow motion works best in the SP or SLP speed. 1. During playback, press SLOW + or – to start slow-motion playback. SLOW appears in the VCRÕs display panel. 2. Press SLOW + to increase the speed or – to decrease the speed. 3. Use TRACKING up or down to remove any streaks from the picture. 4.
Playing a Tape Using the Playback Features DISPLAY Button 1. Press DISPLAY to display the status of the VCR, channel number, time counter, date, time, and tape speed on the TV screen. The time will appear in the display panel. STOP Press DISPLAY CH 05 Status Displays Will Time Out The time and date must be set before they are displayed. If you do not press DISPLAY again, these displays will time out. 11/18/96 Mon 01:30AM SLP 2.
Playing a Tape Using the Playback Features Commercial Scan (SEARCH Button) This is useful for scanning commercials or short program segments. 1. Press SEARCH once during playback to advance the tape approximately 60 seconds. 2. Press SEARCH twice during playback to advance the tape approximately 120 seconds. Index Search The VCR has a ÒVHS Index Search SystemÓ that automatically records an index mark on the tape every time you begin recording a program.
Playing a Tape Using the Playback Features Go-To Search The go-to search feature allows you to locate a counter reading on the tape and automatically begins playing back the tape. 1. Insert the prerecorded tape and press STOP. 2. Press SEARCH on the remote twice to display the GO-TO SEARCH menu on the TV screen. GO-TO SEARCH Current tape counter is 2:17:25 Press REW or FF to go to 0:00:00 Press SEARCH to exit 3.
Recording a Program Types of Recordings Your VCR provides different types of recording. These types are explained in the following sections: Basic Recording Ð Operating Instructions Express (XPR) Recording Recording While You're Away Recording Broadcast Stereo TV or VCR Plus+ Recording SAP (Second Audio Program) Timer Recording Recording Audio Only Using Two VCRs for Copying Tapes Recording Speeds Press SPEED on the remote to select a recording speed (SP, LP, or SLP).
Recording a Program Recording While You’re Away (VCR Plus+* Recording) VCR Plus+ Setup for Antenna or Unscrambled Cable Systems (Not Requiring a Cable Box) A VCR Plus+ channel number is assigned for each broadcast or cable channel. These numbers are listed in most publications that list PlusCode* numbers. Prepare the worksheet on the opposing page for the VCR Plus+ channels that are different than the channels you receive them on. Refer to the chart below for standardized VCR Plus+ channel numbers. 1.
Recording a Program VCR Plus+TM Channel Worksheet Use this worksheet to create a list from which you can set up your VCR Plus+ channel list. Broadcast or Cable TV Station Name VCR Plus+ Channel Number* (Such as ABC, NBC, CBS, etc.) (See Standardized VCR Plus+ Channel Chart) Channel Number You Receive This Station On** *Check your local listing for VCR Plus+ channel numbers assigned to network stations. **Check your local or cable listing for the channel numbers to enter in this column.
Recording a Program Recording While You’re Away (VCR Plus+ Recording) The VCR Plus+ and timer program features let you program the VCR to record up to eight different programs within a one year period. Before using VCR Plus+ to record a program, make sure that: ¥ The clock is set correctly. ¥ A tape with safety tab has been inserted with enough tape to record the programs. ¥ The remote is set to control the VCR Ñ using VCR. ¥ The VCR is setup for VCR Plus+ programming.
Recording a Program Recording While You’re Away (Timer Recording) The VCR Plus+ and timer program features let you program the VCR to record up to eight different programs within a one year period. Before setting the timer, make sure that: ¥ The clock is set correctly. ¥ A tape with safety tab has been inserted with enough tape to record the programs. ¥ The remote is set to control the VCR Ñ using VCR. Setting a Timer Recording 1. Press MENU on remote to display VCR MAIN MENU. 2.
Recording a Program Recording While You’re Away Checking or Clearing VCR Plus+ or Timer Recordings 1. Press MENU on remote to display VCR MAIN MENU on TV screen. 2. Press 2 to display the TIMER RECORDINGS menu. 3. Press 2 for Review Existing Progs. feature. 4. Press MENU to display information for the next program. 5. Press CLEAR when the program you want to erase appears on the screen. VCR MAIN MENU 1 VCR Plus+ 2 Timer Recordings TIMER RECORDINGS 1 Create a New Program 2 Review Existing Progs.
Recording a Program Express Recording (XPR) Express recording lets you record up to four hours without using the timer program feature. The VCR will turn off automatically at the end of the recording. POWER PLAY EJECT STOP FWD REW PAUSE VCR RECORD SLP H M Display showing 30 minutes remaining for express recording. RECORD Operating Instructions 1. Turn on the VCR. 2. Insert a tape with safety tab in place. 3. Select the channel you want to record. 4.
Recording a Program Recording Broadcast Stereo TV or SAP (Second Audio Program) Some TV programs are broadcast with stereo audio or a second audio language (SAP). The Reception: STEREO/MONO/SAP feature lets you select the type of audio you want to record. To Record Stereo Broadcast TV or SAP Turn on the TV and tune it to the VCR viewing channel, either 3, 4, or TVÕs video input. 1. Insert a tape with safety tab in place. 2.
Recording a Program Recording Audio Only You can record audio only from another audio source connected to the AUDIO IN (L MONO and R) jacks on the back of the VCR. All video on the tape will be erased when you record audio only. To Record Audio Only 1. Press the INPUT button to select the line input. Press INPUT to record from the AUDIO IN jacks. L1 appears in the VCRÕs display panel. The VCR will record audio from the audio equipment connected to the AUDIO IN jacks. 2.
Recording a Program Using Two VCRs for Copying and Editing Tapes Operating Instructions (Refer to hookup on page 6.) Use this VCR as the playback VCR and the other as the recording VCR. If you have another compatible RCA, ProScan, or GE VCR that has a remote with VCR1 and VCR2 buttons, use the editing feature described below. Caution: The unauthorized recording of television programs and other materials may infringe the rights of others. 1. Turn on the TV and VCRs. 2.
References Specifications Format: VHS Record/Playback System: Video: 4-Head Audio: 2 Hi-Fi record/playback system Video Signal System: EIA standard: NTSC color Antenna: 75-ohm external VHF/UHF combined antenna terminal Tuner: USA: Type: AutoProgramming frequency synthesis Power Requirement: 120V AC, 60 Hz Power Consumption: 22 watts Dimensions: 3.5 inches high (90 mm) 15.5 inches wide (393 mm) 12.5 inches deep (318 mm) Weight: 9.5 pounds (4.
References Location of Controls Front Panel POWER PLAY Tape Compartment EJECT STOP REW FWD CHANNEL INPUT PAUSE TV • VCR RECORD TRACKING Control Door Open Remote Sensor CHANNEL/TRACKING Up or Down Selects next higher or lower channel in the VCR’s channel memory. Adjusts tracking when a tape is playing. EJECT Press when the VCR is stopped to eject the cassette. FWD (Fast Forward) Fast forwards the tape when the VCR is stopped. RECORD Starts VCR recording. Used for express recording (XPR).
References Location of Controls Back Panel IN MONO L FROM ANTENNA L VIDEO R R IN IN OUT TO TELEVISION Connector Passes signal to TV using the cable supplied. OUT OUT OUT TO TELEVISION CH AUDIO 3 4 AUDIO R and L MONO and VIDEO IN Jacks Receives signals from another component, like a VCR or camcorder, when it is connected to these jacks. Use INPUT to select L1 in the VCR’s display panel.
References Trouble Checks Sometimes problems can be easily solved by checking a few basic things. Check below before you call for help or take your VCR to an Authorized RCA VCR Servicenter. Trouble Here's what to try: No power • Plug VCR into an operating outlet. • Check connections. VCR does not respond to remote • Remove batteries and hold down one or more buttons for several seconds to drain the microprocessor inside the remote to reset it. Reinstall the batteries and try remote again.
References Trouble Checks Trouble Here's what to try: Streaks in picture during normal playback • Some snow/streaks are normal during search, frame advance, slow-motion, or stop-action playback. Will not record • VCR is in pause mode. Press PAUSE. • Safety tab removed from cassette. • Make sure the line indicator (L1) is turned off in VCR’s display panel for normal recording from the VCR’s tuner. Press INPUT to turn off the line indicator. Rewind does not operate • Tape already rewound.
References Limited Warranty What your warranty covers: • Any defect in material or workmanship. For how long after your purchase: • Ninety days for labor charges. • One year for parts. The warranty period for rental units begins with the first rental or 45 days from the date of shipment to the rental firm, whichever comes first. What we will do: • Pay any Authorized RCA VCR Servicenter the labor charges to repair your VCR.
References Index Accessories, Included . . . . . . . . . . . . . . .7 Add or Remove Channels from Memory . . . . . . . . . . . . . . . . . . .9 ADD/REMOVE CHANNEL Menu . . . . . .9 Antenna Connections . . . . . . . . . . . . . .2,3 AUDIO and VIDEO Jacks . . . . . .3-6,26,33 AUDIO Menu . . . . . . . . . . . . . . . . .15,28,29 Auto Channel Search Feature . . . . . . . . .8 Auto Play Feature . . . . . . . . . . . . . . .14,15 Auto TV/VCR Feature . . . . . . . . . . .10,14 Automatic Tracking . . . . . . . . .
For your nearest Authorized Servicenter call toll-free in the U.S.A. 1-800-336-1900 Canadian Consumers – Your toll free numbers are: English: 1-800-522-0338 French: 1-800-522-0445 If your VCR needs service, please contact your dealer or the nearest Servicenter from the yellow pages. Please do not send any products to the Indianapolis address listed in this manual or on the carton. This will only add delays in service for your product.