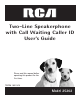
Two-Line Speakerphone with Call Waiting Caller ID User’s Guide Please read this manual before operating this product for the first time.
Important Information Equipment Approval Information Your telephone equipment is approved for connection to the Public Switched Telephone Network and is in compliance with parts 15 and 68, FCC Rules and Regulations and the Technical Requirements for Telephone Terminal Equipment published by ACTA. 1 Notification to the Local Telephone Company On the bottom of this equipment is a label indicating, among other information, the US number and Ringer Equivalence Number (REN) for the equipment.
Table of Contents IMPORTANT INFORMATION ..................... 2 EQUIPMENT APPROVAL INFORMATION .................. 2 INTERFERENCE INFORMATION ............................. 2 INTRODUCTION .................................... 5 CONNECTIONS AND SETUP .................... 6 BASE LAYOUT ................................................ 6 PARTS CHECKLIST ................................................ 7 TELEPHONE JACK REQUIREMENTS .......................... 7 INSTALLATION ........................................
Table of Contents CALLER ID ..................................... 22 CALLER ID (CID) ........................................ 22 SUMMARY SCREEN ........................................... 22 RECEIVING AND STORING CID RECORDS ............ 22 REVIEWING CID RECORDS ................................ 23 SAVING CID RECORDS TO MEMORY/PHONE DIRECTORY MEMORY ................................... 23 DELETING A CID RECORD ................................. 23 DELETING ALL CID RECORDS ............................
Introduction CAUTION: When using telephone equipment, there are basic safety instructions that should always be followed. Refer to the IMPORTANT SAFETY INSTRUCTIONS provided with this product and save them for future reference. Your Caller ID phone stores and displays specific information, provided by your local telephone company, to subscribers of Caller ID or similar caller identification services. Your Caller ID phone enables you to: • Identify callers before you answer the phone.
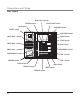
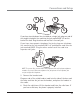
Connections and Setup Base Layout NEW CALL indicator REVIEW button SELECT/SAVE button EXIT button MEMORY buttons DELETE button INTERCOM/MEMORY LOG INT. DIRECTORY 1 MEM. DIRECTORY button INT. 2 VOICE MAIL 1 button MEM. MENU MENU button INT. 3 MEM. INT. STORE 4 MEM. INT. 5 MEM. DELETE EXIT SELECT/SAVE STORE button INT. DIAL 6 NEW CALL MEM. INT. 7 MEM. VOICE MAIL 1 VOICE MAIL 2 button REVIEW INT. 8 DIAL button MEM. CONFER VOICE MAIL 2 2 1 ABC 3 INT. 9 DEF MEM.
Connections and Setup Parts Checklist Make sure your package includes the following items: INTERCOM/MEMORY LOG INT. DIRECTORY 1 MEM. INT. 2 MEM. MENU INT. 3 MEM. INT. STORE 4 MEM. INT. 5 MEM. DELETE EXIT SELECT/SAVE INT. DIAL 6 NEW CALL MEM. INT. 7 MEM. VOICE MAIL 1 REVIEW INT. 8 MEM. VOICE MAIL 2 CONFER 2 1 ABC 3 INT. 9 DEF MEM. INT. DND 10 MEM. 4 GHI 5 JKL 6 MNO INT. 11 PAUSE REDIAL LINE 2 MEM. INT. 7 PQRS 8 TUV 9 12 WXYZ MEM. INT. 13 MEM.
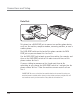
Connections and Setup Installing the Phone 1. Choose an area near an electrical outlet and telephone wall jack. Your phone should be placed on a level surface, such as a table top or desk. 2. Install 3 AA-size alkaline batteries (not included) for back up power in the event of a power failure. • Use a screwdriver to loosen and lift up the battery compartment door located on the bottom of the phone. • Insert the batteries as shown on the diagram inside the battery compartment.
Connections and Setup 4 6 3 5 If you have two telephone lines installed on a single jack, plug one end of the straight telephone line cord into the jack marked LINE 1+2 on the back of the base. Plug the other end into the 2-line wall jack. If you have two separate telephone line jacks, plug one telephone line cord into the jack marked LINE 1+2 and another cord into the jack marked LINE 2. Plug the other end of each line cord into separate wall jacks.
Connections and Setup Data Port This phone has a DATA PORT jack to connect an auxiliary phone device, such as a fax machine, computer modem, answering machine, or even a cordless phone. The DATA PORT switch on the back of the phone controls the DATA PORT jack so you can choose line 1 or line 2. Use the DATA PORT jack to hook up your fax machine, for example, and then set the DATA PORT switch to 2 in order to receive faxes on the phone number for line 2.
Connections and Setup Programming the Telephone Display Language You may set the display language to English, French, or Spanish. The default is English. 1. Press the MENU button. LANGUAGE is displayed 2. Press SELECT. 3. Use the REVIEW or button to select the language. 4. When finished, press SELECT to save. To start over, press EXIT to return to the LANGUAGE menu and repeat step 2.
Connections and Setup Flash Time Depending on the services you have with the phone company, you may need to adjust the flash timing. It can be set from 100ms or 600ms. The default is 600ms. 1. Press the MENU button. 2. Use the REVIEW or to scroll to PHONE OPTIONS. 3. Press SELECT. 4. Use the REVIEW or to scroll to FLASH TIME. 5. Press SELECT. 6. Use the REVIEW or to scroll to the desired setting. 7. Press SELECT to save. To start over, press EXIT to return to the FLASH TIME menu.
Connections and Setup Call Alert Tone When the call alert tone is turned ON, you hear a call alert tone when you are on the phone and you receive a call on the other line. If you prefer to have incoming calls not interrupt or disturb your ongoing conversation, set the Call Alert Tone to OFF. The default is ON. 1. Press the MENU button. 2. Use the REVIEW or button to scroll to PHONE OPTIONS. 3. Press SELECT button. 4. Use the REVIEW or button to scroll to CALL ALERT. 5. Press SELECT button. 6.
Connections and Setup Regional Area Codes Depending on your area, you may need to set regional area codes. These are needed in order for the phone to determine the number format to display when a valid CID signal is received. Calls received that match any of the regional area codes display as 10 digits. If the number is not displayed correctly, the phone may not be able to dial back the number. You can store up to 6 regional area codes.
Connections and Setup Voice Mail Access Codes You can program a voice mail access code for each telephone line for quick access to your voice mail. 1. Press the MENU button. 2. Use the REVIEW or button to scroll to VM CODE. 3. Press SELECT. 4. Use the REVIEW or button to scroll between L1 VM CODE and L2 VM CODE. 5. Press SELECT. 6. Use the touch-tone pad to enter your voice mail access phone number. • Use the REVIEW or button to move the cursor in the display.
Telephone Operation Telephone Operation Making Calls with the Handset 1. Pick up the handset and the phone automatically selects an open line. 2. Wait for a dial tone. 3. Dial a phone number. 4. Hang up the handset when finished. Making Calls with the Speakerphone 1. Press the SPEAKER button and the phone automatically selects an open line. 2. Wait for a dial tone. 3. Dial a phone number. 4. Press SPEAKER when finished. Making Calls with the Optional Headset 1.
Telephone Operation Receiving Calls with the Handset When the phone rings, the corresponding line’s indicator flashes rapidly. 1. Pick up the handset (your phone automatically selects the ringing line). 2. When you are finished, hang up the handset. Receiving Calls with the Speakerphone When the phone rings, the corresponding line’s indicator flashes rapidly. 1. Press the SPEAKER button. The speakerphone turns on and automatically selects a line. 2. When you are finished, press SPEAKER.
Telephone Operation Pre-Dialing Telephone Numbers Pre-dialing lets you to enter , check , and edit a telephone number before engaging the line. There are several ways to pre-dial a telephone number: • Manually enter the telephone number, or • Press one of the 16 memory location buttons, or • Press DIRECTORY, followed by the REVIEW or button to search the phone book memory. • Press the REVIEW or buttons to scroll the CID memory, or • Press the REDIAL button. Then 1. Press the DIAL button.
Telephone Operation Hold Placing a Call on Hold 1. Press HOLD. The indicator for the line on hold flashes green. 2. Hang up or press another line button. Releasing a Call from Hold Press the line button for the call on hold. The phone automatically goes into speakerphone mode. NOTE: If you want to change modes, lift the handset to switch to the handset, or press the HEADSET button to use the headset.
Telephone Operation Ringer Volume While the handset is on the cradle tap the VOLUME or button to increase or decrease the ringer loudness. The phone generates a sample ring at the selected setting. Speakerphone, Handset, and Headset Volume While using the phone press the VOLUME or buttons to set the volume to a comfortable level The phone stores the setting when you release the button. Conference This feature lets you connect two calls to make a conference call. To connect with two calls: 1.
Telephone Operation 2. Use the REVIEW or button to select the duration. You may choose from 15 minutes, 30 minutes, 45 minutes, 1 hour, or 2 hours and increase the duration by 1 hour intervals up to 24 hours. 3. Press the SELECT button to save your selection. 4. When the Do Not Disturb function is on, the DND indicator flashes. To turn off Do Not Disturb, press the DND button. NOTE: When Do Not Disturb is On, you will still receive a ringing line indication, CID information, and New Call indicators.
Caller ID Caller ID (CID) Summary Screen The summary screen shows the current time, current date and number of new calls to be reviewed. It is displayed until any button is pressed. Within 10 seconds of receiving a new call, the new caller information is displayed and the green NEW CALL indicator turns on. Battery Indicator Time Date 12:43 AM 12/31 Number of New calls 29 NEW CALLS NOTE: The number of new calls is displayed until all new calls have been reviewed.
Caller ID Reviewing CID Records • Press the REVIEW or to scroll the call records. NOTE: When you scroll to the start/end of the list, START /END appears in the display. Saving CID Records to Memory/Phone Directory Memory 1. While a name and telephone number shows in the display, press SELECT if you want to edit the information. Then follow the steps in the Storing a Name and Number in Memory section to edit and store the record. 2.
Caller ID 3. To adjust the phone number format, use the REVIEW or button For instance, a 7-digit local number sometimes cannot be dialed because it requires a 10-digit or 11digit format. Use the REVIEW or button to scroll through 7, 10, and 11-digit numbers. 7-digits: 7-digit telephone number (i.e. 555-5555) 10-digits: 3-digit area code + 7-digit telephone number (i.e. 425-555-5555) 11-digits: long distance code 1 + 3-digit area code + 7-digit telephone number (i.e. 1-425-555-5555) 4.
Memory Direct Access Memory & Directory Memory Storing a Name and Number in Memory 1. Press the STORE button. ENTER NUMBER shows in the display. 2. Use the touch-tone pad to enter the number you want to store (up to 32 digits). NOTE: If you make a mistake, use the button to position the cursor and press DELETE to erase an incorrect digit OR directly input another digit to replace the incorrect digit. 3. Press the SELECT button. 4. Use the touch-tone pad to enter a name (up to 21 characters).
Memory 1. Press a MEMORY button to review the record stored in Direct Access Memory. Changing a Stored Name or Number 1. Press DIRECTORY. 2 . Use the REVIEW or button to scroll to the desired memory. 3. Press SELECT and edit the content according to the steps in the Storing a Name & Number in Memory section. OR 1. Press a MEMORY location button. 2. Press SELECT and edit the content according to the steps in the Storing a Name and Number in Memory section.
Memory Dialing a Stored Number If the number is stored in the Directory Memory, 1. Pick up the handset, or press SPEAKER or HEADSET. 2. Wait for the dial tone. 3. Press the DIRECTORY button, and use the REVIEW or button to find the number. 4. Press the DIAL button and the number automatically dials. If the number is stored in the Direct Access Memory, 1. Pick up the handset, or press SPEAKER or HEADSET. 2. Wait for the dial tone. 3. Press the MEMORY location button, and the number automatically dials.
Memory Deleting All Directory Memory This feature allows you to clear all memory saved in the directory at once. 1. Press the MENU button. 2. Use the REVIEW or buttons to scroll to PHONE OPTIONS 3. Press SELECT. CLEAR ALL MEM shows in the display. 4. Press SELECT. 5. Press the REVIEW or button to scroll to YES. 6. Press SELECT. OK is displayed to confirm all directory memory is deleted. If you want to start over, press EXIT once to return to the previous menu level.
Other Information Display Messages The following special messages indicate the status of a message or the unit: NO CALLS The CID memory log is empty. UNKNOWN CALLER The incoming call does not have CID service or their service area is not linked to yours. If UNKNOWN CALLER appears along with a calling number, the name information for that number was not available. BLOCKED CALL The caller is registered as “Private Number” and their CID information is withheld.
Other Information You cannot be heard by the other party. • Make sure the handset or headset cord is connected properly and securely. • Make sure MUTE is not turned on. Phone does not ring. • Make sure the ringer is turned on. • You may have too many extension phones on your line. Try unplugging some phones. • See solutions for “No dial tone.” • Make sure Do Not Disturb is not turned on. Incoming voice too low or none at all. • Check and adjust volume control setting.
Other Information General Product Care To keep your telephone working and looking good, follow these guidelines: • Avoid putting the phone near heating appliances and devices that generate electrical noise (for example, motors or fluorescent lamps). • DO NOT expose to direct sunlight or moisture. • Avoid dropping the handset, as well as other rough treatment to the phone. • Clean the phone with a soft cloth.
Other Information Service If trouble is experienced with this equipment, for repair or warranty information, please contact customer service at 1-800-511-3180. If the equipment is causing harm to the telephone network, the telephone company may request that you disconnect the equipment until the problem is resolved. This product may be serviced only by the manufacturer or its authorized service agents. Changes or modifications not expressly approved by ATLINKS USA, Inc.
Other Information Limited Warranty What your warranty covers: • Defects in materials or workmanship. For how long after your purchase: • One year, from date of purchase. (The warranty period for rental units begins with the first rental or 45 days from date of shipment to the rental firm, whichever comes first.) What we will do: • Provide you with a new or, at our option, a refurbished unit. The exchange unit is under warranty for the remainder of the original product’s warranty period.
Other Information Limitation of Warranty: • THE WARRANTY STATED ABOVE IS THE ONLY WARRANTY APPLICABLE TO THIS PRODUCT. ALL OTHER WARRANTIES, EXPRESS OR IMPLIED (INCLUDING ALL IMPLIED WARRANTIES OF MERCHANTABILITY OR FITNESS FOR A PARTICULAR PURPOSE) ARE HEREBY DISCLAIMED. NO VERBAL OR WRITTEN INFORMATION GIVEN BY ATLINKS USA, INC., ITS AGENTS, OR EMPLOYEES SHALL CREATE A GUARANTY OR IN ANY WAY INCREASE THE SCOPE OF THIS WARRANTY.
Index Accessory Order Form 37 Display Language 11 Display Messages 29 Do Not Disturb 20 B E Base Layout 6 Equipment Approval Information 2 A C Call Alert Tone 13 Call Timer 18 Call Waiting Caller ID 24 Caller ID (CID) 22 Chain Dialing 27 Changing a Stored Name or Number 26 Conference 20 Connections and Setup 6 D Data Port 10 Deleting a CID Record 23 Deleting All CID Records 23 Deleting All Directory Memory 28 Dialing a Stored Number 27 Dialing Back 23 Direct Access Memory & Directory Memory 25 F F
R S T Receiving and Storing CID Records 22 Receiving Calls with the Handset 17 Receiving Calls with the Optional Headset 17 Receiving Calls with the Speakerphone 17 Redial 19 Regional Area Codes 14 Removing a Call from Hold 19 Restoring the Defaults 15 Reviewing CID Records 23 Reviewing Stored Names & Numbers 25 Ringer Volume 20 Saving CID Records to Memory/Phone Directory Memory 23 Service 32 Speakerphone, Handset, and Headset Volume 20 Storing a Name and Number in Memory 25 Storing a Pause 26 Storing
Accessory Order Form To Order To place your order by phone, have your Visa, MasterCard or Discover Card ready and call the tollfree number listed below. Use this number only to place an order for accessory items listed on this order form. 1-800-338-0376 To place your order by mail, detach and mail the completed order form with credit card information, money order or check in US currency (made payable to Thomson multimedia Inc.) to the following address: Thomson Inc.
Visit the RCA web site at www.rca.com Please do not send any products to the Indianapolis address listed in this manual or on the carton. This will only add delays in service for your product. ATLINKS USA, Inc. 101 West 103rd Street Indianapolis, IN 46290 ©2004 ATLINKS USA, Inc. Trademark(s)® Registered Marca(s) Registrada(s) Model 25202 TOCOM 16211370 (Rev.
Teléfono con Altavoz de Dos Líneas con Identificador de Llamada en Espera Guía del Usuario Por favor lea este manual antes de operar este producto por primera vez.
Información Importante INFORMACIÓN SOBRE LA APROBACIÓN DE EQUIPO El equipo de su teléfono esta aprobado para la conexión con la red Telefónica Pública (Public Switched Telephone Network) y cumple con los requisitos establecidos en las secciones 15 y 68 de las Reglas y Regulaciones de la FCC y con los Requerimientos Técnicos para Equipos de Terminales Telefónicas (Technical Requirements for Telephone Terminal Equipment), publicado por ACTA.
Tabla de Contenido INFORMACIÓN IMPORTANTE ................... 2 INFORMACIÓN SOBRE LA APROBACIÓN DE EQUIPO . 2 INFORMACIÓN DE INTERFERENCIAS ...................... 2 INTRODUCCIÓN ................................... 5 CONEXIÓN Y PROGRAMACIÓN ................ 6 FORMATO DE LA BASE ..................................... 6 LISTA DE PARTES ................................................. 7 REQUERIMIENTOS PARA ENCHUFE TELEFÓNICO ....... 7 INSTALACIÓN ..................................................
Table of Contents CONFERENCIA ................................................... 20 FUNCIÓN DE NO MOLESTAR .............................. 20 MENSAJE DE VOZ .............................................. 21 FUNCIONES DEL IDENTIFICADOR DE LLAMADAS (CALLER ID) ................ 22 PANTALLA SUMARIO .......................................... 22 PARA RECIBIR Y ALMACENAR ARCHIVOS DEL IDENTIFICADOR DE LLAMADAS ....................... 22 PARA REVISAR ARCHIVOS DEL IDENTIFICADOR DE LLAMADAS .........................
Introducción CUIDADO: Cuando utilice equipo telefónico, hay instrucciones básicas de seguridad que siempre deben seguirse. Refiérase a la guía de INSTRUCCIONES DE SEGURIDAD IMPORTANTES provista con este producto y guárdela para referencia futura. Su teléfono con Identificador de Llamada almacena y muestra información específica, provista por su compañía telefónica local, a suscriptores al servicio de Identificador de Llamadas o servicios de identificación similares.
Conexión y Programación Formato de la Base Indicador de llamada nueva (“NEW CALL”) Botón para revisar (“REVIEW”) Botón para seleccionar (“SELECT/ SAVE”) Botón para salir (“EXIT”) Botones de memoria (“MEMORY”) Botón para borrar (“DELETE”) INTERCOM/MEMORY LOG Botón de Mensaje de Voz 1 (“VOICE MAIL 1”) INT. DIRECTORY 1 MEM. Botón para directorio (“DIRECTORY”) INT. 2 MEM. MENU INT. 3 MEM. INT. STORE 4 MEM. INT. Botón para menú (“MENU”) 5 MEM.
Conexión y Programación Lista de Partes Asegúrese de que su empaque contenga los siguientes artículos: INTERCOM/MEMORY LOG INT. DIRECTORY 1 MEM. INT. 2 MEM. MENU INT. 3 MEM. INT. STORE 4 MEM. INT. 5 MEM. DELETE EXIT SELECT/SAVE INT. DIAL 6 NEW CALL MEM. INT. 7 MEM. VOICE MAIL 1 REVIEW INT. 8 MEM. VOICE MAIL 2 CONFER 2 1 ABC 3 INT. 9 DEF MEM. INT. DND 10 MEM. 4 GHI 5 JKL 6 MNO INT. 11 PAUSE REDIAL LINE 2 MEM. INT. 7 PQRS 8 TUV 9 12 WXYZ MEM. INT.
Conexión y Programación Para Instalar el Teléfono 1. Escoja un área cerca de un enchufe eléctrico y un enchufe telefónico de pared. Su teléfono debe ser colocado sobre una superficie plana, como una mesa o un escritorio. 2. Instale 3 baterías alcalinas tamaño AA (no incluidas) como repuesto en caso de un corte de corriente. • Utilice un destornillador para aflojar y levantar la puerta del compartimiento de las baterías localizada en la parte de abajo del teléfono.
Conexión y Programación 4 6 3 5 Si usted tiene dos líneas telefónicas instaladas en un solo enchufe, conecte un extremo del cable de línea liso dentro del enchufe marcado “LINE 1+2” en la parte trasera de la base. Conecte el otro extremo en el enchufe de pared de 2 líneas. Si usted tiene dos enchufes telefónicos separados, conecte uno de los cables telefónicos dentro del enchufe marcado “LINE 1+2” y el otro cable dentro del enchufe marcado “LINE 2.
Conexión y Programación Terminal de Datos Este teléfono tiene una terminal de datos (“DATA PORT”) para que usted pueda conectar un accesorio auxiliar del teléfono, como una máquina de fax, un módem de computadora, una máquina contestadora o hasta un teléfono inalámbrico. El selector de terminal de datos (“DATA PORT”) en la parte posterior del teléfono controla el enchufe de la terminal de datos para que usted pueda escoger entre la línea 1 o la línea 2.
Conexión y Programación Para Programar el Teléfono Idioma de la Pantalla Usted puede programar el idioma de la pantalla a inglés, francés o español. El idioma de fábrica es el inglés. 1. Oprima el botón de menú (“MENU”). La indicación de idioma (“LANGUAGE”) aparece en la pantalla. 2. Oprima el botón para seleccionar (“SELECT”). 3. Utilice los botones para revisar (“REVIEW o ”) para seleccionar el idioma. 4. Cuando haya terminado, oprima el botón de seleccionar (“SELECT”) para salvar.
Conexión y Programación Tiempo para Servicios Especiales (“Flash”) Dependiendo de los servicios que usted tenga contratados con la compañía telefónica, usted puede necesitar ajustar el tiempo para servicios. Puede ser programado desde 100 ms hasta 600 ms. El aparato está programado de fábrica a 600ms. 1. Oprima el botón de menú (“MENU”). 2. Utilice los botones para revisar (“REVIEW o ”) para ir a la indicación “OPCIONES TELEF.” 3. Oprima el botón para seleccionar (“SELECT”). 4.
Conexión y Programación Tono para Alerta de Llamada Cuando el tono para alerta de llamada está activado (ON), usted lo escucha cuando está en el teléfono y recibe una llamada en la otra línea. Si usted prefiere que las llamadas entrantes no le interrumpan o le distraigan de su conversación, desactive el Tono de Alerta de Llamada (OFF). Viene activado de fábrica (ON). 1. Oprima el botón de menú (“MENU”). 2. Utilice los botones para revisar (“REVIEW o ”) para ir a la indicación “OPCIONES TELEF.” 3.
Conexión y Programación Claves de Área Regionales Dependiendo de su área, usted puede necesitar programar claves de área regionales. Éstas son necesarias para que su teléfono pueda determinar qué formato de número mostrar cuando recibe una señal válida del Identificador de Llamadas. Las llamadas que provengan de la misma clave de área que las áreas regionales programadas, se mostrarán como números de diez dígitos.
Conexión y Programación Claves de Acceso para Buzón de Voz Usted puede programar una clave para tener acceso rápido al buzón de voz de cada línea. 1. Oprima el botón de menú (“MENU”). 2. Utilice los botones para revisar (“REVIEW o ”) para ir a la indicación “CLAVE VM.” 3. Oprima el botón para seleccionar (“SELECT”). 4. Utilice los botones para revisar (“REVIEW o ”) para escoger entre la clave de acceso para la línea 1 (“L1 CLAVE VM”) o para la línea 2 (“L2 CLAVE VM”). 5.
Operación del Teléfono Operación del Teléfono Para Hacer Llamadas con el Auricular 1. Levante el auricular y el teléfono selecciona automáticamente una línea abierta. 2. Espere al tono de marcar. 3. Marque el número telefónico. 4. Cuelgue cuando usted haya terminado. Para Hacer Llamadas con el Altavoz 1. Oprima el botón de altavoz (“SPEAKER”) y el teléfono selecciona automáticamente una línea abierta. 2. Espere al tono de marcar. 3. Marque el número telefónico. 4.
Operación del Teléfono Para Recibir Llamadas con el Auricular Cuando el teléfono timbra, el indicador de la línea correspondiente parpadea rápidamente. 1. Levante el auricular (su teléfono automáticamente selecciona la línea que timbra). 2. Cuando haya terminado, cuelgue el auricular. Para Recibir Llamadas con el Altavoz Cuando el teléfono timbra, el indicador de la línea correspondiente parpadea rápidamente. 1. Oprima el botón de altavoz (“SPEAKER”).
Operación del Teléfono Pre-Marcado de Números Telefónicos La función de pre-marcado le permite inscribir, verificar y cambiar un número telefónico antes de ocupar la línea. Hay varias maneras de pre-marcar un número telefónico: • Inscriba el número telefónico manualmente, u • Oprima uno de los 16 botones de localizaciones de memoria, u • Oprima el botón de directorio (“DIRECTORY”), seguido por los botones para revisar (“REVIEW o ”) para buscar el número en la memoria del libro telefónico.
Operación del Teléfono En Espera Para Poner una Llamada en Espera 1. Oprima el botón de espera (“HOLD”). El indicador de la línea en espera parpadea en verde. 2. Cuelgue u oprima el botón de otra línea. Para Liberar una Llamada en Espera Oprima el botón de la línea en donde está la llamada en espera. El teléfono automáticamente se pone en modalidad de altavoz.
Operación del Teléfono Volumen del Timbre Mientras que el auricular está en la base, toque los botones de volumen (“VOLUME o “) para aumentar o disminuir el volumen del timbre. El teléfono genera un timbre de ejemplo de la programación deseada. Volumen del Altavoz, Auricular, o Audífonos Mientras que usted utiliza el teléfono, toque los botones de volumen (“VOLUME o “) para programar el volumen a un nivel cómodo. El teléfono almacena esta programación cuando usted suelta el botón.
Operación del Teléfono 2. Utilice los botones de para revisar (“REVIEW o ”) para seleccionar la duración. Usted puede escoger entre 15 minutos, 30 minutos, 45 minutos, 1 hora, 2 horas e incrementar la duración a intervalos de 1 hora hasta 24 horas. 3. Oprima el botón para seleccionar (“SELECT”) para salvar su selección. 4. Cuando la función de No Molestar está activada, el indicador “DND” parpadea. Para desactivar la función de No Molestar, oprima el botón “DND.
Funciones del Identificador de Llamadas (Caller ID) Funciones del Identificador de Llamadas (Caller ID) Pantalla Sumario La pantalla sumario muestra la hora actual, la fecha actual y el número de llamadas esperando a ser revisadas. Esto aparece hasta que se oprime cualquier botón. Dentro de 10 segundos después de que se recibe una llamada nueva la información de la persona que acaba de llamar aparece en la pantalla y se ilumina el indicador de llamada nueva (“NEW CALL”).
Funciones del Identificador de Llamadas (Caller ID) Para Revisar Archivos del Identificador de Llamadas • Utilice los botones para revisar (“REVIEW o ”) para recorrer los archivos de llamadas. NOTA: Cuando usted recorre los archivos hasta el principio o fin de la lista, la indicación “COMIENZO/ FIN” aparece en la pantalla. Para Salvar Archivos del Identificador de Llamadas a la Memoria /Directorio de Memoria 1.
Funciones del Identificador de Llamadas (Caller ID) 3. Para ajustar el formato del número, utilice los botones de para revisar (“REVIEW o ”). Por ejemplo, un número local de 7 dígitos algunas veces no se puede marcar porque requiere un formato de 10 o de 11 dígitos. Utilice los botones de para revisar (“REVIEW o ”) para recorrer los formatos de 7, 10 y 11 dígitos.
Memoria Memoria de Acceso Directo y Directorio de Memoria Para Almacenar un Nombre y Número en la Memoria 1. Oprima el botón para almacenar (“STORE”). La indicación “INSCRIBA NUMERO” aparece en la pantalla. 2. Utilice el teclado numérico para inscribir el número que usted quiera almacenar (hasta 32 dígitos).
Memoria 1. Oprima uno de los botones de memoria (“MEMORY”) para revisar el archivo localizado en Memoria de Acceso Directo. Para Cambiar un Nombre o Número Almacenado 1. Oprima el botón de directorio (“DIRECTORY”). 2 . Utilice los botones para revisar (“REVIEW o ”) para llegar a la localización de memoria deseada. 3. Oprima el botón para seleccionar (“SELECT”) y corrija el contenido de acuerdo a los pasos en la sección “Para Almacenar un Nombre y Número la Sección de Memoria.” U 1.
Memoria Para Marcar un Número Almacenado Si el número está almacenado en la Memoria del Directorio, 1. Levante el auricular, u oprima el botón de altavoz (“SPEAKER”) o audífonos (“HEADSET”). 2. Espere al tono de marcar. 3. Oprima el botón de directorio (“DIRECTORY”) o utilice los botones para revisar (“REVIEW o ”) para encontrar el número. 4. Oprima el botón para marcar (“DIAL”) y el número se marca automáticamente. Si el número está almacenado en la Memoria de Acceso Directo, 1.
Memoria Para Borrar Todas las Memorias del Directorio Esta función le permite eliminar todas las memorias almacenadas en el directorio a la vez. 1. Oprima el botón de menú (“MENU”). 2. Utilice los botones para revisar (“REVIEW o ”) para ir a la indicación “OPCIONES TELEF.” 3. Oprima el botón para seleccionar (“SELECT”). La indicación “LIMPIA LAS MEM” aparece en la pantalla. 4. Oprima el botón para seleccionar (“SELECT”). 5.
Otra Información Mensajes de la Pantalla Los siguientes mensajes especiales indican el estado actual de un mensaje o del aparato: NO CALLS (NO HAY LLAMADAS) El registro de memoria está vacío. UNKNOWN CALLER (PERSONA DESCONOCIDA) La llamada entrante viene de un área en donde el Identificador de Llamadas (Caller ID) no está disponible, o no está enlazado al suyo. Si aparece la indicación “DESCONOCID” junto con el número, la información del nombre no está disponible.
Otra Información • Desconecte la base del enchufe de pared y conecte otro teléfono al mismo enchufe. Si continúa sin haber tono de marcar en el segundo teléfono, el problema puede estar en el cableado o en el servicio local. La otra persona no le escucha • Asegúrese que el auricular y el cable de los audífonos estén conectados adecuadamente. • Asegúrese que la función del enmudecedor (“MUTE”) no haya sido activada.
Otra Información Cuidado General del Producto Para mantener su teléfono funcionando bien y con buena apariencia, observe las siguientes pautas: • • • • • • Evite poner el teléfono cerca de calentadores (calefactores) de ambiente y dispositivos que generen interferencia eléctrica ejemplo, motores o lámparas fluorescentes). No lo exponga a la luz solar directa o a la humedad. No deje caer la extensión móvil y no maltrate el teléfono.
Otra Información Cómo Obtener Servicios de Mantenimiento Si usted experimenta problemas con este equipo, para reparaciones o para información de garantía, comuníquese con el departamento de servicio al cliente al 1-800-511-3180. Si el equipo está causando daños a la red telefónica, la compañía telefónica puede pedirle que desconecte su equipo hasta que el problema haya sido resuelto. Este producto puede únicamente ser reparado por el fabricante o sus agentes de reparación autorizados.
Otra Información Garantía Limitada Lo que cubre su garantía: • Defectos de materiales o de trabajo. Por cuánto tiempo después de la compra: • Un año, a partir de la fecha de compra. (El periodo de garantía para unidades arrendadas se inicia con la primera renta o 45 días de la fecha del embarque a la firma de arrendamiento, lo que ocurra primero). Lo que haremos: • Proporcionarle una unidad nueva o, a nuestra opción, una reacondicionada.
Otra Información Limitaciones sobre la Garantía: • LA GARANTÍA ESPECIFICADA ANTERIORMENTE ES LA ÚNICA GARANTÍA APLICABLE A ESTE PRODUCTO. CUALQUIER OTRA GARANTÍA, EXPRESA O IMPLÍCITA (INCLUYENDO TODAS LAS GARANTÍAS IMPLÍCITAS DE MERCADO O DE SALUD PARA CUALQUIER PROPÓSITO) SON CONSIDERADAS NO VÁLIDAS. NINGUNA INFORMACIÓN VERBAL O ESCRITA OTORGADA POR ATLINKS USA,INC., SUS AGENTES, O EMPLEADOS SERÁ CONSIDERADA PARA CREAR UNA GARANTÍA NI PARA AUMENTAR BAJO NINGUNA CIRCUNSTANCIA LA COBERTURA DE ESTA GARANTÍA.
Índice B Botón de Servicios Especiales (“Flash”) 19 C Clave de Área Local 13 Claves de Acceso para Buzón de Voz 15 Claves de Área Regionales 14 Cómo Obtener Servicios de Mantenimiento 32 Conexión y Programación 6 Conferencia 20 Cuidado General del Producto 31 Funciones del Identificador de Llamadas (Caller ID) 22 G Garantía Limitada 33 Guía para Solución de Problemas 29 I En Espera 19 Enmudecedor 18 Idioma de la Pantalla 11 Información de Interferencias 2 Información Importante 2 Información Importan
Para Cambiar un Nombre o Número Almacenado 26 Para Hacer Llamadas con el Altavoz 16 Para Hacer Llamadas con el Auricular 16 Para Hacer Llamadas con los Audífonos Opcionales 16 Para Instalar el Teléfono 8 Para Liberar una Llamada en Espera 19 Para Marcar un Número Almacenado 27 Para Poner una Llamada en Espera 19 Para Programar el Teléfono 11 Para Programar la Fecha y Hora Manualmente 11 Para Recibir Llamadas con el Altavoz 17 Para Recibir Llamadas con el Auricular 17 Para Recibir Llamadas con los Audífonos
Formulario para Hacer Pedidos de Accesorios Para Ordenar Para hacer su orden por teléfono, tenga su tarjeta Visa, MasterCard o Discover lista y llame al número sin cargo que aparece a continuación. Utilice este número únicamente para hacer una orden de artículos accesorios enlistados en este formulario.
Visite el sitio de RCA en www.rca.com Por favor no envíe ningún producto a la dirección de Indianápolis enlistada en este manual o en la caja. Esto únicamente resultará en un retraso para dar servicio a su producto. ATLINKS USA, Inc. 101 West 103rd Street Indianapolis, IN 46290 ©2004 ATLINKS USA, Inc. Trademark(s)® Registered Marca(s) Registrada(s) Model 25202 TOCOM 16211370 (Rev.