Television User's Guide Changing Entertainment. Again.
Important Information WARNING To reduce the risk of fire or electric shock, do not expose this product to rain or moisture. CAUTION RISK OF ELECTRIC SHOCK DO NOT OPEN This symbol indicates "dangerous voltage" inside the product that presents a risk of electric shock or personal injury. Caution: To reduce the risk of electric shock, do not remove cover (or back). No user serviceable parts inside. Refer servicing to qualified service personnel.
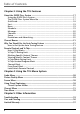
Table of Contents Chapter 1: Connections & Setup Things to Consider Before You Connect .................................................................... 3 Protect Against Power Surges .........................................................................3 Protect Components from Overheating ......................................................... 3 Position Cables Properly to Avoid Audio Interference .................................. 3 Important Stand and Base Safety Information ....................
Table of Contents Chapter 3: Using the TV’s Features About the GUIDE Plus+ System .................................................................................. 17 Using the GUIDE Plus+ System.........................................................................17 The GUIDE Plus+ System Menu Bar .................................................................17 Grid Guide ........................................................................................................18 Sort .................
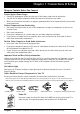
Chapter 1: Connections & Setup Things to Consider Before You Connect Protect Against Power Surges • • • Connect all components before you plug any of their power cords into the wall outlet. Turn off the TV and/or component before you connect or disconnect any cables. Make sure all antennas and cables are properly grounded. Refer to the Important Safety Instructions packed separately. Protect Components from Overheating • • • • Don’t block ventilation holes on any of the components.
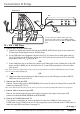
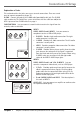
Connections & Setup TV (back panel) Y R-AUDIO-L PB INPUT2 VIDEO VCR PR INPUT1 VIDEO AUDIO OUT G-LINK 4 IN FROM ANT S-VIDEO DVD 1D 1A 1C* Pb Pr VIDEO S-VIDEO L R L 3 OUT Y CH3 CH4 R IN 2 L 1B AUDIO OUT R-AUDIO-L R VIDEO OUT TO TV CABLE/ ANTENNA R L From Cable or Antenna * If you connect an S-Video cable, you must connect the audio cables to the INPUT1 AUDIO jacks on the back of the TV, not the INPUT2 AUDIO jacks. TV + VCR + DVD Player 1.
Connections & Setup Explanation of Jacks This section describes the jacks you can use to make connections. There are several ways to connect components to your TV. G-LINK Connect the end of the G-LINK cable (provided) to this jack. The G-LINK cable enables the TV’s Guide Plus+ system to interact with the cable box and/or the VCR. A picture of the G-LINK cable is on page 3. CABLE/ANTENNA Lets you connect a coaxial cable to receive the signal from the antenna, cable or cable box.
Connections & Setup The Front of Your TV Front Input Jacks The TV has one set of front audio/video input front input jacks for your convenience. These jacks are on the front of the TV behind the access door. To access the component you connected to the front of the TV, press the INPUT button on your remote until FRNT appears on the screen. The jacks are ideal for connecting a video game console or a camcorder.
Connections & Setup Why You Should Connect This G-LINK Cable G-LINK cable The G-LINK cable enables the GUIDE Plus+ system (the on-screen interactive program guide) to work with your VCR and/or cable box. Cable Box – If your TV is connected to a cable box you must connect the G-LINK cable to receive TV program listings for your area, and to tune directly to a channel when the program guide is on your TV screen.
Connections & Setup Plug in the TV Plug the end of the power cord into a grounded wall outlet. Insert the plug completely into the outlet. Put batteries in the remote • • • Remove the battery compartment cover from the back of the remote by pushing down on and sliding off the cover. Insert 2 fresh “AAA” batteries. Make sure the polarities (+ and -) are aligned correctly. Replace the cover.
Connections & Setup SETUP Would you like the TV to search for all available channels? 1 Search for channels 2 Skip this step Complete Auto Channel Search The next part of the SETUP asks if you want the TV to search for all available channels. This is sometimes called “auto programming.” 1. Press OK to tell the TV to begin searching for channels. A progress report appears on the screen. 2.
Connections & Setup Step 3: Configuring for a VCR The next series of screens asks you about your VCR setup. If you connected a VCR to the TV, you will need to follow the on-screen instructions to select your brand of VCR and run a system test so that the one-touch record feature will work properly. Notes: If your VCR brand isn’t listed, choose the Not Listed option. Leave the cable box on to download program listings. Leave your VCR off to record programs with the Guide Plus+ One-Touch Record feature.
Connections & Setup What to Expect The next time you turn on your TV, the GUIDE Plus+ system will appear on the screen. The following examples explain what you might see: • If all of the program information has been sent to your TV, the GUIDE Plus+ system appears with all of your TV program listings. • If the program information hasn’t been sent to your TV yet, an outline of the GUIDE (without TV program listings) will appear on the screen. Program information is usually sent to your TV at night.
Chapter 2: Using the Remote Control Indicator Button Descriptions for TV Mode Arrows Used to highlight different items in the TV menu and to adjust the menu controls. ON OFF DVD VCR TV CH VOL MUTE GO BACK CLEAR MENU OK SKIP PRESETS INFO CC GUIDE 1 2 3 4 5 6 7 8 9 INPUT 0 ANTENNA PLAY FORWARD STOP PAUSE AGAIN ZOOM OPEN CLOSE SPEED SEARCH REVERSE RECORD Indicator Indicates the programming mode when programming the remote to control components.
Using the Remote Control OPEN•CLOSE In DVD mode, opens or closes the DVD disc tray. REVERSE, PLAY, FORWARD, RECORD, STOP, PAUSE If programmed, provides transport control for some remote-controllable VCRs or DVD players. SEARCH In VCR mode, accesses Index Search feature. SPEED In VCR mode, selects a recording speed. VCR Puts the remote in VCR mode and, if auto tuning is enabled, will turn on the TV and tune to the correct video input channel. ZOOM In DVD mode, zooms in on the picture.
Using the Remote Control Using Automatic Code Search The following instructions can be used to program the remote to operate each of your components. If you want to stop the automatic code search without programming any of your components, press CLEAR until the indicator on the remote turns off. 1. Turn on the component you want to operate (VCR or DVD player) 2. Press and hold the component button you want to program (VCR or DVD).
Using the Remote Control How to Use the Remote After You’ve Programmed It Because this universal remote can operate several different components it uses operational modes triggered by the component buttons. For example, if you want the remote to operate the TV, you would press the TV button to put the remote into TV mode before you could operate the TV. 1. Press the appropriate component button (DVD, TV, VCR) to set the remote to operate the component. 2. Press ON•OFF to turn the component ON or OFF. 3.
Using the Remote Control VCR Codes continued Mitsubishi ........................... 2029, 2055, 2056, 2065, 2066, 2067, 2068, .......................... 2069, 2070, 2071, 2072, 2073, 2074, 2106, 2113, 2123 Montgomery Ward ................................................................... 2075, 2132 Motorola .................................................................................... 2021, 2132 MTC ............................................................................................
Chapter 3: Using the TV’s Features Action buttons Video window Program information Menu options About the GUIDE Plus+ System The GUIDE Plus+ system is a no-fee, interactive on-screen program guide that lists TV schedules for your area and allows your TV direct control of a cable box and VCR. There are six sections of the GUIDE Plus+ system: • • • • Promotional information Channel listings Note: The GUIDE Plus+ system screens illustrated in this book are representations of what you are likely to see.
Chapter 3: Using the TV’s Features Grid Guide The Grid Guide appears each time you enter the GUIDE Plus+ system. It displays the current programming for each channel. The current program is displayed in the video window. • Press the up and down arrow buttons on the remote to browse channel listings and the channel up and down buttons to page through the listings. Use the right and left arrow buttons to browse future program listings.
Using the TV’s Features Sort Sort The Sort menu lets you browse programs by category, such as sports, movies or children’s programs. Use the action buttons to set up watch timers or record timers. News menu selection News The News menu lets you browse current news stories by headline. 1. Use the up and down arrow buttons to highlight a story. • Use the up and down arrow buttons to browse the list one story at a time.
Using the TV’s Features Messages Occasionally you will receive messages regarding your GUIDE Plus+ system, as well as special programming information. You can access these messages from the Messages menu on the Menu bar. Channels You can customize the channel listing by enabling or disabling the display of certain channels. For instance, you may disable channels that you never watch. Use action buttons to remove, replace or change channels.
Chapter 3: Using the TV’s Features 12:01 ESPN SAP 60 Channel Banner There are several items that might appear on-screen when you press the TV or INFO button on the remote. This display is called the Channel Banner. The following list describes the items on the Channel Banner screen (left to right and top to bottom). 12:01 Displays the current time. 00:00 The lock is displayed to indicate when Parental Controls are locked or unlocked.
Using the TV’s Features Set VCR Channel Displays a list that lets you set up the channel that the TV tunes to when you press the VCR button on the remote. Set DVD Channel Displays a list that lets you select the channel that the TV tunes to when you press the DVD button. Set SAT/CABLE Channel Not available with your remote control. 5. Highlight the choice that matches the way you have the component connected to this TV, and press OK.
Using the TV’s Features Parental Controls and V-Chip The Parental Controls menu allows you to program your TV so that children cannot see certain programs, channels, or use the front panel controls. The first three choices in the Parental Controls menu involve software inside your TV (referred to as V-Chip) which allows you to block TV programs and movies based on violence, sex, or other content you may believe children should not view.
Using the TV’s Features V-Chip TV Rating Limit The V-Chip TV Rating Limit lets you decide which TV programs can and cannot be viewed. To set TV programming limits: 1. Choose Parental Controls from the Main menu. If Parental Controls are locked, you must enter your password. If they are not locked, you will get a message reminding you that your limits will not be effective until you lock Parental Controls. 2. Press MENU to continue. 3. Highlight and select V-Chip TV Rating Limit. 4.
Using the TV’s Features V-CHIP TV RATING LIMIT Rating TV-MA Status VIEW - - Content - - D L S V FV V V V Press ^/v to select rating. Press MENU to exit.
Using the TV’s Features Content Themes D Sexually explicit dialogue L Adult language S Sexual situations V Violence FV Fantasy Violence Blocking Specific Content Themes You can block programs based on their content. (Content is represented by the D, L, S, V, FV and TV-Y on your screen.) When you block a content theme for a particular rating, you automatically block that content theme for higher rated programs as well.
Using the TV’s Features V-CHIP UNRATED PROGRAM BLOCK V-Chip Unrated Program Block This option lets you decide if programs that the V-Chip recognizes as “unrated” can be viewed. “Unrated” TV programs may include news, sports, political, religious, local and weather programs, emergency bulletins, public announcements, and programs without ratings. 1 View 2 Block View All unrated programs are available. Block All unrated programs are not available.
Chapter 4: Using the TV’s Menu System MAIN MENU 1 Audio 2 Picture Quality AUDIO 3 Screen 41Channel Mute 52Time Tone Controls 63Parental Controls Audio Processor 74GUIDE Menu AudioPlus+ Output & Speakers 80Setup Exit 0 Exit Audio Menu Mute Press OK to reduce the TV’s volume to its minimum level. Press OK again to restore the volume. Tone Controls Displays the slider controls for adjusting the TV’s treble, bass and balance.
Using the TV’s Menu System MAIN MENU 1 Audio 2 Picture Quality 3 Screen PICTURE QUALITY 4 Channel 5 1 Time Basic Picture Controls 6 Control 2 Parental Picture Presets 7 Plus+ Menu 3 GUIDE Auto Color 8 4 Setup Color Warmth 0 0 Exit Exit Picture Quality Menu Basic Picture Controls Displays the five slider controls for adjusting the way the picture looks. Contrast Adjusts the difference between the light and dark areas of the picture. Color Adjusts the richness of the color.
Using the TV’s Menu System MAIN MENU 1 Audio 2 Picture Quality 3 Screen 4 Channel SCREEN 5 Time 61Parental ControlDisplay Closed-Caption 72GUIDE Plus+ MenuMode Closed-Caption 83Setup Menu Language 04Exit Picture Tilt Screen Menu Closed-Caption Display Displays a choice list that lets you choose the way closed captioning information is shown on the screen. Off always No captioning information is displayed. On always Captioning information is shown always, when available.
Using the TV’s Menu System Turning off Closed-Caption 1. Select Screen from the Main menu. 2. Press OK to select Closed-Caption Display. 3. Highlight Off Always and press OK. The closed captioning is turned off and you go back to the Screen menu.
Using the TV’s Menu System MAIN MENU 1 Audio 2 Picture Quality 3 Screen 4 Channel 5 Time 6 Parental Control TIME 7 GUIDE Plus+ Menu 8 1 Setup Sleep Timer 0 2 Exit Schedule 3 Set Time 0 Exit 32 Time Menu Sleep Timer Displays a control panel that lets you select the amount of time you want to give the TV before it shuts itself off. Schedule Displays a control panel that lets you set up a schedule for turning the TV on and off automatically. Reminder: you must turn the schedule On.
Chapter 5: Other Information Troubleshooting Most problems you encounter with your TV can be corrected by consulting the following troubleshooting list. Note for U.S. customers: If you prefer, we can provide you with the name of an Authorized Service Representative who will visit your home for a fee to install your electronic entertainment system and to instruct you in its operation. For details about this service, call 1-888-206-3359.
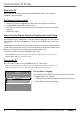
Other Information No sound, picture okay • • • Maybe sound is muted. Press the volume up button to restore sound. Maybe speakers are turned off. Check the Audio Output and Speakers control panel in the Audio menu. Go to page 28 for detailed instructions. If using S-VIDEO cables to connect a component, remember to also connect the component’s left and right Audio Output Jacks to the TV’s R-AUDIO-L INPUT1 Jacks.
Other Information GUIDE Plus+ System Problems GUIDE Plus+ setup won’t switch to channel 9 for VCR and/or channel 02 cable box • • • Make sure you have removed the Demo Pin from the G-LINK jack. Check to see if the G-LINK wands are positioned correctly in front of components’ remote sensors. GUIDE Plus+ system control of cable box is slower than direct control of the box itself. Keep this in mind when changing channels. You may have an incorrect GUIDE Plus+ Channel Lineup.
Other Information Problems with V-Chip/Parental Controls The rating limits don’t work • You must lock the settings. Go to the TV MAIN MENU (press MENU on your remote), select Parental Controls (press 6 on your remote), select Lock Parental Controls (press 6 on your remote). I don’t remember my password and I want to unlock the TV • If you forget your password, simultaneously press and hold MENU on the television and volume down on the remote for 3 seconds.
Other Information Limited Warranty What your warranty covers: • Defects in material or workmanship. For how long after your purchase: • One year from date of purchase for labor charges. • One year from date of purchase for parts. • Two years from date of purchase for picture tube. The warranty period for rental units begins with the first rental or 45 days from date of shipment to the rental firm whichever comes first.
Other Information Product Registration: • Please complete and mail the Product Registration Card packed with your TV or register on-line at www.rca.com/productregistration. It will make it easier to contact you should it ever be necessary. The return of the card is not required for warranty coverage. Limitation of Warranty: • THE WARRANTY STATED ABOVE IS THE ONLY WARRANTY APPLICABLE TO THIS PRODUCT.
Other Information ON OFF DVD VCR TV CH VOL MUTE GO BACK CLEAR MENU OK SKIP PRESETS INFO CC Remote Control This is the remote control that came packed with your TV. Replacements or spares can be ordered as needed. Part No. Price VH81 $3.95 Description Screw-on antenna cable (3-ft) Screw-on antenna cable (6-ft) VH82 $4.95 Push-on antenna cable (6-ft) VH89 $5.95 Monaural VCR Dubbing Cable (6-ft) VH83 $5.95 Stereo VCR Dubbing Cable (6-ft) $9.
This equipment has been tested and found to comply with the limits for a Class B digital device, pursuant to Part 15 of the FCC Rules. These limits are designed to provide reasonable protection against harmful interference in a residential installation. This equipment generates, uses, and can radiate radio frequency energy and, if not installed and used in accordance with the instructions, may cause harmful interference to radio communications.
Téléviseur Guide de l’utilisateur Transforme encore le divertissement.
Information importante AVERTISSEMENT Afin de réduire le risque d’incendie et de choc électrique, ne pas exposer ce produit à la pluie ou l’humidité. ATTENTION RISQUE DE CHOC ÉLECTRIQUE. NE PAS OUVRIR. Attention : Afin de réduire le risque de choc électrique, ne pas enlever le couvercle (ou l’arrière). Ne contient aucune pièce réparable par l’utilisateur. Confiez l’entretien à du personnel qualifié.
Table des matières Chapitre 1: Connexions et réglage Points à prendre en considération avant d’effectuer les connexions ..................... 3 Prévenez les surtensions ..................................................................................3 Protégez vos composants contre la surchauffe ..............................................3 Disposez les câbles correctement pour éviter toute interférence audio ...... 3 Informations de sécurité importantes concernant le support et la base ......
Table des matières Chapitre 3: Utilisation des fonctions du téléviseur À propos du système GUIDE Plus+ ............................................................................. 17 Utilisation du système GUIDE Plus+ ................................................................17 Barre de menus du système GUIDE Plus+ .......................................................17 Grille de programmation .................................................................................18 Tri ..................
Chapitre 1 : Connexions et réglage Points à prendre en considération avant d’effectuer les connexions Prévenez les surtensions • • • Connectez tous les composants avant de brancher leurs cordons d’alimentation dans la prise murale. Éteignez le téléviseur et (ou) le composant avant de connecter ou de déconnecter un câble. Assurez-vous que toutes les antennes et tous les câbles sont mis à la terre correctement. Reportez-vous aux Informations de sécurité importantes, emballées séparément.
Connexions et réglage Tlviseur (panneau arrire) Y R-AUDIO-L PB INPUT2 VIDEO Magntoscope PR INPUT1 VIDEO AUDIO OUT R-AUDIO-L R G-LINK 4 DVD 1D 1C* Pb Pr IN FROM ANT IN S-VIDEO VIDEO R R L R L CH3 CH4 3 1A OUT Y AUDIO OUT 2 L S-VIDEO 1B VIDEO OUT TO TV CABLE/ ANTENNA L Du cble ou de lÕantenne * Si vous connectez un câble S-vidéo, vous devez connecter les câbles audio aux prises INPUT1 AUDIO à l’arrière du téléviseur et non aux prises INPUT2 AUDIO.
Connexions et réglage Explication des prises Cette section décrit les prises que vous pouvez utiliser pour les connexions. Vous pouvez connecter des composants au téléviseur de plusieurs façons. G-LINK Connectez l’extrémité du câble G-LINK (fourni) à cette prise. Le câble G-LINK permet au système GUIDE Plus+ (le guide de programmation interactif) de fonctionner avec votre magnétoscope et (ou) votre câblosélecteur. Vous trouverez une illustration du câble G-LINK à la page 3.
Connexions et réglage L’avant de votre téléviseur Prises d’entrée avant Le téléviseur comporte un ensemble pratique d’entrées audio/vidéo à l’avant. Ces prises sont situées à l’avant du téléviseur, derrière la porte d’accès. Vous pouvez accéder aux composants que vous avez connectés à l’avant de votre téléviseur en appuyant sur la touche INPUT de votre télécommande jusqu’à ce que l’inscription FRNT apparaisse à l’écran. Les prises sont idéales pour l’utilisation d’une console de jeux ou d’un camescope.
Connexions et réglage Utilité de la connexion du câble G-LINK Câble G-LINK Le câble G-LINK permet au système GUIDE Plus+ (le guide de programmation interactif) de fonctionner avec votre magnétoscope et (ou) votre câblosélecteur. Câblosélecteur – Si votre téléviseur est branché à un câblosélecteur, vous devez connecter le câble G-LINK au téléviseur pour recevoir l’horaire télé et pour syntoniser directement un poste lorsque le guide de programmation est affiché à l’écran.
Connexions et réglage Branchement du téléviseur Branchez la fiche du cordon d’alimentation dans une prise murale mise à la terre. Assurez-vous de bien enfoncer la fiche dans la prise. Insertion des piles dans la télécommande • • • Enlevez le couvercle du compartiment à piles se trouvant à l’arrière de la télécommande en le poussant vers le bas et en le glissant. Insérez deux piles « AAA » neuves. Vérifiez si elles sont convenablement installées (+ et -). Replacez le couvercle.
Connexions et réglage RÉGLAGE Voulez-vous que le TV recherche tous les canaux disponibles? 1 Recherche des canaux 2 Passer cette étape Recherche automatique complète de canaux La deuxième partie du RÉGLAGE vous demande si vous voulez que le téléviseur recherche les canaux accessibles. Cette fonction est parfois appelée « auto-programmation ». 1. Appuyez sur OK pour indiquer au téléviseur de rechercher des canaux. Un indicateur de progression s’affiche à l’écran. 2.
Connexions et réglage Étape 3 : Configuration pour un magnétoscope Les écrans qui suivent vous demandent des précisions sur le réglage de votre magnétoscope. Si vous avez connecté un magnétoscope au téléviseur, vous devrez suivre les instructions à l’écran pour sélectionner votre marque de magnétoscope et effectuer un test de système pour que l’enregistrement direct (une seule touche) fonctionne correctement.
Connexions et réglage À quoi s’attendre La prochaine fois que vous allumerez le téléviseur, le système GUIDE Plus+ apparaîtra à l’écran. Les exemples suivants vous expliquent ce que vous pourriez voir : • Si toutes les informations concernant la programmation ont été envoyées à votre téléviseur, le système GUIDE Plus+ apparaît avec tous les horaires d’émissions.
Chapitre 2 : Utilisation de la télécommande Voyant Description des touches pour le mode TV ON OFF DVD VCR TV CH VOL MUTE GO BACK CLEAR MENU OK SKIP PRESETS INFO CC GUIDE 1 2 3 4 5 6 7 8 INPUT REVERSE 0 PLAY 9 ANTENNA FORWARD STOP PAUSE AGAIN ZOOM OPEN CLOSE SPEED SEARCH RECORD Flèches Utilisées pour mettre en surbrillance différents articles du système de menus du téléviseur et régler les commandes dans les menus.
Utilisation de la télécommande OPEN•CLOSE (Ouvrir•Fermer) En mode DVD, ouvre le plateau de disque du lecteur DVD. REVERSE, PLAY, FORWARD, RECORD, STOP, PAUSE (Arrière, Lecture, Avant, Enregistrement, Arrêt, Pause) Si elles sont programmées, commandent l’entraînement de certains magnétoscopes ou lecteurs de disques DVD et compacts télécommandables. SEARCH (Recherche) En mode VCR, accède à la fonction de recherche par index. SPEED (Vitesse) En mode VCR, sélectionne la vitesse d’enregistrement.
Utilisation de la télécommande Utilisation de la recherche automatique du code Les instructions qui suivent peuvent servir à programmer la télécommande pour qu’elle commande chacun de vos composants. Si vous voulez arrêter la fonction de recherche automatique du code sans programmer aucun composant, appuyez sur CLEAR jusqu’à ce que le voyant de la télécommande s’éteigne. 1. Allumez le composant que vous voulez commander (magnétoscope, lecteur DVD). 2.
Utilisation de la télécommande Utilisation de la télécommande une fois programmée Étant donné que cette télécommande universelle peut commander plusieurs composants différents, elle utilise des modes de fonctionnement déclenchés par les touches de composants. Par exemple, si vous voulez que la télécommande commande le téléviseur, appuyez sur la touche TV pour mettre la télécommande en mode TV avant de pouvoir commander le téléviseur. 1.
Utilisation de la télécommande Codes pour magnétoscopes (suite) Mitsubishi ........................... 2029, 2055, 2056, 2065, 2066, 2067, 2068, .......................... 2069, 2070, 2071, 2072, 2073, 2074, 2106, 2113, 2123 Montgomery Ward ................................................................... 2075, 2132 Motorola .................................................................................... 2021, 2132 MTC ...................................................................................
Chapitre 3 : Utilisation des fonctions du téléviseur Fenêtre Options À propos du système GUIDE Plus+ Renseignements du menu Boutons vidéo sur les émissions d’exécution Le système GUIDE Plus+ est un guide de programmation Information de promotion Listes de canaux Nota : Les écrans du GUIDE Plus+ illustrés dans ce manuel représentent ce que vous pourriez voir. Tous les canaux, les programmes et les informations du GUIDE Plus+ illustrés ici ne seront pas disponibles dans votre région.
Utilisation des fonctions du téléviseur Grille de programmation La grille de programmation apparaît chaque fois que vous entrez dans le menu du système GUIDE Plus+. La programmation actuelle de chaque canal y est affichée. L’émission en cours est montrée dans la fenêtre de visualisation. • Appuyez sur les touches à flèche vers le haut ou vers le bas de la télécommande pour parcourir les horaires des canaux et sur les touches de canal vers le haut ou vers le bas pour feuilleter les horaires.
Utilisation des fonctions du téléviseur Tri Tri Le menu de tri Sort vous permet de parcourir les programmes par catégories, comme les sports, les films ou les émissions pour enfants. Utilisez les boutons d’exécution pour régler les minuteurs de surveillance et d’enregistrement. Sélection du menu News Nouvelles Le menu News vous permet de parcourir les dernières nouvelles d’après les titres. 1. Utilisez les touches à flèche vers le haut ou vers le bas pour mettre en surbrillance une nouvelle.
Utilisation des fonctions du téléviseur Messages À l’occasion, vous recevrez un message au sujet de votre système GUIDE Plus+, ainsi que des informations spéciales à propos de la programmation. Vous pouvez accéder à ces messages à partir du menu Messages de la barre de menus. Canaux Vous pouvez personnaliser l’horaire des émissions en activant ou en désactivant l’affichage de certains canaux. Par exemple, vous pouvez désactiver des canaux que vous ne regardez jamais.
Utilisation des fonctions du téléviseur 12:01 ESPN SAP 60 Bannière du canal Plusieurs indicateurs risquent d’apparaître lorsque vous appuyez sur les touches TV ou INFO de la télécommande. Cet affichage est appelé Bannière de canal. La liste suivante décrit les éléments de l’écran Bannière de canal (de gauche à droite et de haut en bas). 12:01 Affiche l’heure actuelle. 00:00 Le cadenas indique que les Contrôles des parents sont verrouillés ou déverrouillés.
Utilisation des fonctions du téléviseur Réglage du canal VCR Affiche une liste de choix qui vous permet de sélectionner le canal syntonisé par le téléviseur à partir de la touche VCR sur la télécommande. Réglage du canal DVD Affiche une liste de choix qui vous permet de sélectionner le canal syntonisé par le téléviseur à partir de la touche DVD. Réglage SAT/CABLE Non disponible sur cette télécommande. 5.
Utilisation des fonctions du téléviseur Contrôle parental et puce V Le menu Contrôles des parents permet de programmer votre téléviseur de façon que les enfants ne puissent pas regarder certains canaux ou certaines émissions, ni utiliser le panneau de commande avant.
Utilisation des fonctions du téléviseur L’écran de limite des catégories TV L’option de limite des catégories TV Limites codes TV vous permet de décider quelles émissions peuvent et ne peuvent pas être regardées. Pour définir les restrictions de programmation télévisée : 1. Sélectionnez Contrôles des parents dans le menu principal. Si les Contrôles des parents sont verrouillés, vous devez introduire votre mot de passe.
Utilisation des fonctions du téléviseur LIMITES CODES TV Code TV-MA - - Contenu - - État VOIR D L S V FV V V V App. sur ^/v p/sélectionner un code. App. sur MENU pour sortir.
Utilisation des fonctions du téléviseur Thèmes D Dialogue sexuel explicite L Langage adulte S Situations à caractère sexuel V Violence FV Violence fictive Blocage de thèmes particuliers Vous pouvez bloquer des émissions d’après leur thème. (Le thème est représenté à l’écran par les lettres D, L, S, V, FV et TV-Y.) Lorsque vous bloquez un thème, dans le cas d’une catégorie d’âge, vous bloquez automatiquement ce thème pour les émissions de catégorie d’âge supérieure.
Utilisation des fonctions du téléviseur BLOCAGE ÉMISS SANS CODE Blocage des émissions sans code Cette option vous permet de décider si les émissions que la puce V reconnaît comme étant « non cotées » peuvent être regardées ou non. Les émissions « non cotées » peuvent inclure les nouvelles, les sports, la politique, la religion, les émissions locales et la météo, les bulletins d’urgence, les déclarations publiques et les émissions qui n’ont pas été classifiées.
Chapitre 4 : Utilisation du système de menus du téléviseur MENU PRINCIPAL TELEVISION 1 Audio 2 Qualité deAUDIO l'image 3 Écran Silence 41Canal Contrôles du timbre 52Horloge Processeur deparents l’audio 63Contrôles des Sortie d’audio et haut-parleurs 74Menu GUIDE Plus+ Sortie 80Réglage 0 Sortie Menu Audio Silence Appuyez sur OK pour réduire le volume du téléviseur au niveau minimal. Appuyez de nouveau sur OK pour rétablir le volume.
Utilisation du système de menus du téléviseur MENU PRINCIPAL TELEVISION 1 Audio 2 Qualité de l'image 3 QUALITÉ Écran DE L'IMAGE 4 Canal 1 Horloge Réglages de l'image 5 6 des 2 Contrôles Préréglages deparents l'image 7 GUIDE Plus+ 3 Menu Ajustement auto. des couleurs 8 4 Réglage Vivacité des couleurs 0 0 Sortie Sortie Menu Qualité de l’image Réglages de l’image Affiche les cinq commandes à glissière pour régler l’image. Contraste Sert à régler la différence entre les zones claires et foncées de l’image.
Utilisation du système de menus du téléviseur MENU PRINCIPAL 1 Audio 2 Qualité de l'image 3 Écran 4 Canal 5 Horloge ÉCRAN 6 Contrôles des parents 1 Sous-titrage 7 Menu GUIDE Plus+ 2 Mode de sous-titrage 8 Réglage 3 Langue des menus 0 Sortie 4 Rotation de l’image 0 Sortie Menu Écran Affichage des sous-titres Affiche une liste vous permettant de choisir le mode d’affichage des sous-titres. Toujours désactivé Aucun sous-titre ne s’affiche.
Utilisation du système de menus du téléviseur Désactiver le sous-titrage 1. Sélectionnez Écran dans le Menu principal. 2. Appuyez sur OK pour sélectionner Affichage du sous-titrage. 3. Mettez Toujours désactivé en surbrillance, puis appuyez sur la touche OK. Le sous-titrage est désactivé et vous revenez au menu Écran. MENU PRINCIPAL 1 Audio 2 Qualité de l'image 3 Écran 4 Canal 5 Horloge 6 Contrôles des parents 71 Menu Plus+ SorteGUIDE de signal 82 Réglage Recherche autom.
Utilisation du système de menus du téléviseur MENU PRINCIPAL TELEVISION 1 Audio 2 Qualité de l'image 3 Écran 4 Canal 5 Horloge 6 Contrôles des parents HORLOGE 7 Menu GUIDE Plus+ 1 Minuteur 8 Réglage 2 Horaire 0 Sortie programmé 3 Réglage de l'heure 0 Sortie 32 Menu Horloge Minuteur Affiche un tableau de commande vous permettant de choisir combien de temps le téléviseur doit fonctionner avant de s’éteindre automatiquement.
Chapitre 5 : Autres informations Dépannage La plupart des problèmes posés par votre téléviseur peuvent être corrigés en consultant la liste de dépannage qui suit. Nota pour les clients des États-Unis : Si vous préférez, nous pouvons vous fournir le nom d’un représentant de service autorisé qui, moyennant des frais, se rendra chez vous pour installer votre système de divertissement électronique et pour vous montrer à l’utiliser. Pour obtenir des détails sur ce service, appelez le 1 888 206-3359.
Autres informations Pas de son, image normale • • • Le son a peut-être été coupé. Appuyez sur la touche du volume vers le haut pour rétablir le son. Les haut-parleurs sont peut-être éteints. Vérifiez le tableau de commande Sortie audio et Haut-parleurs dans le menu Audio. Voyez à la page 28 les instructions détaillées.
Autres informations Problèmes posés par le système GUIDE Plus+ Lors du réglage, le GUIDE Plus+ ne passe pas au canal 9 pour le magnétoscope et (ou) au canal 02 pour le câblosélecteur • • • Vérifiez que vous avez retiré la goupille de démonstration de la prise du câble G-LINK. Vérifiez si les sondes du câble G-LINK sont placées correctement en face des capteurs de télécommande du composant. Le câblosélecteur réagit plus lentement aux commandes du système GUIDE Plus+ qu’aux commandes directes.
Autres informations Problèmes avec les contrôles des parents ou la puce V Les limites de catégories ne fonctionnent pas • Vous devez verrouiller les paramètres. Allez au MENU PRINCIPAL (appuyez sur la touche MENU de votre télécommande), sélectionnez Contrôles des parents (appuyez sur le 6 de votre télécommande), sélectionnez Verr. contrôle parental (appuyez sur le 6 de la télécommande).
Autres informations Garantie limitée Ce que couvre votre garantie : • Les défauts de matériau ou de fabrication. Durée après l’achat : • Un (1) an à partir de la date d’achat pour la main-d’œuvre. • Un (1) an à partir de la date d’achat pour les pièces. • Deux (2) ans à partir de la date d’achat pour le tube à image. La période de garantie pour les appareils loués commence à la première location ou 45 jours après la date d’expédition à l’entreprise de location, la première date prévalant.
Autres informations Enregistrement du produit : • Veuillez remplir et poster la carte d’enregistrement du produit emballée avec votre téléviseur ou vous enregistrer en ligne au www.rca.com/productregistration. Nous pourrons alors vous contacter plus facilement, si nécessaire. Le retour de la carte n’est pas obligatoire aux fins de la garantie. Limitation de la garantie : • LA GARANTIE ÉNONCÉE CI-DESSUS EST LA SEULE GARANTIE APPLICABLE À CE PRODUIT.
Autres informations TV CH VOL MUTE GO BACK CLEAR MENU OK SKIP PRESETS INFO CC GUIDE 1 2 3 4 5 6 7 8 9 INPUT REVERSE 0 PLAY ANTENNA FORWARD STOP PAUSE AGAIN ZOOM OPEN CLOSE SPEED SEARCH RECORD Télécommande C’est la télécommande qui est livrée avec votre téléviseur. Vous pouvez commander des télécommandes de remplacement ou supplémentaires au besoin.
Cet équipement a été soumis à des essais sur prototype et déclaré conforme aux limites stipulées pour un dispositif numérique de classe B, conformément aux spécifications de la partie 15 du Règlement de la FCC. Ce règlement a pour but d’assurer une protection raisonnable contre le brouillage nuisible dans une installation résidentielle.