owner’s manual 200 Watt Stereo Receiver with Remote Control
CONTENTS Introduction .................................................................................................................................................................................... 3 The FCC Wants You To Know ................................................................................................................................................................. 3 Preparation .........................................................................................................
INTRODUCTION Your RCA 200 Watt Stereo Receiver operates as the perfect control center for your audio system. It combines 100 watts-per-channel of clean power with modern styling. It provides connections for one tape deck, a turntable, a CD player, and one other audio source, such as audio from a digital video disk (DVD) player. You can also connect up to two pairs of speakers (not supplied) to your receiver.
Water and Moisture — Do not use this product near water (for example, near a bathtub, washbowl, kitchen sink, or laundry tub; in a wet basement; or near a swimming pool). Accessories — Do not place this product on an unstable cart, stand, tripod, bracket, or table. The product may fall, causing serious injury to a child or adult, and serious damage to the product. Use only with a cart, stand, tripod, bracket, or table recommended by the manufacturer or sold with the product.
PREPARATION Caution: Make all the necessary connections before you plug in or turn on the receiver. Use 16-gauge (or larger) speaker wire for all speaker connections, and consider possible speaker locations before you decide how much speaker wire you need. POSITIONING SPEAKERS Preparing the Speaker Wires Speaker wire consists of two conductors (individual wires) encased in insulation and is usually color-coded or marked with a ridge along one side so you can identify each conductor.
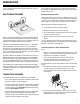
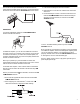
3. Connect the ridged or color-coded conductor’s loose end to the speaker’s positive (+) terminal. CONNECTING THE ANTENNAS 4. Connect the remaining loose conductor to the speaker’s negative (–) terminal. In many areas, the supplied indoor AM loop and FM antennas provide satisfactory reception. AM Antennas CONNECTING PROGRAM SOURCES Note: Use shielded audio cables with phono connectors for all audio connections. You can connect up to four external program sources to your receiver.
You can also use an optional RadioShack shortwave antenna kit, which makes an excellent outdoor AM antenna. Connect the outdoor AM antenna wire to the receiver’s AM ANTENNA terminal as shown. 3. Fold back the shielding from the inner insulation. 4. Remove about 1 inch of the inner insulation from around the center wire. 5. Pull the shielding to one side. Connect the center wire to the receiver’s FM 75Ω Ω ANTENNA terminal.
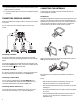
INSTALLING BATTERIES CONNECTING TO AC POWER Cautions: Warning: To prevent electric shock, do not use this polarized plug with an extension cord, receptacle, or other outlet unless you can fully insert the blades to prevent blade exposure. • Use only fresh batteries of the required size and recommended type. • Do not mix old and new batteries, different types of batteries (standard, alkaline, or rechargeable), or rechargeable batteries of different capacities.
OPERATION CD AM PHONO FM TAPE MONITOR TUNING DOWN TUNING MODE TUNING UP AUX VOLUME LOUDNESS BALANCE POWER PHONES SPEAKERS A/B FM MODE PRESET SCAN MEMORY Warning: To prevent possible hearing loss, turn VOLUME to MIN before you turn on the receiver or change the program source. After you turn on the receiver or change the program source, adjust VOLUME to a comfortable listening level.
TUNING THE RADIO Memory Tuning Your receiver has four types of electronic tuning — manual, automatic, direct, and memory. Memory tuning lets you instantly tune to a stored frequency. You can store up to 30 AM and 30 FM frequencies in the receiver’s memory. The receiver automatically stores the first 30 stations found in the selected band into the memory. You can also manually store a station into memory. Note: To listen to stations with weak signals, we recommend manual tuning.
Tuning to a St Station in Memory 1. Press FM or AM on the front panel (or on the remote control) to select the desired band. The receiver tunes to that band and the last selected frequency appears. Note: If CH does not appear on the right side of the display, press TUNING MODE to switch to memory-tuning mode. PRESET briefly appears. 2. Press TUNING UP or DOWN (or PRESET CALL 9 and 8 on the remote control) to tune to the next higher or lower station stored in memory.
TROUBLESHOOTING If the receiver is not working as it should, the following suggestions might help. If you follow the suggestions in this chart and the receiver still does not work properly, contact your local RadioShack store for assistance. Problem Cause Suggestion Power does not turn on. Power cord is disconnected. Plug in the power cord. No sound. Incorrect connections. Check and correct the connections. The mute function is activated. Press MUTING. The volume is turned down.
CARE Keep the receiver dry; if it gets wet, wipe it dry immediately. Use and store the receiver only in normal temperature environments. Handle the receiver carefully; do not drop it. Keep the receiver away from dust and dirt, and wipe it with a damp cloth occasionally to keep it looking new. Modifying or tampering with the receiver’s internal components can cause a malfunction and might invalidate its warranty and void your FCC authorization to operate it.
SPECIFICATIONS Amplifier Power Output ................................................................................................................................................. 100 Watts per Channel into 8 Ohms From 40 to 20,000 Hz, With No More than 0.5% Total Harmonic Distortion Measured Pursuant to the Federal Trade Commission’s Trade Regulation Rule on Amplifier Output Power Claims Input Sensitivity/Impedance: Phono .................................................................................
NOTES 15
Limited Two-Year Warranty This product is warranted by RadioShack against manufacturing defects in material and workmanship under normal use for two (2) years from the date of purchase from RadioShack companyowned stores and authorized RadioShack franchisees and dealers.