
AUDIO/VIDEO RECEIVER User's Guide


Table Of Contents
- Table of Contents
- First Things First
- Operating the Receiver
- Tour of the Receiver
- Programming the Remote
- Programming the Universal Remote
- Programming the Universal Remote to Control a TV
- Programming the Universal Remote to Control a VCR
- Programming the Universal Remote to Control An Audio Component
- Programming the Universal Remote to Control a Cable Box
- Programming the Universal Remote to Control a Laserdisc Player
- Programming the Remote to Control an RCA DSS® Receiver
- Programming the Universal Remote to Control a Satellite
- Programming the AUX Button on the Remote
- Appendix A: Connecting Your Receiver
- Things to Know Before Connecting the Components
- Using the Subwoofer Connections
- Connecting a TV and VCR
- Connecting an RCA DSS® Receiver
- Connecting a Laserdisc Player
- Connecting a Second VCR
- Connecting a Camcorder or Video Camera
- Connecting a Compact Disc Player
- Connecting a Tape Deck or Minidisc Player
- Connecting Antennas
- Connecting Speakers
- Main Speakers
- Rear Speakers
- Center Speaker
- Connecting Speakers to the Receiver
- Connecting The Subwoofer
- Appendix B: Speaker Placement
- Appendix C: Troubleshooting Guide
- Appendix D: Care and Cleaning
- Appendix E: FCC Information
- Appendix F: Limited Warranty
- Appendix G: Equipment Specifications
- Appendix H: Preset Station List Form
- Index
4
First Things First
CABLE
BOX
IN
OUT
OR ANTENNA
L/MONO RIGHT
S-VIDEO
INPUT 1
VIDEO
L/MONO RIGHT
S-VIDEO
INPUT 2
VIDEO
L/MONO RIGHT
INPUT 3
VIDEO
ANT A
SIGNAL
SOURCE
ANT B
L/MONO RIGHT
OUTPUT
BRIDGED
FROM
INPUT 1
VIDEO
L/MONO RIGHTVIDEO
L/MONO RIGHTVIDEO
FIXED
OUTPUT
TV TUNER
OUTPUT
TV
AUDIO
RECEIVER
IN OUT
IN OUT
IN OUT
(MONO)
1
2
VIDEO
SUB WOOFER
OUT
AUDIO
SOURCE
VCR 2/
LD
MONITOR
OUT
CD TAPE/MDTV
VCR 1 DSS
VCR 2/
LD
VCR 1 DSS
AUDIO
AUDIO
L
R
L
R
Step 1: Unpack the Receiver
Unpack the receiver and the accessories. The accessories
packed with the receiver include the RCA Universal Remote
(CRK67A1-224875), four batteries, an AM loop antenna, an
FM wire antenna, and Important Safeguards.
Step 2: Connect the Receiver
Before you plug in and turn on your audio/video receiver,
connect the receiver to the components in your system and
connect the speakers.
The next section shows how to connect the receiver to a TV
only. If you are going to connect the receiver to a TV and
VCR, laserdisc player or other component, see Appendix A:
Connecting the Receiver.
For information on connecting your speakers, see Appendix
A: Connecting the Receiver. For three suggestions on placing
your speakers for the best sound, see Appendix B: Speaker
Placement.
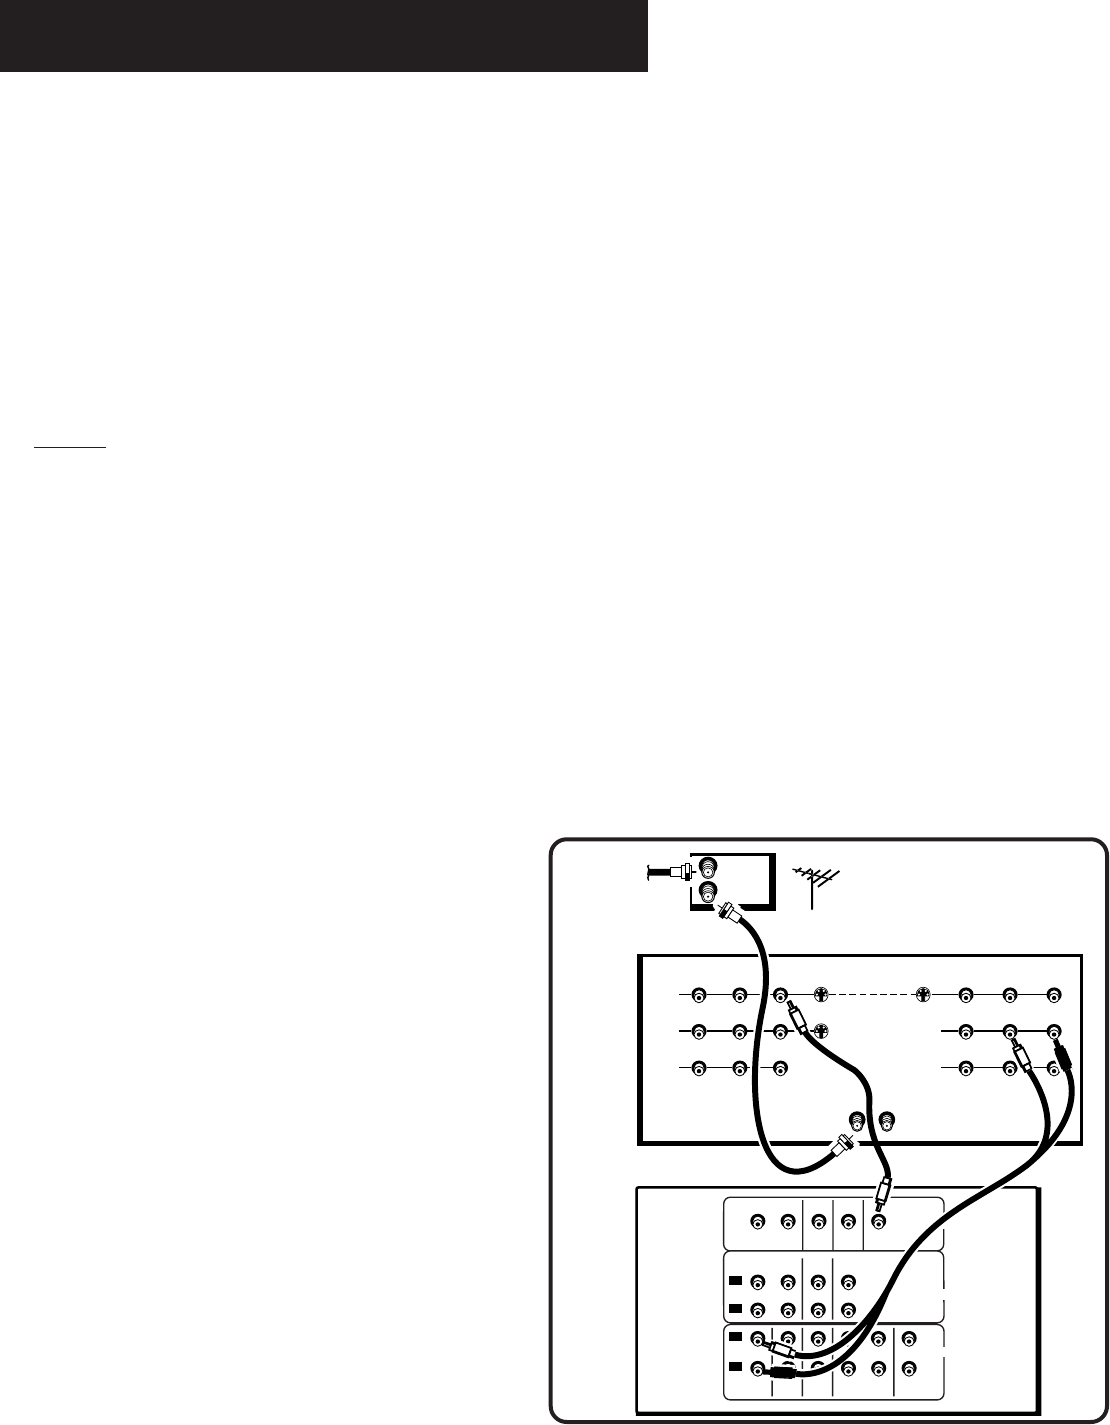
TV Only
Do not plug your TV or VCR into the “switched”
outlet on the back of the receiver.
You will need:
(1) paired (red/white) stereo cable
(1) single (yellow) video cable
(1) coaxial cable.
Connect the cables as shown on the right.