INSTRUCTION MANUAL Before using the TV, please read this manual thoroughly, and retain it for future reference. TV/DVD COMBO @ Model: RTDVD4019 LISTED..
SAFETY PRECAUTION * CAUTION MARKING WAS LOCATED AT THE REAR OF THE APPARATUS, CAUTION NOT 0P DO NOT EXPOSE THIS UNIT TO RAIN OR MOISTURE| AVIS RISQUE DE CHOC ELECTRIC— NE PAS SOUVENIR 'WARNING: TO REDUCE THE RISK OF ELECTRIC SHOCK. DO NOT REMOVE COVER (OR BACK) NO USER SERVICEABLE PARTS INSIDE. REFER SERVICING TG QUALIFIED SERVICE PERSONNEL.
IMPORTANT SAFETY INSTRUCTIONS 1)Read these instructions. 2)Kaep these Instructional. Theodore all warnings. 4)Follow all Instructions. 5)Da not use this apparatus near water. 6)Clean only with a dry cloth. 7)De not block any ventilation openings. Install In accordance with the manufacturer's Instructions. 8Da not Install near any heat sources such as radiators, heat register, stoves, or ‘other apparatus (Including amplifiers) that produces hast.
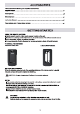
ACCESSORIES Please check and Identify the supplied accessories. Re mots control . Battery(AAA) .. ‘Warranty Cal Instruction Manual Base stand and 4 base stand screws GETTING STARTED USING THE REMOTE CONTROL Point the remote contra at the cremate sensor located an the unit. When there | a strange lambent light source, the performance of the Infrared remote sensor may be degraded, causing unreliable operation. “The recommended detective distance for remote operation Is about 16 feet (5 maters).
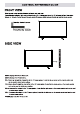
CONTROL REFERENCE GUIDE FRONT VIEW Out remote control working distance and angle, see next page. Power/Standby Indicator: Blue and red dual-color LED. ft shows red when the TV Is muted off and bite when turned on. Re mate Control Riser: Re mate control IR sensor, which receives infrared ray chert by cremate control. Remote Control Sensor Power/Standby Indicator SIDE VIEW INPUT: Displays the Source Select List. MENU: Displays the TV Main Peru. CHa: Sloane up through the channel Ist.
CONTROL REFERENCE GUIDE BACK VIEW EARPHONE:Connect a 3.5mm headphone for personal audio. OPTICAL: Connect to an textual digital audio devices. GABS : Connect an AV device that has composite video jacks, such as a VCR or DVD player. * L: Left audio channel connection. * R: Right audio channel connection. Ypres: Connect a device that has component video jacks,such as a DVD player. HDMI1/2/3: Select HDMI1/HDMI2/HDMI3 source Input. VGA: Conn act a computer to these cask.
WALL MOUNT INSTALLATION INSTALLING / REMOVING THE BASE STAND WARNING : The LED Display Is very fragile , and must be protected mealtimes when removing the base Stand Be sure that no hard or sharp object or anything that could scratch or damage the LED display comes into contact with It Do NOT exert pressure on the grant of the unit at any teems because the screen could crack. 1. Disconnected cables or cords connected to the unit.
Installation Your TV is packaged with the stand and the cabinet separated. Before using the TV, install the stand as described below, or if you want to mount it to a wall, see page 7 for mounting advice; the wall mount itself is not supplied. IMPORTANT! * Make sure the TV set is unplugged from the power supply before installing or removing the stand. * The TV panel may be awkward to install on your own. We recommend you ask someone to help with installation and/or removal of the stand.
CONNECTIONS CONNECTING ATV ANTENNA / CABLE / SATELLITE To view television channels correctly, a signal must bereave from one of the following sources: -Rosalinda outdoor aerial antenna A cable system -Satellite system NOTE For receiving over-the-air TV broadcasts, we recommend that you use an external fixed antenna. Should you require the use of a temporary antenna, pleas ensure that you purchase an antenna with sufficlentabllity to relevance In weak signal areas.
CONNECTIONS Connection to a Home Theater Audio System For BEST audio performance Connecting to a Home Theater System Dolby Digital can sliver optimal 2 channel stereo or surround sound with flee discrete full range channels plus a sixth channel for a sub woofer. En Joy optimal sound reproduction from your system with a Dolby Digital amplifier that incorporates a digital coaxial input. Connect an optional digital cable directly to the television’s COAX audio output to listen through all inputs except VGA.
INITIAL SETUP PUTTING THE UNIT ON PROPER PLACE When you turn on your television set for the first time, be sure to place it on a solid stable surface. To avoid danger, do not expose the TV to water, or a heat source {e.g.lamp, candle, radiator). Do not obstruct the ventilation grid at the rear and be sure to leave sufficient gaps around the unit. TURNING THE UNIT ON FOR THE FIRST TIME After you have initially connected your TV antenna or cable, turn the television ON. .
SETUP CHANNEL MENU Press MENU button to display the main menu. Press
SETUP PICTURE MENU Press MENU button to display the man menu. Press
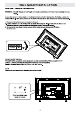
SETUP SOUND MENU Press MENU button to display the main menu. Press > button to select SOUND in the main menu, it will highlight the first option. Star English TPV R POM E ST 14 AVL [ SOUND MODE Allow the selection of an audio-enhancement technique: Standard/Music/Movie/Usar/Sports. Alternative: you may press the S.MODE button to select the sound made directly. TREBLE Control the relative intensity of higher-pitched sounds. (For User mode) BASS Control the relative Intensity of lower-cliched sounds.
MEETUP TIME MENU Crass MERE bunion to display the main menu. Press 4 / b button to select TIRE in the main manumit will highlight the first option. Sines Timor Tami Zola s el 12-hair Gl G Clonk S SLEEP TIMER This timer automatically lures off the TV at the designated teems. TIME ZONE This option adjusts the global time zone for the TV, DAYLIGHT SAVING TIME This option toggles tha daylight saving time features.
SETUP SETUP MENU Press MENU button to display the main menu. Press
SETUP LOCK MENU Crass MENU button to display the main menu. Press « / button to select LOCK in the main menu,it will highlight the first option. Press for the lock password. ey System Lock Input Block I3 [ LUt Reset RRT CHANGE PASSWORD This opulent allows you to change the LOCK menu password. KEY LOCK Press « / » button to select On/Off. When Key lock mode is On, you can’t use the key pane! buttons. SYSTEM LOCK This option enables parental locking and filtering for the TV.
DVD OPERATIONS 1. Huw to ante DVD mode Press INPUT bunion on remote control, select “DVD” In the Source Select menu (see page 7), then press QK or it arrow to entrust DVD mode. The DVD wil start playing automatically i here s a disk in DVD module. 1f nt, the TV wil diapason a standby screen &s shown. And a “No Disc” message i appear on screen Nos: Tha TV wil tum to DVD mods automatically when you Insert a disk, o attar which mods R s now. 2.
DISPLAY MODE PC FORMATS SUPPORTED PC INPUT MODE Horizontal Vertical Resolution |ScanningFrequency | Scanning Frequency Format (KHz) [GE) 640 X 480 31.5 60.0 DoS 800 X 600 35.1 56.2 VASE 800 X 800 378 60.0 VASE 1024 X 768 48.4 60.0 VASE 1366 X 768 49.0 60.0 VASE 1920 x 1080 67.5 60.0 VASE NOTE: This product does not support the display mode not listed above. In ardor to achieve the best display effect, pleads select the above-listed 5 display modes Input signal.
DISPLAY MODE VIDEO FORMATS SUPPORTED COMPONENT / HDMI INPUT MODE Horizontal Vertical Resolution |Scanning Frequency Scanning Frequency Format ( KHz) {Hz) 720 X 480 15.73 59. 94 480i 720 X 480 31.5 59. 94 480p 1280 X 720 45 80 720p 1920 x 1080 33.75 80 10801 1920 x 1080 27 24 1080 p 1920 X 1080 6750 60 1080 p NOTE: The above listed formats are also related to the AV devices you are about to connect.
TROUBLESHOOTING GUIDE SYMPTOM v Bad Picture {show, multiple images distortion, blurry) No sound. Black and White pic hire. No picture or sound. Multicolored pic hire. Anal function key does nat respond correctly. The display monitor's panel goes hot. Unusual dots Stripes on screen The top of the monitor gets hot Unable to celesta channelization. Disorder display powerboat. CAUSE (AND REMEDY ) « Check tha location of the antenna and adjust it if necessary. « Make sure the antenna cable Is firmly connected.
MANUEL D'UTILISATION Avant d'utiliser le TV,veuillez lire attentivement ce manuel et le conserver pour référence ultérieure.
Installation Votre téléviseur est livré avec le support et I'appareil séparés. Avant d'utiliser le téléviseur, installez le ‘support tel que décrit là-dessous, ou sl vous voulez le monter sur un mur, consultez la page 7 pour les. conseils de montage. Le support mural n'est pas fournil avec le téléviseur. IMPORTANT 1 + Débranchez toujours le téléviseur de I'alimentation électrique avant d'installer ou de retirer le support. * Installation du téléviseur peut être difficile & réaliser seul.
RÉGLAGE INITIAL DU serviteur MENU IMAGE Appuyez sur ls bouton MENU pour afficher le menu principal. Appuyez sur la touche < / > pour sélectionner IMAGE dans le menu principal, il mettra I'accent sur la première option. Brightismes [T Colo Tint Ll Colo Température < Redevance Meetings @ select CADRE DE I'IMAGE Cette fonction permet de modifier différents modes de couleur du téléviseur. BRILLANTE Quetta fonction modifie détalle de 'mage dans des couleurs sombres.
RÉGLAGE INITIAL DU serviteur MENU TEMPS Appuyez sur ls bouton MENU pour afficher le menu principal. Appuyez sur 4 / » pour sélectionner HEURE dans le menu principal, il mettra I'accent sur la première option. Tim Zone 200 LRt LTS an Glock HORLOGE SOMMEIL Cette minuterie coupe automatiquement le téléviseur hors tenson & I'heure prévue. ITEM ZONE Cette option permet d'ajuster le fuseau horaire mondial pour ls téléviseur. L'HEURE D’ÉTÉ Natte option active ou désactive la fonction heure d'été.
RÉGLAGE INITIAL DU serviteur MENU DE RÉGLAGE Appuyez sur le bouton MENU pour afficher le menu principal. Appuyez sural touche pour sélectionna SEPTUPLE dans le menu principal, Il mettra l'accent sural première option. L 08D Toutim IR Ver cancan Input Gabe! Mons 2 LR LANGUE Cette option mediums la langue du menu OSD du téléviseur. TRANSPARENT Cette option modifie la transparence du menu permettant de fond des images ds télévision de montrer & travers.
RÉGLAGE INITIAL DU serviteur MENU SERRURE Appuyez sur le bouton MENU pour afficher ls menu principal. Appuyez sur « / P pour sélectionner LOCO dans le menu principal, il mettra accent sur la première option. Appuyez sur pour ls mot de pacs de verrouillage. [y R R Input Black US Rating Canada Rating Select CHANGER MOT DE PASSE Cette option vous permet de modifier e mot de pacs du menu LOCO. SERRURE A GLE Appuyez sur le bouton « / B pour sélectionner on / off.
FONCTIONNEMENT DU DVD 1.Comment accéder au mode DVD ? Appuyez sur la bouton INPUT de la télécommandes, sélectionnez « DVD » dans le menu Source Sélect (voir page 7), puis appuyez sur OK ou sur |a flache directionnelle droite pour accéder au mode DVD. Le DVD commencera 3 jouer automatiquement s'il y a un disque dans le module & DVD. Sinon, la télévision affichera un écran de veille tel que illustratrice. Elle message « No Fisc » sera affiché & Scriban.
FORMATS VIDÉO MODE D'AFFICHAGE Mode D’entrée Pour Le Support Du COMPOSENT / HDMI . Fréquence De Fréquence De Résolution San Horizontale San Verticale Format ( KHz) {Hz) 720 x 480 15.73 59.94 480i 720 X 480 315 59.94 480p 1280 X 720 45 60 720p 1920 x 1080 33.75 80 1080i 1920 x 1080 27 24 1080 p 1920 x 1080 67. 50 80 1080 p REMARQUE : Les formats listés ci-dessus dépendent aussi des dispositif AV qus vous y connectés.