
Instruction Manual


7
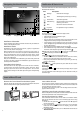
Connections
Micro-USB
$POOFDUZPVSVOJUUPB1$PSB64#TUPSBHFEFWJDFXJUIB64#DBCMF
OPUJODMVEFEBOE64#DPOWFSUFSDBCMFJODMVEFEUPUSBOTGFSNVTJD
pictures and other files in both directions.
Notes:
t 5PDIBOHFZPVSVOJUT64#DPOOFDUJPOPQUJPOTZPVTIPVMEHPUP
Settings > DEVICE > Storage, and tap Menu icon
at the upper
right corner. Then tap USB computer connection to enter to
setup.
t 5IFVOJUDBOCFDPOOFDUFEUPBLFZCPBSEBNPVTFPSPUIFSJOQVU
EFWJDFTWJBB64#DBCMFBOEVTFJUKVTUBTZPVXPVMEDPOOFDUXJUI
B1$
Micro SD
Remove the rubber cover on the side of screen and insert the micro
4%DBSEJOUPUIFVOJUT.JDSP4%TMPUVOUJMJUDMJDLT
5PDIFDLUIFTUPSBHFPGUIFNJDSP4%DBSEHPUP
Settings > DEVICE > Storage
3FNPWFUIF NJDSP4% DBSECZQVTIJOH JO POUIFDBSEhTFEHF5IF
card will pop out and can be removed.
Notes:
t :PVDBOVTF NJDSP4%
5.
DBSEBOE NJDSP4%)$
5.
DBSEVQ UP(#
4%DBSEOPUJODMVEFE
t /FWFSSFNPWFPSJOTFSUNJDSP4%DBSEJO0ONPEF
Micro-HDMI
$POOFDUZPVSVOJUUPB57PSPUIFSEJTQMBZEFWJDFXJUIB)%.*DBCMF
OPU JODMVEFE BOE )%.*DPOWFSUFS DBCMFJODMVEFEUPPVUQVU UIF
video.
Notes:
t 5PDIBOHFZPVSVOJUT)%.*PQUJPOTZPVTIPVMEHPUP
Settings > HDMI > to modify each setting.
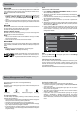
8J'J
$POOFDUUPB8J'J/FUXPSL
1. Go to Settings > WIRELESS & NETWORKS > Wi-Fi, and slide the
8J'JTXJUDIUPUIF0/QPTJUJPO
5IFEFWJDFXJMMTDBO8J'JOFUXPSLTBVUPNBUJDBMMZBOEEJTQMBZUIF
available names.
t *GUIFEFWJDFGJOETBOFUXPSLUIBUZPVDPOOFDUFEUPQSFWJPVTMZJU
will connect to it automatically.
3. Tap a network name to connect to it, and enter a password if
necessary.
"MUFSOBUJWFMZJGZPVS8J'JSPVUFSTVQQPSUT8J'J1SPUFDUFE4FUVQ
UBQUIF814JDPO
at the top of the screen, and then press the
814CVUUPOPOZPVSSPVUFS
*GZPVS OFUXPSLEPFTOPU CSPBEDBTU JUT 44*%UBQUIF1MVT JDPO
+BUUIF UPQ PGUIFTDSFFO BOEFOUFSUIF/FUXPSL44*% OBNF
of the network. If necessary, enter security or other network
configuration details.
71/7JSUVBM1SJWBUF/FUXPSL
:PV DBODSFBUF WJSUVBMQSJWBUF OFUXPSL 71/ BOEDPOOFDUUPZPVS
private network securely through a public network, such as the
JOUFSOFU:PVNVTUTFUBMPDLTDSFFO1*/PSQBTTXPSECFGPSFZPVDBO
use credential storage.
"EE71/OFUXPSLBOEGPMMPXUIFJOTUSVDUJPOTPOUIFTDSFFO
)%.* UIF)%.* MPHPBOE )JHI%FGJOJUJPO
.VMUJNFEJB *OUFS GBDF BSF USBEFNBS LT PS
SFHJTUFSFEUSBEFNBSLTPG)%.*-JDFOTJOH--$
Note:
you can tap Menu icon
at the upper right corner in the Settings
screen for advanced settings.
#BUUFSZ.BOBHFNFOUBOE$IBSHJOH
1SPMPOHUIF#BUUFSZ-JGF
)FSFBSFTPNFUJQTGPSIPXUPQSPMPOHUIFMJGFPGUIFCBUUFSZ
t *GZPVBSFOUVTJOH8J'JHPUP4FUUJOHT8*3&-&44/&5803,4
8J'JUVSOJUPõ
t %POU MFBWF UIF .BQT PS /BWJHBUJPO BQQT PQFO PO UIF TDSFFO
when you’re not using them.
t 5VSO EPXOTDSFFOCSJHIUOFTT BOE TFUBTIPSUFS TDSFFOUJNFPVU
4FUUJOHT%&7*$&%JTQMBZ
t *G ZPV EPOU OFFE JU UVSO Põ BVUPNBUJD TZODJOH GPS BMM BQQT
4FUUJOHT "$$06/54 <(PPHMF BDDPVOUOBNF> 5IJT NFBOT
you need to sync manually to collect messages, email, and other
recent information, and won’t receive notifications when updates
occur.
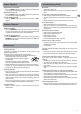
The control panel has a built-in rechargeable battery.
#BUUFSZ*DPO
The battery icon in the upper-right corner shows the battery level or
charging status.
$IBSHJOHUIF#BUUFSZ
In order to keep the battery working in best condition, please pay
attention to the following:
t 1MFBTFJOTUBMMUIJTDPOUSPMQBOFMUPUIF.VTJD4ZTUFNUPDIBSHFUIF
CBUUFSZBOENBLFTVSFUIFTZTUFNJTQPXFS0/
t 1MFBTFEPOPUDIBSHFUIFCBUUFSZJOIJHIUFNQFSBUVSFT
t %POPUXBJUGPSUIFCBUUFSZUPCFGVMMZEFQMFUFECFGPSFDIBSHJOH
BHBJO,FFQUIFCBUUFSZDIBSHFEBTOFFEFE
t *GDPOUSPMQBOFMIBTOPUCFFOVTFEGPSBMPOHQFSJPEPGUJNFUIF
battery might be in over discharge protection mode and may take
longer to charge.
'VMMCBUUFSZ -PXCBUUFSZ Need to be charged Charging
Settings
WIRELESS & NETWORKS
Wi-Fi
Bluetooth
More...
DEVICE
ScreenshotSetting
Storage
Battery
Hdmi
Sound
Display
6:14
ON
OFF
CoffeeShopWF
WPS available
MyHomeWF
Connected
EN