(Model L26WD26D shown) reality: reproduced. LCD Users Guide Connections ............page 7 Menus ....................page 29 Remote ............ page 17 FAQs ............... page 36 Playing Discs ........ page 19 Warranty ...............
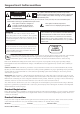
Important Information CAUTION RISK OF ELECTRIC SHOCK DO NOT OPEN This symbol indicates that this product incorporates double insulation between hazardous mains voltage and user accessible parts. When servicing use only identical replacement parts. Caution: To reduce the risk of electric shock, do not remove cover (or back). No user serviceable parts inside. Refer servicing to qualified service personnel.
Important Information Important Safety Instructions Important Safety Instructions 1. Read these instructions. 2. Keep these instructions. 3. Heed all warnings. 4. Follow all instructions. 5. Do not use this apparatus near water. 6. Clean only with dry cloth. 7. Do not block any ventilation openings. Install in accordance with the manufacturer’s instructions. 8.
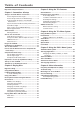
Table of Contents Important Safety Instructions ....................................... i Chapter 3: Using the TV's Features Chapter 1: Connections & Setup Channel Banner ........................................................... 25 Parental Controls and V-Chip ..................................... 25 How V-Chip Works ................................................ 26 Lock/Unlock Parental Controls ............................ 26 US V-Chip TV Ratings ............................................
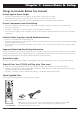
Chapter 1: Connections & Setup Things to Consider Before You Connect Protect Against Power Surges • • Connect all components before you plug any of their power cords into the wall outlet. Turn off the TV/DVD and/or component before you connect or disconnect any cables. • Make sure all antennas and cables are properly grounded. Refer to the Important Safety Instructions. Protect Components from Overheating • • • • Don’t block ventilation holes on any of the components.
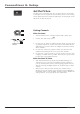
Connections & Setup Get the Picture ANT The first part of connecting your TV is to get the picture, also known as the signal. The back panel of your TV allows you to receive analog and/or digital channels by using the ANT Input. See the graphic to the left for the location of the jack. Getting Channels What You Need Coaxial cable • • Antenna ("rabbit ears") or outdoor antenna with coaxial cable OR Coaxial cable with cable service or Outdoor or Indoor antenna A.
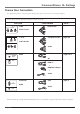
Connections & Setup Choose Your Connection For additional assistance while using your RCA product, please visit www.rca.com/customersupport. There are several ways to connect your TV. Please use the following chart to determine which connection is best for you. Proceed to the appropriate page and connect your TV. Jacks Used Video VIDEO AUDIO L Cables Needed Go to...
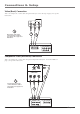
Connections & Setup Video (Basic) Connection This is an example of a connection using the Video jack. Go to the top of page 9 for specific instructions. L VIDEO AUDIO R (MONO) 1 Don't forget: If necessary, connect antenna or cable to get a picture. Go to page 6 for instructions. 2 OUTPUT 3 VIDEO INPUT L AUDIO R S-VIDEO L AUDIO VIDEO R COMPONENT VIDEO Y Pb Pr L AUDIO R S-VIDEO Component Video (Advanced) Connection This is an example of a connection using the Component Video jacks.
Connections & Setup Red Yellow White Composite cables are color coded- Yellow= video; Red= right audio; white= left audio Connecting the Device with Video (Basic) This connection allows you to connect a device that has a Video Out jack, for example, a satellite receiver. Note: If the device you're connecting also has Component Video jacks and you have component video cables, we recommend you use the Component Video (Advanced) Connection instead. See instructions below.
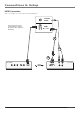
Connections & Setup HDMI Connection This is an example of a connection using the HDMI jack. PC/HDMI AUDIO *Don't forget: If necessary, connect antenna or cable to get a picture. Go to page 6 for instructions.
Connections & Setup Connecting the Device High-Definition Multimedia Interface (HDMI) technology is an uncompressed digital connection that carries both video and audio data by way of an integrated mini-plug cable. Since HDMI technology is based on Digital Visual Interface (DVI), the jack on the back of your TV/DVD is also compatible with devices that have a DVI output jack. Using the example of a set-top box: • If your set-top box has an HDMI jack, connect an HDMI cable.
Connections & Setup PC Connection This is an example of a connection using the PC jacks. PC MONITOR PC/HDMI AUDIO 1 2 Don't forget: If necessary, connect antenna or cable to get a picture. Go to page 6 for instructions. 3 Connecting the Device This connection allows you to connect to a personal computer. 1. If necessary, connect your cable and/or off-air antenna as described on page 6. 2. Connect your monitor cable.
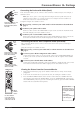
Connections & Setup Plug in the TV/DVD Plug the end of the power cord into the back of the TV/DVD. Plug the other end into a grounded wall outlet. Insert the plug completely into the outlet. Do not plug into an outlet controlled by a light switch. Put Batteries in the Remote • Remove the battery compartment cover from the back of the remote by pushing the tab and lifting off the cover. • Insert two fresh batteries. Make sure the polarities (+ and -) are aligned correctly. • Replace the cover.
Connections & Setup Complete the Initial Setup The menu system in your TV allows the TV’s features to work properly. You need to set up a few things first before using your TV/DVD. Set the Menu Language Press the SETUP/TV MENU button on the remote. With the SETUP icon ( ) highlighted, press the down arrow button. SETUP LANGUAGE ENGLISH ENGLISH/FRANÇAIS/ESPAÑOL TV/CABLE CABLE AUTO CH MEMORY ADD/DELETE :SELECT If English is your preferred language, press the down arrow button to continue to the next step.
Connections & Setup Explanation of Jacks (in alphabetical order) This section describes the jacks on the back panel of your TV. There are several ways to connect devices. ANT INPUT Lets you connect a coaxial cable to receive the signal from your antenna, cable, or cable box. AUDIO/VIDEO INPUT 1 Lets you connect a device that has composite video jacks, such as a VCR. VIDEO AUDIO L R (MONO) L AUDIO R • L AUDIO Provides left audio connection when using the VIDEO INPUT 1 jack.
Connections & Setup The Top of Your TV/DVD If you cannot locate your remote, you can use the top panel buttons of your TV/DVD to operate many of the TV/DVD’s features. PLAY Begins disc play. STOP Stops disc play. SKIP Skips a disc forward or backward. EJECT Removes the disc. VOLUME – Decreases the volume. In the menu system, acts like the left arrow button on the remote control and adjusts menu controls. VOLUME + Increases the volume.
Connections & Setup The Buttons on the Remote Control POWER DISPLAY Arrows Used to highlight different items in the TV menu and to adjust the menu controls. TV/DVD VOL 1 2 3 (0-9) Number Buttons Enter channel numbers and parental control password directly through the remote control. ANGLE 4 6 5 MUTE 7 8 9 SLEEP SETUP/ TV MENU 0 DVD MENU ENTER DVD MENU In DVD mode, displays the DVD disc’s menu. Eject ( Removes the disc.
Connections & Setup SLEEP Sets the TV to turn off after a set time. The time increases in 10 minute increments and goes up to 2 hours. SLOW In DVD mode, plays a disc in forward or backward slow motion. STOP In DVD mode, stops a disc. SUBTITLE In DVD mode, displays the available subtitles. TOP MENU While playing a JPEG file, press to return to the folder selection menu. TV/DVD Switches between TV and DVD mode. VOL + or VOL – Increases or decreases or the TV/DVD’s volume.
Chapter 2: Playing Discs Regional Coding Both the TV/DVD unit and the discs are coded by region. These regional codes must match in order for the disc to play. If the codes don’t match, the disc won’t play. This unit’s code is region 1. Using Different Menus Each disc is programmed with different features. There are three separate menu paths that you can use to access features: • The Disc menu – The disc menu is part of each disc and is separate from the DVD’s menu system.
Playing Discs Using a Disc Menu A disc is capable of having an on-screen menu that is separate from the DVD’s menu system. The disc menu might only contain a list of the titles and chapters, or it may allow you to change features such as language and playback settings. To access the disc menu, while the disc is loaded, press the DVD MENU button. The content and operation of disc menus vary from disc to disc.
Playing Discs Disc Features To see the Info Display, press the DISPLAY button on the remote while a disc is playing. The Info Display appears across the top of the screen. To make the Info Display disappear from the screen, press DISPLAY on the remote. DVD Disc Info Display Disc Operation Time Display Total Time Title Chapter Angle Audio Language Jump Audio Type Subtitles Using the Jump Feature For DVD discs, the feature displays title, chapter or time you can go to.
Playing Discs Changing the Audio Language If the disc was created with different language tracks (recorded in different languages), you can temporarily change the DVD’s Audio Language setting. 1. While a disc is playing, press the AUDIO button on the remote. 2. Repeatedly press the AUDIO button to scroll through the languages that are available on the disc. The language you selected plays after a few moments. Notes: The language feature only works if the disc was created with multiple audio tracks.
Playing Discs Changing the Camera Angle Some discs contain multiple angles of a particular scene or sequence. If the disc only has one angle, this feature won’t work. To change the camera angle: 1. While a disc is playing, press the ANGLE button on the remote. The number of angles available are displayed. For example, if there are 3 different angles, the display will read 1/3. This means angle 1 is currently being played. 2. Repeatedly press the ANGLE button to scroll through the camera angle choices.
Playing Discs Playing Other Music and JPEG Files The TV/DVD can play mp3 files, Windows Media-formatted content and JPEG files. Music Files 1/15 00:00:00 /MP3-5.MP3 MP3-5 MP3-6 WMA-11 WMA-12 Picture-1 Picture-2 Picture-3 Picture-4 Select Files Repeat :Off Mode :Off Music Playing mp3 is an audio file format which compresses recorded music. It was developed by Fraunhofer Gesellschaft in collaboration with Thomson Inc.
Chapter 3: Using the TV's Features Channel Banner There are several indicators that might appear when you press the DISPLAY button on the remote. This display is called the Channel Banner. The following list describes the items on the Channel Banner screen (left to right and top to bottom).
Using the TV’s Features How V-Chip Works V-Chip reads the program’s age-based rating (TV-MA, TV-14, etc.) and content themes [(Violence (V), Adult Language (L), etc.)]. If you have blocked the rating and/or content themes that the program contains, you will receive the message This program has been blocked! TV-14 exceeds set limits. Push MUTE to enter password.
Using the TV’s Features Blocking Specific Content Themes You can block programs based on their content, for example, violence. When you block a content theme for a particular rating, you automatically block that content theme for higher rated programs as well. To block program content: 1. Determine the content themes you want to block. Go to the LOCKS menu and select VChip Set. 2. Press the right arrow button to scroll to the rating whose content theme you want to change and press DISPLAY. 3.
Using the TV’s Features Additional Features There are additional features available unrelated to Parental Controls. Picture Processing With a focus on exceptional picture performance, all RCA models feature Enhanced Natural Vision (EN-V). EN-V picture processing is designed to provide enhanced color and contrast giving you a bright, crisp picture. Go to page 29 to adjust picture settings. Screen Formats Screen format is the way the picture is displayed on your TV.
Chapter 4: Using the TV's Menu System Using the Menu System SETUP LANGUAGE ENGLISH ENGLISH/FRANÇAIS/ESPAÑOL TV/CABLE CABLE AUTO CH MEMORY ADD/DELETE :SELECT :ADJUST This section explores the menus of your TV. Each menu is outlined and detailed to help you get the most from your TV. The Parental control menu is discussed in the Features chapter. To access the menu system: 1. Press the SETUP/TV MENU button. 2. Use the left and right arrow buttons to highlight an option.
Using the TV's Menu System Additional Options in PC Mode The Picture menu in PC mode contains some additional menu options. PICTURE BRIGHTNESS CONTRAST HOR POSITION VER POSITION PHASE CLOCK :SELECT Hor Position Adjusts the picture's position left or right. 25 50 25 25 25 0 Ver Position Adjusts the picture's position upward or downward. Phase Adjusts the picture if there is flicker of screen letters, color misalignment, or blurring. :ADJUST Clock Adjusts the clock sync of the picture.
Using the TV's Menu System Setup Menu SETUP LANGUAGE ENGLISH TV/CABLE AUTO CH MEMORY ADD/DELETE CABLE :SELECT :ADJUST The SETUP menu ( ) lets you configure the TV to fit its surroundings and your preferences. To access the Setup menu, press MENU on the remote, and then select the Setup icon from the Main Menu. Language Allows you to change the language of the menu system. TV/Cable INPUT.
Using the TV's Menu System SETUP PICTURE SIZE PICTURE SCROLL CINEMA MODE ASPECT SIGNAL METER AUTO SHUT OFF :SELECT FILM O FF O FF :ADJUST Picture Size Allows you to change the format of the screen. If there are bars on-screen try a different format, if available, that may eliminate the bars. Choose between Natural, Cinema Wide1, Cinema Wide2, Cinema Wide3, and Full. Go to page 28 for more information on changing the picture size.
Chapter 5: Using the DVD's Menu System The DVD’s Menu System The DVD’s menu system is not the same as the disc menu or the Info Display. The DVD’s main menu comes up when there is no disc playing. If you are playing a disc, press STOP on the remote control to stop playback and bring up the DVD’s main menu. Menu : English Subtitle : English Audio : English The Languages Menu The Languages menu enables you to choose different language options for DVD audio, subtitles, Disc Menu items.
Using the DVD's Menu System Display The default is to show all on-screen displays. To turn the option off, press the down arrow to highlight Display, then press ENTER. Press the up or down arrow to highlight Off and press ENTER. Picture Mode There are two types of picture content recorded on DVD discs- Film (pictures recorded from films at 24 frames per second) and Video (video signals recorded at 30 frames per second).
Using the DVD's Menu System The Language Code List Enter the appropriate code number for the Menu, Subtitle, and Audio DVD language menu options.
Chapter 6: Other Information Frequently Asked Questions (FAQs) What’s the quickest way to view High Definition (HD) content? Connect an off-air antenna to the ANT Input to view free local digital channels where available. You might need to purchase an antenna. Go to page 6 for more information. Visit www.antennaweb.org to get help deciding what type of antenna to use to receive the local digital channels available to you.
Other Information Troubleshooting Most problems with your TV/DVD can be corrected by consulting the following troubleshooting list. Note for U.S. customers: If you prefer, we can provide you with the name of an Authorized Service Representative who will visit your home for a fee to install your electronic entertainment system and to instruct you in its operation. For details about this service, call 1-888-206-3359. For additional assistance while using your RCA product, please visit www.rca.
Other Information The menu is displayed in a foreign language • The Menu Language preference is set to that language. From the DVD’s main menu, select the Languages option (first item option in the DVD menu). From the Languages menu, select the Menu option (first item in the menu). Highlight the language you prefer and press OK. No forward or reverse scan • Some discs have sections that prohibit rapid scanning, or title and chapter skip.
Other Information Noisy stereo reception • The station might be weak. Access the Audio menu, highlight MTS and then choose Mono. No picture, no sound but TV is on • The channel might be empty — change channels. • If you’re watching your VCR and it’s connected with coaxial cable to the ANT jack, tune the TV to channel 3 or 4 (whichever channel is selected on the 3/4 switch on the back of your VCR).
Other Information Mounting Your TV to the Wall Caution: The wall mount must bear a minimum of five times the TV’s net weight without causing damage. L26WD26D base To mount your TV to the wall you need to purchase a VESA wall mount. For model L26WD26D, purchase a VESA 100 x 100, M4; and for model L32WD26D, purchase a VESA 200 x 200, M6 (100 x 100, for example, means the mounting measurements are 100mm horizontally and 100mm vertically; M4 is the type of screw that needs to be used). 1.
Other Information Cleaning Discs • • • Dirty discs can cause reduced video and audio performance. Always keep discs clean by wiping them gently with a soft cloth from the inner edge toward the outer perimeter. If a disc becomes very dirty, wet a soft cloth in water, wring it out well. Wipe the dirt away gently, and remove any water drops with a dry cloth. Do not use record-cleaning sprays or anti-static agents on discs.
Other Information Limited Warranty What your warranty covers: • Defects in materials or workmanship to the first consumer purchaser. For how long after your purchase: • 90 days from date of purchase for labor charges for screen sizes 32” and smaller. One year from date of purchase for labor charges for screen sizes larger than 32”. At our option, we will either pay an Authorized RCA Service Center the labor to repair your television or replace your television with a new or refurbished unit.
Other Information • REPAIR OR REPLACEMENT AS PROVIDED UNDER THIS WARRANTY IS THE EXCLUSIVE REMEDY OF THE CONSUMER. TTE TECHNOLOGY, INC. SHALL NOT BE LIABLE FOR SPECIAL, INCIDENTAL OR CONSEQUENTIAL DAMAGES RESULTING FROM THE USE OF THIS PRODUCT OR ARISING OUT OF ANY BREACH OF ANY EXPRESS OR IMPLIED WARRANTY ON THIS PRODUCT. THIS DISCLAIMER OF WARRANTIES AND LIMITED WARRANTY ARE GOVERNED BY THE LAWS OF THE STATE OF INDIANA.
ENERGY STAR® and the ENERGY STAR mark are registered U.S. marks Manufactured under license from Dolby Laboratories. "Dolby" and the double-D symbol are trademarks of Dolby Laboratories. FCC Information This equipment has been tested and found to comply with the limits for a Class B digital device, pursuant to Part 15 of the FCC Rules. These limits are designed to provide reasonable protection against harmful interference in a residential installation.