TM CUSTOM HOME THEATRE User’s Guide For Systems: HT35713BD, HT60903BD, 253 Series, 802 Series & 852 Series
Important Information Congratulations on choosing the RCA Custom Home Theatre system! Your decision to select this high quality, fully integrated system will give you years of entertainment enjoyment. Your system may include all or only some of the components listed. If your system does not have the component being explained, please skip to the next bit of information. Please review this OwnerÕs System Operating Guide for a brief introduction to your system.
Table of Contents Important Information Introduction, Safety Precautions, Product Information __________________________ i Setting Up Your TV To Autoprogram TVÕs Channel Memory ______________________________________ 2 To Add or Erase Channels from TVÕs Memory _________________________________2 To Set Up Channels for VCR, Laserdisc Player, and Satellite Receiver _____________ 3 Using Your TV To Watch a TV Program ____________________________________________________ 4 To Set the Clock ________________________
Setting Up Your TV Your TV must be programmed for the system to operate properly. If it was not programmed, complete these programming functions. For complete operating information on your TV, see the UserÕs Guide for your TV. To Autoprogram TV’s Channel Memory 1. Press TV on the remote to turn on the TV and audio/video receiver. Select an active channel on the TV. Adjust the volume, if necessary. 2. Press TV MENU on the remote repeatedly until Setup Menu is highlighted.
Setting Up Your TV (Continued) To Set Up TV Channels for VCR, Laserdisc Player, and Satellite Receiver To have your TV automatically turn on and tune to the proper channel for viewing the VCR, Laserdisc player, or satellite receiver when you press the corresponding button on the remote, set up the channels as explained below.
Using Your TV To Watch a TV Program 1. Press TV on the remote to turn on the TV and audio/video receiver and set the remote to operate the TV. 2. Press CHANNEL up or down on the remote to scan up or down for an active channel or press two number buttons to go directly to a channel. To tune channels 100 and above, press and hold the number 1 button on the remote until 1– – is displayed on the screen. Then enter the other two numbers. 3.
Using Your TV (Continued) To Use Picture-In-Picture (PIP) 1. Press TV and select the TV channel you want to watch. 2. Press PIP on the remote. A small picture will appear on the TV screen. The small and large picture will be the same. 3. Press the VCR1, or VCR2•LD, or DSS•CABLE button on the remote to see the picture from that component in the small PIP window. 4. Press TV to return the audio/video receiver to the TV mode. 5.
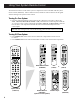
Using Your System Remote Control All of the basic features of each of the systemÕs components can be controlled with the system remote control (CRK67A1). Unless otherwise noted, all remote control references in this guide will be referring to the system remote control. Turning On Your System ¥ Press the component button on the remote for the component you wish to control (TV, VCR1, VCR2•LD, DSS•CABLE, AM•FM, or CD). This will turn on that component and the A/V receiver.
Using Your System Remote Control Universal Remote Control ¥ VCR1 DSS CABLE TV POW ER VCR2 Component Buttons Press one of these buttons to turn on all of the system components needed to operate that component. This also puts the remote in the mode to operate that component. AM TAPE AUX REW PLAY FF REC STOP ¥RDM CHAN SKIP CHAN PREV CH GUIDE PAUSE VOL AM•FM (Audio/Video Receiver) Turns on receiver and sets remote to control the receiver.
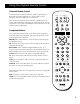
Using Your System Remote Control (Continued) Buttons TV Function Press the TV button to turn on the TV and audio/video receiver and set the remote to operate the TV. + and - Used with the MENU button to select or adjust a function. ANTENNA Changes the antenna input between ANT A and ANT B. CHAN (Channel) Up or Down Selects next higher or lower channel in the TVÕs channel memory. CLEAR Removes menus or status displays from the screen.
Using Your System Remote Control (Continued) Buttons Audio/Video Receiver Function Press the AM•FM button to turn on the receiver and set the remote to operate the receiver. + and – Used with REAR•CTR LEVEL button to adjust volume level of center and rear speakers. AM•FM Turns on the receiver and toggles between AM and FM bands. BY-PASS Turns By-Pass Mode on and off. By-Pass Mode cancels all surround modes and sound is produced with no surround effects.
Using Your System Remote Control (Continued) Buttons VCR Function Press VCR1 to turn on the VCR, audio/video receiver, and TV. The TV will tune to channel 91 (Input 1). This also sets the remote to operate the VCR. ANTENNA Turns the VCR indicator on and off in the VCRÕs display panel. This has no effect when using this system. Arrow Buttons (MOVE ) Allow you to move through the menus when they are displayed. CHAN (Channel) UP or DOWN Selects next higher or lower channel in the VCRÕs channel memory.
Using Your System Remote Control (Continued) Buttons Laserdisc Player Function Press VCR2•LD to turn on the laserdisc player, audio/video receiver, and TV. The TV will tune to channel 92 (Input 2). This also sets the remote to operate the laserdisc player. ANTENNA Toggles between analog and digital audio on laser discs. CHAN (Channel) UP or DOWN Selects next or previous track on laserdisc. Skips to next step during program playback. CLEAR Clears an entry during programming.
Using Your System Remote Control (Continued) RCA DSS® Receiver Controls ANTENNA Toggles between antenna input and RCA DSS¨ input. CLEAR Removes all menus and guides from the screen. CHAN (Channel) UP or DOWN Tunes to the next or previous channel when watching TV through the RCA DSS¨ System. Steps through one screen at a time when the program guide is on the screen. DISPLAY (Also used as the SELECT button) Displays the RCA DSS¨ Channel Information header on the screen.
Programming Your Remote Programming Your Remote You can program the universal remote to control most brands of remote controllable TVs, VCRs and cable boxes. If you have an RCA, GE or ProScan component, you may not need to program the remote at all. Other manufacturersÕ brands will need to be programmed.
Programming Your Remote Remote Control Codes Audio Equipment Audio Equipment (cont.) Brand Code(s) Brand ads: Aiwa: Akai: Denon: Dynamic Bass: AMP...............001 CD .................060 AMP........002,008 CD .................057 AM/FM ...........029 CD .................025 TAPE ......026,027 PHONO .........028 CD .................066 AMP...............023 CD .................067 CD .................063 AMP........016,058 AM/FM ....030,035 CD .................032 TAPE ......033,034 AUX ............
Remote Control Codes Televisions Brand (Continued) Televisions (cont.) Code(s) Admiral ......................................005 Amtron .......................................064 Akai.....................................002,103 A-Mark .......................................102 Anam ..................................104,105 Anam National ....................038,106 AOC ...............011,019,027,088,107 Bell & Howell .............................005 Candle .........................011,027,033 Citizen.....
Using Your Audio/Video Receiver The audio/video receiver tunes in the signals for AM and FM radio stations in your area, and controls the sound output for the TV, VCR, laserdisc Player, CD changer, and satellite receiver (optional for some systems). To Listen to AM/FM Stations 1. Press AM•FM on the remote to turn on the receiver and set the remote to operate the receiver. Repeatedly press the AM•FM button to toggle between AM and FM mode. 2.
Using Your Audio/Video Receiver To Set Surround Modes for Each Input 1. Press the Input you want to set the surround mode for. (TV, VCR1, VCR2•LD, DSS, etc.) 2. Set the surround mode by repeatedly pressing the SURROUND button on the remote or the SURROUND MODE button on the receiver until the surround mode you want is selected. ¥ If the receiver does not toggle through the surround modes when you press the SURROUND button, press the BY-PASS button and then the SURROUND button. 3. Press 1 to Begin setup.
Setting Up Your VCR There are several setup feature options for your VCR. The VCR has an Interactive Guide that will take you step-by-step through the setup options for your VCR. For complete operating information about your VCR, see the VCR userÕs guide. Setting Up the VCR Using the Interactive Guide 1. Press VCR1 to turn on the VCR, audio/video receiver, TV, and tune the TV to channel 91 (Input 1). This also sets the remote to control the VCR. 2.
Setting Up Your VCR (Continued) To Add or Remove Channels from VCR’s Channel Memory You may want to add or remove channels if some of the channels are not active, have weak signals, or you do not want to watch them. 1. Press VCR1 to turn on the VCR, audio/video receiver, TV, and tune the TV to channel 91 (Input 1). This also sets the remote to control the VCR. 2. Press MENU/PROGRAM on the remote to display the VCR MAIN MENU on the TV screen. 3. Press 4 to display the CHANNEL SETUP menu. 4.
Using Your VCR To Play Back a Videotape 1. Press VCR1 on the remote to turn on the VCR, audio/video receiver, TV, and tune the TV to channel 91 (Input 1). This also sets the remote to control the VCR. 2. Insert a pre-recorded tape in the VCR. The VCR automatically turns on, and the cassette-in indicator lights. The tape automatically begins playback if the safety tab on the cassette has been removed and the Auto Play feature is turned on. 3. Press PLAY, if necessary.
Using Your VCR (Continued) To Record a Program 1. Insert a blank tape with safety tab in place. 2. Press VCR1 on the remote to turn on the VCR, audio/video receiver, TV, and tune the TV to channel 91 (Input 1). This also sets the remote to control the VCR. 3. Select a recording speed (SP, LP, or SLP) using the SPEED button on the VCR or VCRÕs remote. The tape speed indicator appears in the VCRÕs display panel and on the TV screen. • SP (Standard Play) gives the best quality recording.
Using Your VCR (Continued) Express Recording (XPR) Express recording lets you record up to four hours without using the timer program feature. The VCR will turn off automatically at the end of the recording. 1. Press VCR1 on the remote to turn on the VCR, audio/video receiver, TV, and tune the TV to channel 91 (Input 1). This also sets the remote to control the VCR. 2. Insert a blank tape with safety tab in place. 3.
Using Your VCR (Continued) Recording While You’re Away Timer and VCR Plus+ recordings let you program the VCR to record up to eight different programs within a one-year period. Before recording, make sure that: ¥ The clock is set correctly. ¥ A tape with safety tab has been inserted with enough tape to record the program(s). Timer Recording 1. Press VCR1 on the remote to turn on the VCR, audio/video receiver, TV, and tune the TV to channel 91 (Input 1). This also sets the remote to control the VCR. 2.
Using Your VCR (Continued) VCR PLUS+* Recording Make sure the VCR has been set up for VCR Plus+ programming. See VCRÕs UserÕs Guide. 1. Press VCR1 on the remote to turn on the VCR, audio/video receiver, TV, and tune the TV to channel 91 (Input 1). This also sets the remote to control the VCR. 2. Press MENU PROGRAM on the remote to display the VCR MAIN MENU. 3. Press 1 to display the VCR PLUS+ menu. VCR MAIN MENU 4.
Using Your VCR (Continued) Checking or Clearing a VCR Plus+ or Timer Recording 1. Press VCR1 on the remote to turn on the VCR, audio/video receiver, TV, and tune the TV to channel 91 (Input 1). This also sets the remote to control the VCR. 2. Press MENU PROGRAM on remote to display VCR MAIN MENU on TV screen. 3. Press 3 for Review Programs. The black highlights the area for review. 4. Follow the on-screen prompts for checking or clearing the programs.
Using Your DSS® Receiver (optional with some systems) If your system came with, or you have added, an RCA Digital Satellite System, you can press the DSS•CABLE on the remote and the DSS¨ receiver, audio/video receiver, and TV will turn on and the TV will tune to channel 90 (S-Video Input). For more detailed instructions see the satellite receiver userÕs manual. To Watch a Program 1.
Using Your DSS® Receiver (continued) Channel Guide 1. Press DSS•CABLE on the remote to turn on the satellite receiver, audio/video receiver, TV, and tune the TV to channel 90 (S-Video Input). This also sets the remote to control the satellite receiver. 2. Press the GUIDE•RDM button on the remote to display the channel guide. Program Guide Channel 7:30PM 8:00PM 8:30PM Movies Sports Other 9:00PM 9:30PM 122 123 124 125 126 3 All Exit 3.
Using Your Laserdisc Player If your system came with a laserdisc player, follow the directions below to help you with the most common functions. For complete operating information about your laserdisc player, see the player userÕs guide. To Play a Disc 1. Press VCR2•LD on the remote to turn on the laserdisc player, audio/video receiver, TV, and tune the TV to channel 92. This also sets the remote to operate the laserdisc player. 2. Press OPEN•CLOSE on the player to open the disc table. 3.
Using Your CD Changer For complete operating information about your CD changer, see the CD changerÕs UserÕs Guide. To Play a CD 1. Press CD on the remote to turn on the CD changer and audio/video receiver. This also sets the remote to operate the CD changer. Note: If the CD changer does not turn on when you press the CD button, check to make sure that the POWER button on the front of the changer is pressed into the on position. 2. Press OPEN/CLOSE on the CD changer to open disc tray.
Setting Up Your Speaker System Each of your speakers were designed to deliver unique audio characteristics to your Custom Home Theatre system. When combined, they reproduce a clear, crisp sound for such diverse audio sources as movie soundtracks and compact discs.
Troubleshooting Checks Trouble Here’s What to Try No Power ¥ Make sure all components are plugged in as instructed in the Installation & Hookup Guide. ¥ Check circuit breaker for the wall outlet. ¥ If a disconnect switch was added to the system, but sure it is in the ON position. ¥ Remove batteries for 2 minutes then reinstall the batteries and try remote again. ¥ Maybe batteries were installed incorrectly. Remove batteries and reinstall correctly.
Troubleshooting Checks 32 (continued) Trouble Here’s What to Try No Video from VCR or laserdisc player ¥ Make sure TV is in the correct input. If the TV does not go to the correct input when the VCR1, VCR2•LD, or DSS•CABLE button on the remote are pressed, refer to the Test the System section of the Installation and Hookup Guide for proper programming of the components. ¥ Make sure all cables are connected as shown in the Installation and Hookup Guide.
Index Add Channel, TVÕs Channel Memory . . . . . .2 Add Channel, VCRÕs Channel Memory . . .19 AM/FM Stations Listen to . . . . . . . . . . . . . . . . . . . . . . . . . . . .16 Preset . . . . . . . . . . . . . . . . . . . . . . . . . . . . .16 While YouÕre Away . . . . . . . . . . . . . . . . . .23 Express (XPR) . . . . . . . . . . . . . . . . . . . . .22 Timer . . . . . . . . . . . . . . . . . . . . . . . . . . . .23 VCR Plus+ . . . . . . . . . . . . . . . . . . . . . . . .24 Remote Control, Buttons . . .
TM CUSTOM HOME THEATRE 10330 North Meridian Street, Indianapolis, IN 46290 ©1995 Thomson Consumer Electronics, Inc.