
Installation guide

Installation/Dish Assembly 79
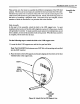
This section uses four steps to assemble the different components of the DSS dish
antenna. The first and second steps are assemble the dish and install the LNB cable.
The third step explains the installation of the LNB. This includes connecting the LNB
cable to the LNB and fastening the LNB to the dish. Finally, the fourth step points out
the basics of installing a telephone cable. Once these steps are complete, all that
remains to finish the installation is to point the dish at the satellites.
Assemble the
Dish
Dish Assembly
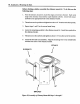
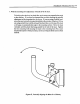
In this part of the assembly, attach the dish to the LNB support arm. In most
installations the location of the dish will be high above ground. In these cases, a ladder
will generally be needed. To make assembly easier and prevent multiple trips up and
down a ladder, do most of the assembly work on the ground. When the basic assembly
is complete, lift the dish onto the mast.
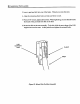
Use the following steps to attach the dish to the LNB support arm:
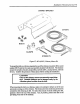
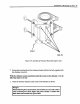
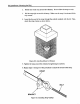
1. Locate the dish, LNB support arm, and the four pan head bolts.
Note: The DSA400RW dish antenna uses a SMC dish with mounting studs molded
into the SMC material.
2. Place the dish on the LNB support arm bracket aligning the four holes of the dish
with the holes in the support arm.
DISH
PAN
HEAD
BOLTS
LNB
SUPPORT
ARM
Figure 64, Attach Dish to LNB Support Arm