
Installation guide


Installation/Mounting the Dish 63
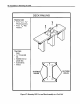
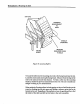
When selecting horizontal mounting surface for the DSS dish, select one that is both
structurally sound and offers some protection from traffic. Do not position the dish
where it may be used as a hand rail or have objects hung from it. Deck railings and
floors are examples of good mounting surfaces for the system if the right location is
chosen.
Horizontal
Mounting
Systems
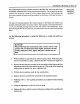
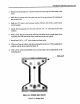
The type of mounting material the system mounts to, determines the number and
location of the bolts used to secure the system. For example, if you mount the foot to
a 2 x 4 or 2 x 6 board, you may want to use two 1/4" screws in the center holes, if you
are mounting the foot to 3/4" plywood, you will want to use four screws in the outside
holes.
Use the following procedure to install the DSS foot on a deck rail with four
screws:
DANGER!
When following these instructions, take extreme care to avoid
contact with overhead power lines, lights, and power circuits.
Contact with power lines, lights, and power circuit s may be
fatal.
.
6
,
4.
5.
4
8.
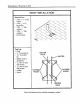
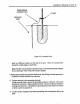
With a bubble level, check the level of the mounting surface. While doing this,
check several different angles. Mark the direction with the most angle to it.
Position the foot and mast assembly on the mounting surface aligning the foot
adjustment with the direction marked in step one. If the width of the mounting
surface does not permit this, select a different site.
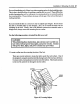
With the foot in position, mark the four outside holes.
Remove the foot and drill 3/16" pilot holes in the marked locations.
With four 5/16" x 1- 1/2" lag bolts and washers, secure the foot to the mounting
surface.
Using the adjustment on the foot, level the mast.
Tighten all bolts on and foot and mast before proceeding to the assembling the
dish section.