
Installation guide


44 Installation/Mounting the Dish
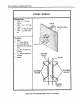
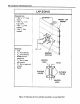
2. Place the mounting foot on the panel aligning the center holes with the center
of the stud. With a pencil, mark the upper center hole of the mounting foot.
3. Remove the mounting foot and drill a 1/8" hole in the location just marked.
J
With a 114" x 3" lag screw and washer, attach the mounting foot to the wall
using the hole drilled in step three. Tighten the lag bolt until it just holds the
mounting foot to the wall. The lower half of the mounting foot should move
slightly back and forth.
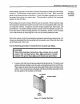
5. Horizontally level the mast using either a bubble level or a plumb line.
To horizontally level the mast, place the level or plumb line on the mast at an
perpendicular angle to the wall. If you are using a bubble level, move the
bottom of the mounting foot to center the bubble in the window of the level.
If you are using a plumb line, move the lower part of the foot until the plumb
line aligns parallel to the side of the mast. With a pencil, draw line from the
center line of the lower foot onto the wall. For details on this procedure, see the
Leveling the Dish section of this manual.
6. Using a 7/16" wrench, loosen the lower two nuts holding the mast onto the
mounting foot. With these two nuts loose, move the mast to gain access to the
lower center mounting hole.
7. Align the center mark of the mounting foot with the line drawn in the horizontal
leveling procedure.
8. Drill a 118" pilot hole in the lower center mounting hole.
9. Insert a 1/4" x 3" lag screw with washer into the lower mounting hole. At this
time tighten both top and bottom lag screws.
10. With a 3/16" bit in the drill, drill two pilot holes in opposite comers of the
mounting foot.
11. Insert 5116" x 1-1/2" lag screws with washers into the outside holes and
tighten.
Note: Inserting lag screws into these holes in the four comers of the mounting
foot is optional and only done to improve the appearance of the installation. A
minimum of two lag screws in opposite comers of the mounting foot are