
Installation guide


Installation/AligningtheDish 113
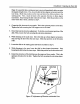
Note: It is possible that a continuous tone is received immediately after you enter
the signal strength menu. If so, move the dish in three degree increments until the
tone stops. Mark that position on the mast and return the dish's position to the
starting point. Now, rotate the dish in the opposite direction in three degree
increments. Stop rotating the dish when the tone stops. Mark that position on the
mast. Once that is done, continue to step 4.
4. Center the dish between the two marks. This is the optimum position of the dish.
Tighten the bolts securing the LNB support arm to the mast.
5. Next, fine tune the elevation adjustment. To do this, record current position of the
dish. Then, loosen the bolts securing the elevation adjustment.
6. While listening to the audio tone. Move the dish up in three degree increments.
Stop moving the dish when the tone stops. Mark that position on the elevation
scale.
7. Lower the dish to the starting point (elevation recorded in step 7).
8. While listening to the tone, lower the dish in three degree increments. Stop
lowering the dish when the tones stops. Mark that position on the elevation scale.
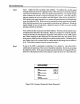
9. Center the elevation of the dish between the upper and lower marks. This is the
optimum elevation for the dish. Tighten the bolts securing the elevation adjust-
ment.
CENTER
UPPER
ao
40 50 60
Figure 97, Adjustment of Elevation with Audio Tone