Important Information Equipment Approval Information Your telephone equipment is approved for connection to the Public Switched Telephone Network and is in compliance with parts 15 and 68, FCC Rules and Regulations and the Technical Requirements for Telephone Terminal Equipment published by ACTA. 1 Notification to the Local Telephone Company On the bottom of this equipment is a label indicating, among other information, the US number and Ringer Equivalence Number (REN) for the equipment.
Important Information you the opportunity to correct the situation; and (3) inform you of your right to bring a complaint to the Commission pursuant to procedures set forth in Subpart E of Part 68, FCC Rules and Regulations. The telephone company may make changes in its communications facilities, equipment, operations or procedures where such action is required in the operation of its business and not inconsistent with FCC Rules and Regulations.
Important Information FCC RF Radiation Exposure Statement This equipment complies with FCC RF radiation exposure limits set forth for an uncontrolled environment. This equipment should be installed and operated with a minimum distance of 20 centimeters between the radiator and your body. This transmitter must not be co-located or operated in conjunction with any other antenna or transmitter.” Licensing Licensed under US Patent 6,427,009.
Table of Contents Equipment Approval Information........................... 2 Interference Information...................................... 3 FCC RF Radiation Exposure Statement.................. 4 Licensing.............................................................. 4 Hearing Aid Compatibility..................................... 4 Introduction......................................................... 7 Parts Checklist.................................................... 8 Telephone Jack Requirements.....
Table of Contents IF YOU PROGRAMMED YOUR LOCAL AREA CODE .........35 IF YOU DID NOT PROGRAM YOUR LOCAL AREA CODE .35 CALL WAITING CALLER ID..........................................36 MEMORY LOG AND PHONE BOOK MEMORY ................36 STORING A NUMBER AND NAME IN MEMORY .......36 REVIEWING PHONE BOOK MEMORY ......................37 REVIEWING THE INTERCOM/MEMORY LOG .............37 EDITING A NAME OR NUMBER STORED IN PHONE BOOK (DIRECTORY) MEMORY ...............................
Connections & Setup Introduction CAUTION: When using telephone equipment, there are basic safety instructions that should always be followed. Refer to the IMPORTANT SAFETY INSTRUCTIONS provided with this product and save them for future reference. Your Four-Line Speakerphone is a full-featured phone ideally suited for home-office use. It is designed to receive calls on up to four incoming telephone lines and to serve up to 16 station users.
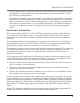
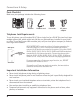
Connections & Setup Parts Checklist Make sure your package includes the following items: Base Handset Handset cord Line cords AC power adaptor Telephone Jack Requirements To use this phone, you will need an RJ11C (for a single line) or a RJ14C (for two lines) type modular phone jack, which might look like the one pictured here, installed in your home or office. If you don’t have either modular jack, call your local phone company to find out how to get one installed.
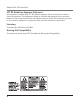
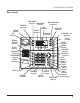
Connections & Setup Base Layout PRIVACY (button) MENU (button) EXIT (button) REDIAL/ FORMAT (button) FLASH (button) TRANSFER (button) CONFERENCE (button) HOLD (button) * (button) HEADSET (button) ATTENDANT NEW MESSAGE (button) ANSWERER (indicator) (button) DIAL INTERCOM (button) (button) DELETE (button) SEL/SAVE MEMORY 1-16 (button) (buttons) PAGE (button) STORE (button) MEMO (button) PLAY/STOP (button) VOLUME +/(buttons) CID (button) LINE 4 (button) LINE 3 (button) LINE 2 (button) LINE 1 #PAUSE SPEAKER
Connections & Setup Important Installation Guidelines • Install telephone near both a telephone (modular) jack and an electrical power outlet. • Avoid sources of noise, such as a window by a busy street, and electrical noise, such as motors, microwave ovens, and fluorescent lighting. • Avoid heat sources, such as heating air ducts, heating appliances, radiators, and direct sunlight. • Avoid areas of excessive moisture or extremely low temperature. • Avoid dusty locations.
6
Connections & Setup • The Phone ID (01 to 16) is unique. When more than one phone using the same Phone ID is detected, only one phone with that ID will be valid. The phone IDs for the other phone(s) is automatically erased, and the phone(s) intercom indicators blink. You must use the Menu options to select a new Phone ID for each phone. VERY IMPORTANT: In order to achieve full system operation (i.e. intercom, page, etc.), Line 1 must be connected and must be common to all phones connected to the system.
Connections & Setup System Verification Use the following procedures to test system configuration and identify possible line connection errors. The phone must be connected to the power outlet, Line 1 must be connected to the LINE 1 + 2 jack, and the phone must have a phone ID. VERY IMPORTANT: In order to achieve full system operation (i.e. intercom, page, etc.), Line 1 must be connected and common to all phones on the system.
Programming the Telephone Auto Attendant Turn on auto attendant function by pressing the ATTENDANT button, the blue indicator will light. For detail information on auto attendant setting, please refer to Auto Attendant section. Programming the Telephone When programming the phone, if at any time you wish to discontinue or stop programming, press the “Exit” button.
Programming the Telephone Ringer Tone The ringers for all four lines may be set independent of one another. 1. Press the MENU button while in standby mode. 2. Use the VOL (+ or -) buttons to scroll up or down to SET PHONE OPTIONS. 3. Press the SEL/SAVE button. 4. Use the VOL (+ or -) buttons to scroll up or down to SET RING TONE. 5. Press the SEL/SAVE button. The ringer tone settings for each of the four telephone lines show in the display. 6.
Programming the Telephone Delay Ring Use this setting to delay the Central Office ring. 1. Press the MENU button while in standby mode. 2. Use the VOL (+ or -) buttons to scroll up or down to SET PHONE OPTIONS. 3. Press the SEL/SAVE button. 4. Use the VOL (+ or -) buttons to scroll up or down to SET DELAY RING. 5. Press the SEL/SAVE button. 6. Use the VOL (+ or -) buttons to scroll up or down to 0 ring up to 10 rings. 7. Press the SEL/SAVE button to save. NOTE: The default Delay Ring is 0.
Programming the Telephone 5. Press the SEL/SAVE button. 6. Use the touch-tone pad to enter the phonebook name (up to 8 characters). More than one letter is stored in each of the number keys. For example, to enter “Lorraine,” press the 5 key three times for the letter L. Press the 6 key three times for the letter O. Press the 7 key three times for the first letter R. Press the 7 key three times for the second letter R. Press the 2 key once for the letter A. Press the 4 key three times for the I.
Programming the Telephone Call Alert Tone Turn on the Call Alert to hear a tone for incoming calls while you are on the telephone. This function notifies you that there is a incoming call while you are using the phone. If you do not want this tone to disturb your conversation, you can set it to OFF. 1. Press the MENU button while in standby mode. 2. Use the VOL (+ or -) buttons to scroll up or down to SET PHONE OPTIONS. 3. Press the SEL/SAVE button. 4.
Programming the Telephone Local Area Code 1. Press the MENU button while in standby mode. 2. Use the VOL (+ or -) buttons to scroll up or down to SET AREA CODE. 3. Press the SEL/SAVE button. 4. Use the VOL (+ or -) buttons to scroll up or down to LOCAL AREA CODE. 5. Press the SEL/SAVE button. Enter Number shows in the display. 6. Use the touch tone pad on your phone to enter your local area code. 7. Press the SEL/SAVE button to save. NOTE: If you make a mistake, press DELETE to erase all digits.
Programming the Telephone Manually Setting the Time and Date The time and date is automatically set when you receive the first CID call. To manually reset the time and date, follow the steps below. 1. Press the MENU button while in standby mode. 2. Use the VOL (+ or -) buttons to scroll up or down to SET TIME & DATE. 3. Press the SEL/SAVE button. 4. Use the VOL (+ or -) buttons to scroll up or down to SET CLOCK. 5. Press the SEL/SAVE button, and the cursor moves to the hour field. 6.
Programming the Answering System 6. Use the VOL (+ or -) buttons to scroll up or down to select 12-HOUR or 24-HOUR. 7. Press the SEL/SAVE button to save. Restoring the Default Settings This feature allows you to reset the menu to the original factory default settings. 1. Press the MENU button while in standby mode. 2. Use the VOL (+ or -) buttons to scroll up or down to RESTORE TO DEFAULTS. 3. Press the SEL/SAVE button. 4. Use the VOL (+ or -) buttons to scroll up or down to YES or NO. 5.
Programming the Answering System Message Length This sets the maximum recording time for the caller to leave a message when the answering function is on. 1. Press the MENU button while in standby mode. 2. Use the VOL (+ or -) buttons to scroll up or down to ANSWERING SYSTEM. 3. Press the SEL/SAVE button. 4. Use the VOL (+ or -) buttons to scroll up or down to MESSAGE LENGTH. 5. Press the SEL/SAVE button. 6.
Programming the Answering System 6. Use the VOL (+ or -) buttons to scroll up or down to choose ON or OFF. The default is ON. 7. Press the SEL/SAVE button to save. Remote Password To set the remote access password; 1. Press the MENU button while in standby mode. 2. Use the VOL (+ or -) buttons to scroll up or down to ANSWERING SYSTEM. 3. Press the SEL/SAVE button. 4. Use the VOL (+ or -) buttons to scroll up or down to REMOTE PASSWORD. 5. Press the SEL/SAVE button. 6.
Programming the Auto Attendant Programming the Auto Attendant Auto Attendant will pick up and redirect incoming calls to other extensions in the system per the caller’s input. After you have finished programming this feature, press the ATTENDANT button on the base to activate. The button will light when Auto Attendant is activated. Auto Attendant Pickup Delay This sets the time delay before the call is picked up by the Auto Attendant. 1. Press the MENU button while in standby mode. 2.
Programming the Auto Attendant 6. Use the VOL (+ or -) buttons to scroll up or down to select the hour. AM or PM will be set accordingly with the selected hour. 7. Press the SEL/SAVE button to save, and the curser moves to the minutes field. 8. Use the VOL (+ or -) buttons to scroll up or down to select the minute. 9. Press the SEL/SAVE button to save. 10. Press the EXIT button.
Basic Operation 6. Use the VOL (+ or -) buttons to scroll up or down to choose ON or OFF. The default is OFF. 7. Press the SEL/SAVE button to save. Set Weekend Greeting There are two options for you to select from for your Weekend Greeting. The Night Greeting option will play your Night Greeting from Friday night until Monday morning, the Same As Weekday greeting will play your weekday greeting throughout the weekend. 1. Press the MENU button while in standby mode. 2.
CAUTION: For servicing or replacement, you can purchase a suitable headset through service centre or retailer shop.
Basic Operation Pre-dialing 1. With the phone idle and the handset on the cradle, manually enter the telephone number. The telephone number shows in the display. 2. Press the DIAL or SPEAKER button, or lift the handset to take a line, and the telephone number is automatically dialed. Answering Calls If you receive a call on the priority line, 1. 2. 3. 4. Pick up the handset (handset mode), OR Press the SPEAKER button (speakerphone mode), OR Press the HEADSET button (headset mode).
Basic Operation Do Not Disturb This feature is set at individual telephones to disable (silence) an incoming ring signal, intercom ring, or page. When there is an incoming call or an intercom call, the status indicators function as normal but the phone will not ring. 1. When the unit is idle, press the PRIVACY button. The Privacy indicator flashes and the last setting is displayed. 2. Use the VOL (+ or -) buttons to scroll up or down to select the duration.
Basic Operation 2. Press the REDIAL/FORMAT button NOTE: The redial function will not operate if the number to be redialed contains more than 32 digits. If the number is longer than that, you will hear an error tone. Reviewing the Redial Numbers Your phone records up to six previously dialed phone numbers. 1. When the phone is idle, press the REDIAL/FORMAT button. 2. Use the VOL (+ or -) buttons to scroll up or down to view the last six previously dialed numbers. 3.
Basic Operation Privacy While in use, a line can be secured so that no one else can listen to the conversation. This feature only applies to 25423, 25424, 25425, 25413, 25414, 25415, 25403 and 25404 phones. However, other phone which are not compatible with these models can still access the line. Providing Privacy At any time during a conversation, you can use the privacy feature to secure the line. 1. While on a line, press the PRIVACY button. The indicator turns on. 2.
Intercom Calls Intercom Calls One-Touch Intercom NOTE: If the INTERCOM indicator is turned on (solid red), the intercom is in use. You must wait until the indicator turns off before making an intercom call. 1. Press the INTERCOM/MEMORY LOG button (1-16) for the station you want to intercom with. The SPEAKER turns on. Alternately, you may press the INTERCOM button, then press the INTERCOM/MEMORY LOG button (1-16) for the stations you want to intercom with. The speakerphone automatically turns on.
Intercom Calls Intercom Conference Calls This feature allows you to have a 3-way conversation using the intercom feature and an open line. 1. Place a call or make an intercom call. 2. Press the HOLD button. 3. Place a call on another line or make an intercom call. 4. Press the CONFERENCE button. 5. Speak to both parties. NOTE: If you have more than one party on hold (telephone line or intercom), you must select the line for the party you want to conference with.
Caller ID Caller ID Summary Screen The summary screen shows the current time, current date, number of CID records to be reviewed and total number of records saved to CID memory. It is displayed until any button is pressed. Within 60 seconds of receiving a new call, the new caller information is displayed.
Caller ID Deleting a CID Record To delete the record shown in the display, press the DELETE button once. Deleting All Call Records This feature allows you to clear all CID records at once. 1. While viewing a CID record, press and hold the DELETE button. PRESS DELETE AGAIN CLEAR ALL CALLER ID shows in the display. 2. Press the DELETE button again to confirm. Dialing Back When reviewing CID records, you can dial back the numbers showing on the display by pressing the DIAL button.
Memory Call Waiting Caller ID This feature allows you to see who is calling when you hear the call waiting beep. The caller identification information appears in the display after you hear the tone. • Press the FLASH button to put the person to whom you’re talking on hold and answer the incoming call. IMPORTANT: To use all the features of this unit, you must subscribe to either the standard Name/Number Caller ID Service or Caller ID with Call Waiting Service.
Memory NOTE: If there is a record stored in selected memory location “OVERWRITE?” shows in the display. Press Sel/Save button to confirm overwrite or press the EXIT button, then select a new location. 7. Repeat steps 1-6 for any additional names and numbers you want to store, up to 94, in phone book memory. NOTE: The storage procedure automatically cancels after 30 seconds if no keys are pressed. Reviewing Phone Book (Directory) Memory 1. Press the DIR button.
Memory 4. Add the name as explained in the Storing A Name and Number in Memory section. 5. Press the STORE button. ENTER LOCATION shows in the display. 6. Press the DIR button to store the redial number in the Phone Book memory or press an INTERCOM/MEMORY LOG button (1-16) to store the redial number in that memory location.
Memory To delete an INTERCOM/MEMORY LOG: 1. Press the DIR button. 2. Press the corresponding button (1-16) for the Intercom/Memory Log you want to delete. 3. Press the DELETE button to delete, DELETE -DELETE AGAIN shows in the display. 4. Press the DELETE button again to confirm. NOTE: Press the EXIT button to cancel the “delete” function. Clear All Memories 1. Press the MENU button while in standby mode. 2. Use the VOL (+ or -) buttons to scroll up or down to SET PHONE OPTIONS. 3.
Answering System Operation Answering System You can set one or more additional phones to act as an Answering System (up to 16 units in the system), each Answering System can pick up only one line at a time. To prevent several Answering System units picking up the same call, you should assign different pickup delay times for each Answering System unit. The Answering System can store approximately 60 minutes of messages, memos, and all the announcements, for a total of up to 99 messages.
Answering System Operation Recording Incoming Messages The unit will answer incoming calls or routed calls after X rings (pickup delay set in MENU) and play the outgoing greeting. After hearing the greeting followed by a long beep, the caller can leave a message. The message counter shows new number of messages. If there is a new message recorded in the unit, the “NEW MESSAGE” indicator will blink.
Answering System Operation Message Playback In idle mode, press the PLAY button once. The unit starts to playback the messages. If the unit has new messages, only the new messages will be played, otherwise all messages will be played. Unit will play messages to the end, then return to standby mode. During each message playback, you can press CID button to skip the current message OR press DIR button to replay the message playing. If there are no messages, the unit will announce “You have NO messages”.
Answering System Operation Press 1 to review. Press 0 while playing a message to erase. Press 4 to turn on and off. Press 6 to play greeting. Press 9 to record a greeting, press 9 again to stop taking message. Press 7 to review menu again. 4. Enter the remote commands. 5. To exit remote operation, hang up. The system will automatically disconnect the call if the user does not enter a command within 10 seconds.
Auto Attendant Operation Auto Attendant You can set this phone to function as the Auto-Attendant. A phone designated as an AutoAttendant will pick up and redirect incoming calls to other extensions in the system. Each Auto-Attendant can pick up only one line at a time, so you may wish to have more than one Auto-Attendant within your system. You can designate up to 16 Auto-Attendants in your system.
Auto Attendant Operation Auxiliary Greeting is played when an outside caller presses the “0” key twice after hearing the Day or Night message. It is supposed to be recorded by you to tell the caller about the extension number list. The Default Auxiliary Greeting is “Please enter your party’s extension.” You can follow the procedures listed below to record the your own greeting.
Auto Attendant Operation 9. To erase the recorded greeting, press DELETE button during greeting playback. Press DELETE again to confirm the deletion. The default greeting will play back once after deletion. NOTE: The default greeting cannot be deleted. 10. To stop playback, press EXIT.
Troubleshooting Guide Operation By Battery If the power cord is not plugged into the unit, and the battery is available, the unit enters Battery Operation Mode. In this mode, the unit fully supports all operational features, except the intercom call function and cordless handset. NOTE: Under battery operation mode, the RF module (optional for use with cordless handset) is not supported.
Troubleshooting Guide Phone does not ring. • Make sure the ringer is turned on. • Make sure the Do Not Disturb feature is not activated. • You may have too many extension phones on your line. Try unplugging some phones. • See solutions for “No dial tone.” Incoming voice too low or none at all. • Check volume setting.
Manager, Consumer Relations 4915 SW Griffith DR.
What your warranty covers: • Defects in materials or workmanship For how long after your purchase: • Two years, from date of purchase What we will do: • Provide you with a replacement unit. The exchange unit is under warranty for the remainder of the original product's warranty period. How you get service: • Locate your proof of purchase in the form of a bill of sale or receipted invoice which is evidence that the product is within the warranty period.
HEREBY DISCLAIMED. NO VERBAL OR WRITTEN INFORMATION GIVEN BY TELEFIELD NA REMEDY OF THE CONSUMER. TELEFIELD NA INC. SHALL NOT BE LIABLE FOR INCIDEN How state law relates to this warranty: • Some states do not allow the exclusion nor limitation of incidental or consequential damages, or limitations on how long an implied warranty lasts so the above limitations or exclusions may not apply to you.
Index Mute 28 N No Unknown/Blocked 18 O One-Touch Intercom Operation By Battery Operation without Power Other System Phones 32 47 47 13 P Paging All Stations 33 Parts Checklist 8 Phone ID 16 Phone Name 16 Pickup Delay 21 Placing a Call on Hold 29 Playback and Erasing a Greeting 40 Playback and Erasing Auto Attendant Greetings 45 Pre-dialing Priority Line Privacy Programming the Answering System Programming the Auto Attendant Programming the Telephone Providing Privacy 28 15 31 21 24 14 31 R Receivin
Visit the RCA web site at www.rca4business.com Please do not send any products to the Oregon address listed in this manual or on the 302 12 T0009009 (REV.
Información Importante Información sobre la Aprobación de Equipo El equipo de su teléfono esta aprobado para la conexión con la red Telefónica Pública (Public Switched Telephone Network) y cumple con los requisitos establecidos en las secciones 15 y 68 de las Reglas y Regulaciones de la FCC y con los Requerimientos Técnicos para Equipos de Terminales Telefónicas (Technical Requirements for Telephone Terminal Equipment), publicado por ACTA.
Información Importante 2 Derechos de la Compañía Telefónica Si su equipo causase algún problema en su línea que pudiera dañar la red telefónica, la com‑ pañía telefónica siempre que sea posible le avisará de la posible interrupción temporal de su servicio. En caso que la compañía no pudiera avisarle de antemano y hubiera necesidad de tomar tal acción, la compañía telefónica podrá interrumpir su servicio inmediatemente.
Información Importante Si estas medidas no eliminan la interferencia, favor de consultar a su distribuidor o a un técnico de radio/televisión experto por otras sugerencias. También, la Comisión Federal de Comunicaciones (FCC) ha preparado un folleto muy útil, “How To Identify and Resolve Radio/TV Interference Problems” (“Como Identificar y Resolver Problemas de Interferencia de Radio/Televisión”). Este folleto se puede obtener del U.S. Goverment Printing Office, Washington, D.C. 20402.
Tabla de Contenido Información sobre la Aprobación de Equipo. .... 2 Información de Interferencias.......................... 3 Declaración de la FCC sobre Exposición a la Radiación RF ...................... 4 Licensing......................................................... 4 Compatibilidad con Audífonos (CCA)............... 4 Introducción................................................... 7 Programación para Contestadora Automática 23 Informacion Importante para la Instalacion..... 8 Operación Básica.
Tabla de Contenido SI USTED PROGRAMÓ SU CLAVE DE ÁREA ............ 35 SI USTED NO PROGRAMÓ SU CLAVE DE ÁREA .................. 35 IDENTIFICADOR DE LLAMADA EN ESPERA ............... 36 MEMORIA DEL REGISTRO DE MEMORIA Y DE LIBRO TELEFÓNICO (DIRECTORIO) ................. 36 PARA ALMACENAR UN NÚMERO Y NOMBRE EN LA MEMORIA .......................................... 36 PARA REVISAR LA MEMORIA DEL LIBREO TELEFÓNICO ....... 37 PARA REVISAR EL REGISTRO DE MEMORIA .......................
Conexión y Programación Introducción CUIDADO: Cuando use equipo telefónico, hay instrucciones básicas de seguridad que siempre deben seguirse. Refiérase a la sección INSTRUCCIONES IMPORTANTES DE SEGURIDAD provistas con este producto y guárdelas para referencia en el futuro. Su teléfono de Cuatro Líneas con Altavoz es un teléfono funcional, ideal para uso en oficinas en casa. Está diseñado para recibir llamadas en hasta cuatro líneas telefónicas entrantes y servir a hasta 16 usuarios.
Conexión y Programación Lista de Partes Asegúrese de que su empaque contenga los siguientes artículos: Base Auricular Cable del auricular Cable de línea telefónica Adaptador de corriente AC Requerimientos de Enchufe Telefónico Para utilizar este teléfono, usted necesitará un enchufe modular tipo RJ11C (para una línea sencilla) o tipo RJ14C (para dos líneas), que puede ser como el enchufe ilustrado aquí, instalado en oficinas en casa.
Conexión y Programación Formato de la Base NEW MESSAGE indicator (Indicador de mensajes nuevo) ATTENDANT (botón operadora ) ANSWERER (botón contestadora) PRIVACY (botón privacia) MENU (botón de menu) EXIT (botón salir) REDIAL/ FORMAT (botón para volver a marcar/ formato) FLASH (botón para servicios especiales) TRANSFER (botón de transferencia) CONFERENCE (botón para conferencia) DELETE (botón de borrar) DIAL (botón marcar) SEL/SAVE (botón seleccionar/ guardar) INTERCOM (botón intercommunicación) MEMORY
Conexión y Programación Indicaciones Importantes para la Instalación: • Instale el teléfono cerca de un enchufe telefónico (modular) y un enchufe de corriente eléctrica. • Evite áreas de mucho ruido, como una ventana hacia una calle con mucho tráfico, y ruido eléctrico como motores, hornos de micro ondas, o lámparas de luz fluorescente. • Evite fuentes de calor, como conductos de calefacción, aparatos eléctricos que se calientan, radiadores y luz de sol directa.
6
Conexión y Programación MUY IMPORTANTE: Para poder lograr el máximo rendimiento en el sistema de operación (por ejemplo interfono, localizador, etc.), la Línea 1 debe estar conectada y debe ser común a todos los teléfonos conectados al sistema. Únicamente otros modelos 25423, 25424, 25425, 25413, 25414, 25415, 25403 o 25404 son compatibles para la operación óptima del sistema. Para la operación adecuada del interfono, la función del localizador, etc., NO CONECTE un módem DSL a la Línea 1.
Conexión y Programación MUY IMPORTANTE: Para poder lograr el funcionamiento óptimo del sistema (por ejemplo, interfono, localizador, etc.), la línea 1 debe estar conectada y ser común a todos los teléfonos del sistema. Únicamente los modelos 25423, 25424, 25425, 25413, 25414, 25415, 25403 y 25404 son totalmente compatibles. Otros Teléfonos en el Sistema 1. Oprima el botón de Línea 1. 2. Vea todas las otras estaciones. Si todas indican que la Línea 1 está en uso, la conexión está correcta. O 1.
Programación del Teléfono Programar el Teléfono Al programar el teléfono, si en algún momento usted desea descontinuar o detener la program‑ ación, oprima el botón “Salir”. También, cuando usted haya realizado una selección de programa presionando el botón SEL/SAVE la pantalla mostrará “OK” por varios segundos y luego regresará a la visualización de solicitud de comando del MENÚ PRINCIPAL. Idioma Programe el idioma de la pantalla para mostrar las indicaciones en inglés, español o francés. 1.
Programación del Teléfono 5. Oprima el botón SEL/SAVE. La programación del tono del timbre para cada una de las líneas telefónica aparecerá en la pantalla. 6. Use el botones VOL (+ ó -) para desplazarse arriba o abajo seleccionar cada tono de timbre para LINEA 1. Un modelo de tono del timbre se genera cuando usted recorre a los tonos individuales. Escoja entre los ocho diferentes tonos, o desactive el timbre (OFF).
Programación del Teléfono 6. Use los botones VOL (+ ó -) para desplazarse arriba o abajo 0 a 10 timbres. La programación de fábrica es 10 timbre. 7. Oprima el botón SEL/SAVE para salvar. Identificador del Teléfono 1. Oprima el botón MENU mientras está en la modalidad de alerta. 2. Use los botones VOL (+ ó -) para desplazarse arriba o abajo PROG OPCIONES TELEF. 3. Oprima el botón SEL/SAVE. 4. Use los botones VOL (+ ó -) para desplazarse arriba o abajo PROG IDENT TELEFONO. 5.
Programación del Teléfono Contestar Automáticamente el Interfono Para operación “manos libres”, el teléfono puede ser programado para responder una llamada de intercomunicación activando automáticamente el altavoz. NOTA: Usted puede también utilizar esta función para vigilar una habitación. 1. Oprima el botón MENU mientras está en la modalidad de alerta. 2. Use los botones VOL (+ ó -) para desplazarse arriba o abajo PROG OPCIONES TELEF. 3. Oprima el botón SEL/SAVE. 4.
Programación del Teléfono 8. Repita los pasos 6 y 7 para cada línea telefónica. Después de que usted seleccione un tono para la LINEA 4, oprima el botón EXIT. No Desconocido o Bloqueado Esta opción le permite decidir si el archivo del Identificador de Llamadas que es desconocido o está bloqueado sea salvado o no. Si usted selecciona “SI,” las llamadas desconocidas o bloquea‑ das serán salvadas. 1. Oprima el botón MENU mientras está en la modalidad de alerta. 2.
Programación del Teléfono Claves de Área Regionales Dependiendo de su localización, usted puede necesitar programar hasta seis claves de área regionales. La programación de las Claves de Área Regionales ayuda al teléfono a determinar el formato de números que se van a mostrar en la pantalla cuando se recibe una señal válida del identificador de Llamadas. Los archivos de llamadas que coinciden cualquiera de las claves de área regionales programadas aparecen como números de 10 dígitos.
Programación del Teléfono 9. Oprima el botón SEL/SAVE, y el cursor se mueve hacia el campo del mes. 10. Use los botones VOL (+ ó -) para desplazarse arriba o abajo seleccionar el mes. 11. Oprima el botón SEL/SAVE, y el cursor se mueve hacia el campo de la fecha. 12. Use los botones VOL (+ ó -) para desplazarse arriba o abajo seleccionar la fecha. 13. Oprima el botón SEL/SAVE, y el cursor se mueve hacia el campo del dia. 14.
Programación del Sistema de Contestadora Programación el Sistema de Contestadora Demora para Tomar la Llamada Esto establece el número de timbres antes de que el sistema de contestadora tome la llamada. 1. Oprima el botón MENU mientras está en la modalidad de alerta. 2. Use los botones VOL (+ ó -) para desplazarse arriba o abajo SYSTEMA CONTESTADOR. 3. Oprima el botón SEL/SAVE. 4. Use los botones VOL (+ ó -) para desplazarse arriba o abajo RETRASO EN LEVANTAR. 5. Oprima el botón SEL/SAVE. 6.
Programación del Sistema de Contestadora Monitoreo de Llamada Si está activado, le permite escuchar los mensajes entrantes conforme son grabados. 1. Oprima el botón MENU mientras está en la modalidad de alerta. 2. Use los botones VOL (+ ó -) para desplazarse arriba o abajo SYSTEMA CONTESTADOR. 3. Oprima el botón SEL/SAVE. 4. Use los botones VOL (+ ó -) para desplazarse arriba o abajo FILTRAR LLAMADAS. 5. Oprima el botón SEL/SAVE. 6.
Programación de la Contestadora Automática 8. Oprima el botón SEL/SAVE para salvar. NOTA: Si Ud. selecciona la clave de acceso remoto en OFF, la unidad no aceptará el acceso remoto de el sistema de contestadora. Buzón Seleccionar General Mailbox le permite tener la respuesta del sistema transferida o las llamadas entrantes a las 4 líneas. O Ud. puede elegir Personal Mailbox para responder las llamadas a sólo una línea seleccionada. Si Ud.
Programación de la Contestadora Automática con ID# en 5 ó 6, el tiempo de demora en tomar la llamada de fábrica es de 8 segundos con ID# en 7 ó 8, el tiempo de demora en tomar la llamada de fábrica es de 9 segundos con ID# en 9 ó 10, el tiempo de demora en tomar la llamada de fábrica es de 10 segundos con ID# en 11 ó 12, el tiempo de demora en tomar la llamada de fábrica es de 11 segundos con ID# en 13 ó 14, el tiempo de demora en tomar la llamada de fábrica es de 12 segundos con ID# en 15 ó 16,
Programación de la Contestadora Automática 6. Use los botones VOL (+ ó -) para desplazarse arriba o abajo seleccionar la hora. AM o PM serán fijados de acuerdo con la hora seleccionada. 7. Oprima el botón SEL/SAVE para salvar, y el cursor se mueve al campo de minutos. 8. Use los botones VOL (+ ó -) para desplazarse arriba o abajo seleccionar el minuto. 9. Oprima el botón SEL/SAVE para salvar. 10. Oprima el botón EXIT.
Operación Básica Programación de Identificación (ID) Válida Cuando la Contestadora Automática esté activada, la llamada puede ser reenviada a cualquier número de extensión listado. 1. Oprima el botón MENU mientras está en la modalidad de alerta. 2. Use los botones VOL (+ ó -) para desplazarse arriba o abajo CONTESTAD AUTOMATIC. 3. Oprima el botón SEL/SAVE. 4. Use los botones VOL (+ ó -) para desplazarse arriba o abajo PROG IDENTIF VALIDA. 5. Oprima el botón SEL/SAVE. 6.
CUIDADO: Para mantenimiento o reemplazo, puede comprar un auricular adecuado a través del centro de servicios o tienda minorista.
Operación Básica Si usted recibe una llamada en una línea que no es la línea prioritaria, 1. Levante el auricular y oprima el botón de la línea correspondiente (en modalidad el auricular), O Oprima el botón SPEAKER y oprima el botón de la línea (en modalidad de altavoz), O Oprima el botón de línea correspondiente, y después oprima el botón HEADSET (en modalidad de audífonos). 2. Cuando haya terminado, cuelgue el auricular, o oprima el botón SPEAKER o el botón HEADSET.
Operación Básica 3. Oprima el botón SEL/SAVE para confirmar. El indicador de la pantalla muestra cuánto tiempo estuvo deshabilitado el timbre. 4. Para cancelar, oprima nuevamente el botón PRIVACY o cuelgue el auricular. NOTA: Si el Contestadora Automático del Interfono (Intercom Auto Answer) está activado (ON), entonces el aparato automáticamente contestará la llamada del interfono aunque la función de No Molestar (Do Not Disturb) haya sido activada.
Operación Básica Para Revisar los Números de “Redial” Su teléfono graba hasta seis números telefónicos marcados previamente. 1. Cuando el aparato está inactivo, oprima el botón REDIAL/FORMAT. 2. Use los botones VOL (+ ó -) para desplazarse arriba o abajo para ver los últimos seis números marcados previamente. 3. Mientras que el número seleccionado se muestra, levante el auricular u oprima el botón SPEAKER, DIAL, o el botón de alguna línea para marcar el número telefónico.
Llamadas por Interfono Para Ofrecer Privacidad En cualquier momento durante una conversación, usted puede utilizar la función de privacidad para asegurar la línea. 1. Mientras está en la línea, oprima el botón PRIVACY. El indicador se ilumina. 2. Para cancelar, oprima nuevamente el botón PRIVACY y cuelgue. NOTA: Si usted pone una llamada en espera mientras está en modalidad de privacidad, nadie más que usted puede tener acceso a la línea en espera.
Llamadas por Interfono En la alternativa, usted puede oprimir el botón INTERCOM, y después oprima el botón INTERCOM/ MEMORY LOG (1-16) para llamar a la estación con quien usted quiera comunicarse. El altavoz se activa automáticamente. El altavoz se activa automáticamente. NOTA: Si usted quiere cambiar al auricular, levántelo y continúe hablando. Para usar los audífonos, oprima el botón HEADSET.
Llamadas por Interfono Llamadas en Conferencia por Interfono Esta función le permite tener una conversación de 3 personas usando la función del interfono y una línea abierta. 1. Haga una llamada o mande una llamada por interfono. 2. Oprima el botón HOLD. 3. Haga una llamada en otra línea o haga la llamada por interfono. 4. Oprima el botón CONFERENCE. 5. Hable con las dos personas.
Identificador de Llamadas Identificador de Llamadas (CID) Pantalla Sumario La pantalla sumario muestra la hora y fecha actuales, el número de llamadas que deben ser re‑ visadas y el número total de llamadas salvadas. Esta información permanece en la pantalla hasta que algún botón sea oprimido. Dentro de 60 segundos de haber recibido una llamada nueva, la información de la persona que llama aparece en la pantalla.
Identificador de Llamadas Para Borrar un Archivo del Identificador de Llamadas Para borrar el archivo que aparece en la pantalla, oprima el botón DELETE una vez. Para Borrar Todos los Archivos Esta función le permite borrar todos los archivos del Identificador a la vez. 1. Mientras que ve un archivo del Identificador de Llamadas, oprima y sostenga el botón DELETE. La indicación OPRIM DELETE OTR VEZ BORRE ARCHIV IDENTIF aparece en la pantalla. 2. Oprima nuevamente el botón DELETE para confirmar.
Memoria Identificador de Llamada en Espera Esta función le permite ver quién está llamando cuando usted escucha el tono de llamada en espera. La información de identificación de la persona que llama aparece en la pantalla después de que usted escucha el tono. • Oprima el botón FLASH para poner en espera a la persona con la que usted está hablando y poder contestar la llamada entrante.
Memoria Oprima un número del interfono (INTERCOM/ MEMORY LOG) (1-16) para salvar el archivo en esa localización de memoria. NOTA: Si hay un registro guardado en la ubicación en memoria seleccionada “CORREGIR?” se muestra en la pantalla. Oprima Sel/Save para confirmar la sobreescritura o oprima el botón EXIT, luego seleccione una nueva ubicación. 7. Repita los pasos 1-6 para los nombres adicionales y números que usted quiera almacenar, hasta 94, en el Libro Telefónico.
Memoria Para Almacenar el Último Número Marcado 1. Cuando el teléfono está inactivo, oprima el botón REDIAL/FORMAT. 2. Use los botones VOL (+ ó -) para desplazarse arriba o abajo para ver los últimos seis números marcados previamente. 3. Mientras ve el número deseado, oprima el botón SEL/SAVE dos veces. 4. Agregue el nombre como se explica en la sección de Para Almacenar un Nombre y Número en la Memoria. 5. Oprima el botón STORE. La indicación INSCRIBA LOCALIZ aparece en la pantalla. 6.
Memoria Para borrar un archivo del registro de memoria (INTERCOM/ MEMORY LOG): 1. Oprima el botón DIR. 2. Oprima el botón correspondiente (1-16) para el registro de Intercom/Memoria que usted quiere eliminar. 3. Oprima el botón DELETE para borrar, BORR- DELETE OTRA VEZ aparece en la pantalla. 4. Oprima nuevamente el botón DELETE para confirmar. NOTA: Oprima el botón EXIT para cancelar la función de borrar. Para Borrar Todas la Memorias 1. Oprima el botón MENU mientras está en modalidad de alerta.
Sistema de Contestadora Sistema de Contestadora Usted puede programar uno o más teléfonos adicionales para actuar como una Sistem de Contestadora (hasta 16 unidades en el sistema), cada máquina contestadora puede tomar sólo una línea a la vez. Para prevenir que varias unidades el Sistema de Contestadora tomen la misma llamada, usted deberá asignar diferentes tiempos de demora de toma de llamada por cada unidad el Sistem de Contestadora.
Sistema de Contestadora Grabación de Mensajes Entrantes La unidad responderá las llamadas entrantes o las llamadas enrutadas después de X timbres (demora para toma de llamada programada en MENU) y reproducirá el saludo de salida. Después de escuchar el saludo seguido por un largo bip, la persona que llame puede dejar un mensaje. El contador de mensajes muestra el nuevo número de mensajes. Si hay un nuevo mensaje grabado en la unidad, el indicador “NEW MESSAGE” parpadeará.
Sistema de Contestadora Durante la reproducción de cada mensaje, usted puede presionar el botón CID para saltar el mensaje actual O presionar el botón DIR para volver a reproducir el mensaje actual. Si no hay mensajes, la unidad anunciará “You have NO messages”. Eliminación de Mensajes Para eliminar mensajes: 1. Oprima el botón PLAY mientras está en el modo desocupado. 2. Use los botones DIR ó CID (izquierda/derecha) para desplazarse al mensaje que usted quiere eliminar. 3.
Operadora Automática 4. Ingrese los comandos remotos. 5. Para salir de la operación remota, cuelgue. El sistema desconectará automáticamente la llamada si el usuario no ingresa un comando dentro de 10 segundos. Operación con Tarifa Reducida Este sistema tiene una modalidad de tarifa reducida automática integrada para permitirle saber si usted ha recibido algunos nuevos mensajes antes de responder, ahorrándole así costos de larga distancia.
Operadora Automática Si la persona que llama no ingresa un número de extensión después de escuchar el mensaje, la Operadora Automática espera 5 segundos y reproduce el anuncio de salida de OPERADORA (AT‑ TENDANT) para quien llama. Si la persona que llama aún no ingresa un número de extensión en 5 segundos; a) el Anuncio Saludo de Salida “Lo lamento, nadie está disponible para responder la llamada. Por favor llame otra vez “ será reproducido si el sistema de contestadora está apagada.
Operadora Automática 6. Use los botones VOL (+ ó -) para desplazarse arriba o abajo SALUDO DIA, o SALUDO NOCHE, o SALUDO AUXILIAR. 7. Oprima el botón SEL/SAVE. 8. Espere el bip. Luego hable hacia el teléfono en un tono normal de voz. 9. Oprima el botón SEL/SAVE para salvar., y el saludo grabado será reproducido una vez. Reproducción y Borrado de Saludos de Operadora Automática 1. Oprima el botón MENU mientras está en la modalidad de alerta. 2.
Solución de Problemas Mensajes en la Pantalla del Identificador de Llamadas Los siguientes mensajes especiales indican el estado actual de un mensaje o del aparato: NO HAY LLAMADAS La memoria del Identificador está vacía. DESCONOCIDA La llamada entrante no tiene servicio de Identificador de Llamadas o su área de servicio no está conectada con la suya. Si la indicación DESCONOCIDO aparece junto con el número que llama, la información del nombre para ese número no estaba disponible.
Solución de Problemas Solución de Problemas No hay tono de marcar • Verifique o repita los pasos de la instalación: Asegúrese que el cable telefónico esté conectado a la base del aparato y a un enchufe de pared. Asegúrese que los cables de línea no estén dañados. • Asegúrese que el gancho para colgar se levante cuando se descuelga el auricular. • Verifique el botón SPEAKER. Asegúrese que el indicador esté apagado. • Desconecte el teléfono del enchufe de pared y conecte otro teléfono en el mismo enchufe.
Telefield NA Inc. Gerente, Servicio al Consumidor 4915 SW Griffith DR.
Qué cubre la garantía: • Defectos de materiales o de mano de obra. Cuánto tiempo después de su compra: • Dos años a partir de la fecha de compra. Qué haremos: • Le proporcionaremos un aparato de reemplazo. La unidad de intercambio estará bajo garantía por el período de garantía restante del producto original. Cómo obtiene el servicio: • Busque una prueba de compra, tal como una factura o recibo de compra, que ofrezca evidencia de que el producto se encuentra dentro del período de garantía.
Cómo se relaciona la ley estatal con esta garantía: • Algunos estados no permiten la exclusión ni la limitación de daños incidentales ni resultantes, o la limitación de la duración de una garantía implícita, por lo tanto, las limitaciones y exclusiones mencionadas pueden no aplicarse en su caso. • Esta garantía le concede derechos legales específicos y, además, puede tener otros derechos que varían de un estado al otro.
Indice A H Activación/Desactivación de la Operadora Automática 43 Hacer Llamadas con los Audífonos Opcionales Hacer una Llamada con el Altavoz 26 Hacer una Llamada con el Auricular 26 B Buzón I 23 ra 36 34 16 C Clave de Acceso Remoto 22 Clave de Área Local 18 Claves de Área Regionales 19 Cómo Obtener Servicios de Mantenimiento Compatibilidad con Audífonos (CCA) 4 Conexión con el Sistema de Contestadora Contestar Automáticamente el Interfono Contraste de la Pantalla 18 Cuidado General del Producto 48
Indice O Opción de Teléfono Inalámbrico Operación Básica 26 Operación con Tarifa Reducida Operación de las Baterías 46 Operación sin Corriente 46 Operadora Automática 13 Operadora Automática 43 Otros Teléfonos en el Sistema 46 43 13 P Pantalla Sumario 34 Para Accesar el Sistema de la Contestadora desde otra Ubicación 42 Para Almacenar el Último Número Marcado 38 Para Almacenar un Número y Nombre en la Memoria 36 Para Almacenar una Pausa en la Memoria 38 Para Borrar Todas la Memorias 39 Para Borrar Todos
Oregon 302 RCA es una marca registrada de RCA Trademark Management S.A. y se utiliza bajo licencia. © 2012. Todos los derechos reservados. T0009009 (REV.