4-Line Intercom Speakerphone User’s Guide Quick Guide on Pgs. 7-14 Please read this manual before operating product for the first time.
Important Information Equipment Approval Information Your telephone equipment is approved for connection to the Public Switched Telephone Network and is in compliance with parts 15 and 68, FCC Rules and Regulations and the Technical Requirements for Telephone Terminal Equipment published by ACTA. 1 Notification to the Local Telephone Company On the bottom of this equipment is a label indicating, among other information, the US number and Ringer Equivalence Number (REN) for the equipment.
Important Information 2 Rights of the Telephone Company Should your equipment cause trouble on your line which may harm the telephone network, the telephone company shall, where practicable, notify you that temporary discontinuance of service may be required. Where prior notice is not practicable and the circumstances warrant such action, the telephone company may temporarily discontinue service immediately.
Important Information Interference Information This device complies with Part 15 of the FCC Rules. Operation is subject to the following two conditions: (1) This device may not cause harmful interference; and (2) This device must accept any interference received, including interference that may cause undesired operation. This equipment has been tested and found to comply with the limits for a Class B digital device, pursuant to Part 15 of the FCC Rules.
Table of Contents Equipment Approval Information...................... 2 Licensing......................................................... 3 Hearing Aid Compatibility................................ 3 Interference Information................................. 4 FCC RF Radiation Exposure Statement............. 4 Introduction.................................................... 7 Parts Checklist............................................... 8 Telephone Jack Requirements...........................
Table of Contents Reviewing Phone Book (Directory) . Memory.........................................................32 Reviewing the Intercom/Memory Log (memory location).........................................32 Editing a Name or Number Stored in Phone Book (Directory) Memory............................33 Editing a Name or Number Stored in the Intercom/Memory Log . (Memory Location)........................................33 Storing the Last Number Dialed..................33 Storing a Pause in Memory......
Important Information Introduction CAUTION: When using telephone equipment, there are basic safety instructions that should always be followed. Refer to the IMPORTANT SAFETY INSTRUCTIONS provided with this product and save them for future reference. Your Four-Line Speakerphone is a full-featured phone ideally suited for home-office use. It is designed to receive calls on up to four incoming telephone lines and to serve up to 16 station users.
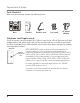
Connections & Setup Parts Checklist Make sure your package includes the following items: Base Handset Handset cord Line cords AC power adaptor Telephone Jack Requirements To use this phone, you will need an RJ11C (for a single line) or a RJ14C (for two lines) type modular phone jack, which might look like the one pictured here, installed in your home or office. If you don’t have either modular jack, call your local phone company to find out how to get one installed.
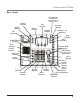
Connections & Setup Base Layout New Message (indicator) only applicable for Model 25424 Privacy (button) Menu (button) Exit (button) Redial/Format (button) Flash (button) Delete (button) Dial (button) Sel/Save (button) Intercom (button) Memory 1-16 (buttons) Page (button) Store (button) Volume pq (buttons) Transfer (button) CID (button) Conference (button) Hold (button) * (button) Headset (button) only applicable for Model 25424 Line 4 (button) Line 3 (button) Line 2 (button) Line 1 (button) Spe
Connections & Setup Important Installation Information • Never install telephone wiring during a lightning storm. • Never install telephone jacks in wet locations unless the jack is specifically designed for wet locations. • Never touch non-insulated telephone wires or terminals, unless the telephone line is disconnected from the network. • Use caution when installing or modifying telephone lines. • Temporarily disconnect any equipment connected to the phone such as faxes, other phones, or modems.
Connections & Setup Installing the Phone The phone may be connected to two 2-line (RJ14C) wall jacks or four single line (RJ11C) wall jacks to accomodate all four lines. IMPORTANT: Install batteries and connect the AC power supply to the base unit as outlined in steps 1 through 3 below prior to connecting the telephone line cords to insure for proper base station ID assignment. 1. Choose an area near an electrical outlet and telephone wall jack.
Connections & Setup 4. Connect the telephone line cords: If you have two dual line wall jacks installed in your home or office, plug one end of the straight telephone line cord tagged as “LINE 1+2” into the jack marked LINE 1 + 2 and one end of the other straight line cord into the other jack on the back of the base. Plug the other end of each line cord into the dual-line wall jacks.
Connections & Setup VERY IMPORTANT: In order to achieve full system operation (i.e. intercom, page, etc.), Line 1 must be connected and must be common to all phones connected to the system. Only other 25413/14/15 models are compatible for full system operation. For proper operation of intercom, page function, etc., DO NOT connect a DSL modem to Line 1. • To set your own Phone ID, or change your phone ID, follow the steps in the Phone ID section.
Programming the Telephone Other System Phones 1. Press Line 1. 2. Look at all the other stations. If they all indicate line 1 is being used, the connection is correct. OR 1. Press the Intercom button. The display shows INTERCOM and ENTER CALLING PHONE ID. 2. Enter a phone ID by pressing an Intercom/Memo Log button (1-16). The display shows the phone ID you entered. If the phone ID you entered is connected to the system, you will hear a ring back tone (call through tone) at your phone.
Programming the Telephone Speakerphone, Handset, and Headset Volume While the phone is in use, during the desired mode, press the Vol (+ or -) buttons until you reach a comfortable listening level. The phone stores the setting after the last button press. Ringer Tone The ringers for all four lines may be set independent of one another. 1. Press the Menu button while in standby mode. 2. Use the Vol (+ or -) buttons to scroll up or down to SET PHONE OPTIONS. 3. Press the Sel/Save button. 4.
Programming the Telephone Delay Ring Use this setting to delay the Central Office ring. 1. Press the Menu button while in standby mode. 2. Use the Vol (+ or -) buttons to scroll up or down to SET PHONE OPTIONS. 3. Press the Sel/Save button. 4. Use the Vol (+ or -) buttons to scroll up or down to SET DELAY RING. 5. Press the Sel/Save button. 6. Use the Vol (+ or -) buttons to scroll up or down to 0 ring up to 10 rings. 7. Press the Sel/Save button to save. NOTE: The default Delay Ring is 0.
Programming the Telephone Phone Name 1. Press the Menu button while in standby mode. 2. Use the Vol (+ or -) buttons to scroll up or down to SET PHONE OPTIONS. 3. Press the Sel/Save button. 4. Use the Vol (+ or -) buttons to scroll up or down to SET PHONE NAME. 5. Press the Sel/Save button. 6. Use the touch-tone pad to enter the phonebook name (up to 8 characters). More than one letter is stored in each of the number keys. For example, to enter “Lorraine,” press the 5 key three times for the letter L.
Programming the Telephone Flash Time 1. Press the Menu button while in standby mode. 2. Use the Vol (+ or -) buttons to scroll up or down to SET PHONE OPTIONS. 3. Press the Sel/Save button. 4. Use the Vol (+ or -) buttons to scroll up or down to SET FLASH TIME. 5. Press the Sel/Save button. 6. Use the Vol (+ or -) buttons to scroll up or down through the flash time options. The default setting is 600ms. 7. Press the Sel/Save button to save. NOTE: You may press the Exit button at any time to exit.
Programming the Telephone 7. Press the Sel/Save button to save. NOTE: Not applicable to Model 25423. Display Contrast Adjust the display contrast to one of four contrast levels. 1. Press the Menu button while in standby mode. 2. Use the Vol (+ or -) buttons to scroll up or down to SET LCD CONTRAST. 3. Press the Sel/Save button. The MIN and MAX contrast scale shows on the display. 4. Use the DIR or CID (left/right) buttons to adjust the contrast. The display instantly adjusts with each press of the button.
Programming the Telephone 1. Press the Menu button while in standby mode. 2. Use the Vol (+ or -) buttons to scroll up or down to SET AREA CODE. 3. Press the Sel/Save button. 4. Use the Vol (+ or -) buttons to scroll up or down to REGIONAL AREA CODES. 5. Press the Sel/Save button. All six regional area code fields and Enter Number show in the display. 6. Use the touch tone pad on your phone to enter up to six regional area codes. 7. Press the Sel/Save button to save.
Basic Operation Hour Format You may set this phone to a 12 or 24-hour format. The default is 12-hour format. 1. Press the Menu button while in standby mode. 2. Use the Vol (+ or -) buttons to scroll up or down to SET TIME & DATE. 3. Press the Sel/Save button. 4. Use the Vol (+ or -) buttons to scroll up or down to SET HOUR FORMAT. 5. Press the Sel/Save button. 6. Use the Vol (+ or -) buttons to scroll up or down to select 12-HOUR or 24-HOUR. 7. Press the Sel/Save button to save.
Basic Operation Making Calls with the Speakerphone 1. Press the Speaker button and the phone automatically selects the priority line. If the priority line is occupied, it selects an open line. OR Press a Line button to select a line. 2. Wait for a dial tone then dial a phone number. 3. Press Speaker button when finished. NOTE: Only one-way conversation is possible in speakerphone mode. When you are speaking, you are transmitting. When you are listening, you are receiving. You can’t do both at the same time.
Basic Operation Answering Calls If you receive a call on the priority line, 1. Pick up the handset (handset mode), OR 2. Press the Speaker button (speakerphone mode), OR 3. Press the Headset button (headset mode). 4. When finished, hang up the handset, or press the Speaker button or press the Headset button. If you receive a call on a line other than the priority line, 1. Pick up the handset and press the corresponding line button (handset mode), OR 2.
Basic Operation Do Not Disturb This feature is set at individual telephones to disable (silence) an incoming ring signal, intercom ring, or page. When there is an incoming call or an intercom call, the status indicators function as normal but the phone will not ring. 1. When the unit is idle, press the Privacy button. The Privacy indicator flashes and the last setting is displayed. 2. Use the Vol (+ or -) buttons to scroll up or down to select the duration.
Basic Operation Redial 1. Pick up the handset (handset mode), or press the Speaker button (speakerphone mode), or press the Headset button (headset mode) and the priority line is automatically selected, OR Press a line button to select other line. 2. Press the Redial/Format button NOTE: The redial function will not operate if the number to be redialed contains more than 32 digits. If the number is longer than that, you will hear an error tone.
Basic Operation Receiving a Transferred Call from Another Station If a call is transferred to your station, the line indicator flashes red. To answer the call, press that line button. If you are on the line when a call is transferred to you, you will hear beeps to alert you of the incoming call. Put your current call on hold by pressing Hold, and then pick up the incoming call by pressing the corresponding line button.
Intercom Calls 3. Press another line button and dial the telephone number of the party you want to conference with. 4. Press the Conference button. 5. Speak to both parties. NOTE: If you have more than one line on hold, and you want to have a conference call, you must first select the line on which you want to conference. To disconnect one party: Press the line button for the person you want to continue speaking with, and the other party is automatically disconnected.
Intercom Calls Answering an Intercom Call When you receive an Intercom call, the Intercom indicator flashes red, and the display shows the caller’s name and phone ID. NOTE: If you want to answer with the speakerphone, press the Intercom or Speaker button. If you want to answer by headset, press the Headset button (the headset must be connected). To answer by handset, lift the handset. NOTE: Press Speaker or lift the handset to automatically select a party.
Caller ID Paging All Stations 1. Lift the handset. 2. Press the Page button and listen for the beep. The other stations not in use automatically activate their speakerphones and receive your page. 3. Speak into the handset. You have 30 seconds to page in this mode. After 30 seconds, the page is cancelled. 4. When finished, hang up the handset. NOTE: You will not receive a page when Do Not Disturb is turned on. NOTE: Paging can be done with optional headset.
Caller ID Reviewing CID Records • Press the CID button , and then use the Vol (+ or -) buttons to scroll through the call records. • When you scroll to the start/end of the list, START/END appears in the display. Saving a CID Record to the Intercom/Memory Log or to Phone Book Memory 1. While a name and telephone number shows in the display, if you need to edit the information, press the Sel/Save button and follow the steps for Storing a Name and Number in Memory. 2.
Memory 7-digits: 7-digit telephone number (i.e.555-5555) 10-digits: 3-digit area code +7-digit telephone number (i.e.425-555-5555) 11-digits: long distance code 1 +3-digit area code +7-digit telephone number (i.e. 1-425-555-5555) 4. To dial the displayed number, select a line or press Dial again. If You Did Not Program Your Local Area Code 1. Press the CID button , and then use the Vol (+ or -) buttons to display the number you want to dial. You will only see 10-digit numbers (i.e.234-555-1234). 2.
Memory 4. Use the touch-tone pad to enter a name (up to 21 characters). More than one letter is stored in each of the number keys. For example, to enter Bill Smith, press the 2 key twice for the letter B. Press the 4 key 3 times for the letter I. Press the 5 key 3 times for the letter L. Press the 5 key 3 times for the second letter L, and press the 1 key to insert a space between the first and last name.
Memory Editing a Name or Number Stored in Phone Book (Directory) Memory 1. Press the DIR button. 2. Use the Vol (+ or -) buttons to scroll up or down to the desired memory record. 3. Press the Sel/Save button and edit the content according to the steps in the Storing a Name and Number in Memory section. Editing a Name or Number Stored in the Intercom/Memory Log (Memory Location) 1. Press the DIR button. 2. Press the Intercom/Memory Log button (1-16). 3.
Memory 2. Use the Vol (+ or -) buttons to scroll up or down through the phone book memories, or use the touch tone pad to enter the corresponding letters for the memory you want to review. For example, press the 5 key to display phone book memories that start with the letter J. Press the 5 key twice to go to memories starting with the letter K. 3. Press the Dial button. The number automatically dials. Memory Delete/Clear To delete a Phone Book memory: 1. Press the DIR button. 2.
Memory Chain Dialing This process allows you to dial a succession of stored numbers from separate memory locations. This is useful when you must dial several sequences of numbers, such as with frequent calls via a telephone company long distance provider. For example Memory location Local access number of long distance company 6 Authorization code (ID) 7 Long distance phone number 8 1. Press the line you want. 2. Press memory location 6. 3. Press memory location 7. 4. Press memory location 8.
Troubleshooting Guide Operation without Power If the power cord is not plugged into the unit and no battery is installed, the unit enters into No Power Operation mode. in this mode, the user may: 1) use the handset to manually make a call on line 1 only, 2) answer a call on line 1 with the handset. Cordless Phone Option It is possible to enhance your phone to a cordless feature with the additional purchase of the H5401 accessory handset and module.
Troubleshooting Guide Memory dialing doesn’t work • Did you program the memory location keys correctly? • Did you follow proper dialing sequence? Battery icon is blank or shows only one bar • The 4 “AAA” batteries need replacing or are improperly installed or not installed at all. Intercom does not function correctly • Make sure line 1 is connected properly and common to all phones on the system. • Make sure all phone ID’s (station numbers) involved have been assigned.
Warranty Assistance Warranty Assistance If trouble is experienced with this equipment, for warranty information, please contact customer service at 1-800-448-0329. If the equipment is causing harm to the telephone network, the telephone company may require that you disconnect the equipment until the problem is resolved. Any unauthorized repairs, changes or modifications not expressly approved by Thomson Inc. could void the user’s authority to operate this product.
Accessory Information Accessory Information AC power adaptor 5-2777 To place order, have your Visa, MasterCard, or Discover Card ready and call toll-free 1-800-338-0376. A shipping and handling fee will be charged upon ordering. We are required by law to collect appropriate sales tax for each individual state, country, and locality to which the merchandise is being sent. Items are subject to availability. *Prices are subject to change without notice.
Warranty Limited Warranty What your warranty covers: • Defects in materials or workmanship. For how long after your purchase: • Two years, from date of purchase. (The warranty period for rental units begins with the first rental or 45 days from date of shipment to the rental firm, whichever comes first.) What we will do: • Provide you with a new or, at our option, a refurbished unit. The exchange unit is under warranty for the remainder of the original product’s warranty period.
Warranty Product Registration: • Please complete and mail the Product Registration Card packed with your unit. It will make it easier to contact you should it ever be necessary. The return of the card is not required for warranty coverage. Limitation of Warranty: • THE WARRANTY STATED ABOVE IS THE ONLY WARRANTY APPLICABLE TO THIS PRODUCT. ALL OTHER WARRANTIES, EXPRESS OR IMPLIED (INCLUDING ALL IMPLIED WARRANTIES OF MERCHANTABILITY OR FITNESS FOR A PARTICULAR PURPOSE) ARE HEREBY DISCLAIMED.
Index A Accessory Information Answering an Intercom Call Answering Calls B Base Layout Basic Operation C Call Alert Tone Call Waiting Caller ID Caller ID Chain Dialing Clear All Memories Conference Calls Cordless Phone Option D Data Port Delay Ring Deleting a CID Record Deleting All Call Records Dialing a Stored Number Dialing Back Display Contrast Display Messages Do Not Disturb E 39 28 23 9 21 FCC RF Radiation Exposure Statement 4 Flash 24 Flash Time 18 G General Product Care H 18 31 29 35
Index M Making Calls with the Handset 21 Making Calls with the Optional Headset 22 Making Calls with the Speakerphone 22 Manually Setting the Time and Date 20 Memory Delete/Clear 34 Memory Log and Phone Book (Directory) Memory 31 Message Waiting 26 Mute 23 N No Unknown/Blocked O One-Touch Intercom Operation By Battery Operation without Power Other System Phones P Paging All Stations Parts Checklist Phone ID Phone Name Placing a Call on Hold Pre-dialing Priority Line Privacy Programming the Telephone
Visit the RCA web site at www.rca.com Please do not send any products to the Indianapolis address listed in this manual or on the carton. This will only add delays in service for your product. Thomson Inc. 101 West 103rd Street Indianapolis, IN 46290-1102 © 2007 Thomson Inc. Trademark(s) ® Registered Marca(s) Registrada(s) Model 25423/24 00020876 (Rev.