
Programming instructions

Speed Controller
Programming Instructions
20A/30A/40A/45A/60A/70A/80A/100A/125A/200A
Phrases 1 Enter programming Mode
1. Connect your motor and receiver to the speed controller, but do not connect the
battery yet.
2. Turn on your transmitter and move the throttle stick to the full throttle position (full
up). Please Note: Most Futaba transmitters have the throttle channel reversed by
default.
3. Connect your battery and the controller will initialize with a musical tone.
Phrases 2 Programming
After 3 seconds, the controller will start beeping a sequence of tones – a musical tone
followed by one or more beeps. Each sequence represents a parameter that you can program
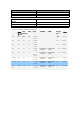
and is repeated 3 times. The parameters are:
— Tone + 1 Beep Cell Type and No. of Cells
— . — Tone + 2 Beeps Throttle Setting
— . — . — Tone + 3 Beeps Brake Setting /Throttle type (for Heli)
— — — — Tone + 4 Beeps Direction and Cutoff Type
— — — — — Tone + 5 Beeps Timing Mode
— — — — — — Tone + 6 Beeps Pulse Width Modulation (PWM)
Step 1. Starting. When you hear the sequence for the parameter you wish to program, move the
throttle stick to the center position.
The controller will then start beeping a Morse code sequence of short and long beeps
representing the possible options you may choose for the selected parameter. See table 2 for
a list of all programmable options. Each option sequence is repeated 3 times.
Step 2. Select and save, the select the option, move the throttle stick back to the full up
position., When you hear the sequence for the option you wish to select. The controller will
then save the selected option, and sound a long beep as a confirmation. It then goes back
to the beginning of the programming sequence (phrases 2 step 1).
Step 3. Complete programming and save options. Setup all the parameters you need to change.
When complete, move the throttle stick to the lowest (down) position. The controller will
save all options and re-initialize in normal running mode so you can start your motor.