Operating instructions Manual de uso Instructions d’utilisation Istruzioni d’uso Bedienungsanleitung Gebruiksaanwijzing 取扱説明書 88005RC (mode 1) 88006RC (mode 2) RC EYE One S Page 3 – 42 Página 43 – 82 Page 83 – 123 Pagina 124 – 163 Seite 164 – 204 Pagina 205 – 244 ページ245 – 285
These Operating Instructions accompany this product. They contain important information on setting up and using the device. You should refer to these instructions, even if you are buying this product for someone else. Please retain these Operating Instructions for future use! A list of the contents can be found in the Table of contents, with the corresponding page number, on page 3. Estas instrucciones de operación acompañan este producto.
Table of Contents 1. 2. 3. 4. 5. 6. 7. 8. 9. 10. 11. 12. 13. 14. 15. 16. 17. 18. 19. 20. Introduction Intended use Delivery content Safety instructions Product description Operating elements Start preparations Operating elements of the transmitter and RC EYE One S Safety installation Information for First Take-Off The first take-off Binding 2.4 GHz TX and RX 2.
1. Introduction Dear customer, Thank you for making the excellent decision to purchase this RC Logger® product. You now have a highquality product with a name that represents outstanding products. This product complies with the applicable National and European standards and regulations. We kindly request the user to follow the operating instructions, to preserve this condition and to ensure safe operation! These operating instructions relate to this product.
2. Intended use The model “RC EYE One S” is a model helicopter solely designed for private use in the model making area and the operating times associated with this. This system is not suitable for other types of use. Any use other than the one described above damages the device. Moreover, this involves dangers such as short circuit, fire, electric shock, etc. Observe the safety information under all circumstances! The product must not become damp or wet.
-- has been subjected to any serious transport-related stresses. >> Handle the product carefully. Jolts, impacts or a fall even from a low height can damage the product. Before commissioning >> Regularly check the functional reliability of your model and the remote control system. Watch out for any visible damage such as defective plug connections or damaged cables. >> All moving parts of the model must run smoothly but should not have any play in their bearings.
>> To avoid damage to the “RC EYE One S” helicopter through crashing due to low voltage of the rechargeable battery through total discharge, we recommend that you respect the low voltage light signals without fail. Batteries >> Correct polarity must be observed while inserting the batteries. >> Batteries should be removed from the device if it is not used for a long period of time to avoid damage through leaking.
>> Never damage the exterior of a LiPo flight battery. Never cut the covering foil. Never stab any LiPo flight batteries with pointed objects. There is a risk of fire and explosion! >> Remove the LiPo flight battery that is to be charged from the model and place it on a fire-proof support (e.g. a plate). Keep a distance to flammable objects (use USB extension cable if required).
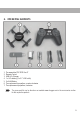
6. Operating elements 1. 2. 3. 4. 5. 6. 7. Pre-assembled “RC EYE One S” Remote Control USB LiPo Charger 1 x LiPo battery (2 x 3.7 V 350 mAh) 2 x AAA Battery Two replacement propellers, counter-clockwise Two replacement propellers, clockwise The spare part list can be found on our website www.rclogger.com in the accessories section for the respective product.
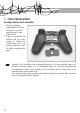
7. Start preparations Inserting batteries in the transmitter 1. Remove the battery compartment lid (1) of the transmitter. You need to push the lever (2) down slightly for this. 2. Insert two micro/AAA size batteries with the correct polarity (3). Observe the corresponding icons in the battery compartment. Insert the battery compartment lid again. Operation of the transmitter with rechargeable batteries is not recommended because of the lower cell voltage (battery = 1.5 V, rechargeable battery = 1.
Charging the flight battery Do not use any computer or notebook USB port to connect power to the USB charger because it may be damaged. USB ports also usually are limited to a current of max. 500 mA. Only use the battery included or the supplementary battery from 89029RC. 1. Use a suitable plug-in mains adapter or a cigarette lighter adapter with one USB output socket each (output 5 V/DC, at least 1.5 A). 2.
Individual battery cells of a battery pack are usually different. The USB charger has two separate chargers integrated. Therefore, it is possible that a battery cell is already charged (LED off) and the other battery cell is still being charged (LED on). Wait until both LEDs have gone out before unplugging the battery. The plug at the flight battery must be connected in a special manner. Therefore, the flight battery cannot be charged with conventional LiPo chargers.
88006RC (mode 2) Transmitter 1. Button on/off 2. Button MODE 3. Control stick left (throttle and rudder) 4. Rudder trimming 5. Control stick right (aileron and elevator) 6. Elevator trimming 7. Aileron trimming 8. ACRO button Model Top 1. Propellers front (red propellers) 2. Propellers rear (black propellers) 3.
Model Bottom 1. Bind button 2. Hook-and-loop tape for battery fastening 3. Connection socket for flight battery 4. Battery holder 9. Safety installation The “RC EYE One S” has a range of safety devices in the transmitter and model which protect the model from damage and/or should reduce possible damage to a minimum. The protection mechanisms are identified by LED indicators (model) or an acoustic warning signal (transmitter).
Model >> The LED in the “RC EYE One S” shows if the transmitter is “bound” to the model and reception of the control signal is proper. This is displayed by a flashing LED. The LED flashes in the colour of the flight mode that is set. >> If there is any interference with reception, the LED is continually lit in the colour of the set flight mode. If reception interferences are permanently present in flight operation, the motors are switched off after approx. five seconds (emergency landing initiated).
10. Information for First Take-Off For a simpler and consistent explanation of steering, classic terminology is used here as well. This comes from flight language and is widely used. Direction descriptions are always to be interpreted from the perspective of a “virtual” pilot in the model. The two red propellers are considered direction indicators. They mean “front”.
Figure 1b 88005RC (mode 1) rudder Rudder denotes the rotation of the “RC EYE One S” around the rudder axis (vertical axis). This movement either occurs unintentionally due to the speed torque of the propellers or intentionally as a flight direction change. For the “RC EYE One S”, this movement is not controlled by a tail propeller, but through speed variation of the individual propellers to each other. The two red propellers show “front”.
Figure 2a Figure 2b 18
88005RC (mode 1) elevator Elevator denotes the movement around the cross axis which can be compared to the nodding of a head. Through this, the “RC EYE One S” gains flight speed forwards or backwards or decelerates. The two red propellers show “front”. If you move the left control lever (figure 3a) to the front, the “RC EYE One S” will float forwards as a whole. If you move the control lever to the rear, the “RC EYE One S” will float backwards.
Figure 3b 88005RC (mode 1) aileron Aileron denotes the movement around the centre line which can be compared to the sideways rolling of a ball (or the sideways crawl of a crab). In this way, through lifting one side the “RC EYE One S” moves independent of its forward direction to the side. The two red propellers show “front”. If you move the right control lever (figure 4a) to the left, the “RC EYE One S” will float to the left as a whole.
Figure 4a Figure 4b 21
88006RC (mode 2) hover flight Hovering denotes a flight status in which the “RC EYE One S” neither rises nor falls so that the upwards directed uplift force is equal to the downwards directed weight. This is achieved about at the central throttle position. Push the throttle lever (figure 5a) forward to increase the motor speed and lift up the RC EYE One S. Pulling the throttle lever back causes the “RC EYE One S” to drop. Pulling the throttle lever back all the way shuts off the engines.
Figure 5b 23
88006RC (mode 2) rudder Rudder denotes the rotation of the “RC EYE One S” around the rudder axis (vertical axis). This movement either occurs unintentionally due to the speed torque of the propellers or intentionally as a flight direction change. For the “RC EYE One S”, this movement is not controlled by a tail propeller, but through speed variation of the individual propellers to each other. The two red propellers show “front”.
Figure 6b 88006RC (mode 2) elevator Elevator denotes the movement around the cross axis which can be compared to the nodding of a head. Through this, the “RC EYE One S” gains flight speed forwards or backwards or decelerates. The two red propellers show “front”. If you move the right control lever (figure 7a) to the front, the “RC EYE One S” will float forwards as a whole. If you move the control lever to the rear, the “RC EYE One S” will float backwards.
Figure 7a Figure 7b 26
88006RC (mode 2) aileron Aileron denotes the movement around the centre line which can be compared to the sideways rolling of a ball (or the sideways crawl of a crab). In this way, through lifting one side the “RC EYE One S” moves independent of its forward direction to the side. The two red propellers show “front”. If you move the right control lever (figure 8a) to the left, the “RC EYE One S” will float to the left as a whole.
Figure 8b Flight Mode The “RC EYE One S” permits you to choose between three different flight modes depending on your experience. The button (1) for this is at the bottom of the RC EYE One S.
Switching between flight modes 1. Install the flight battery into your RC EYE One S and connect the battery. The RC EYE’s status LED should go solid green. 2. Make sure that the throttle stick is at full zero. Turn on your TX. The RC EYE’s status LED should start to flash either, green, orange or red, depending on its last known flight mode. To change the flight mode press the MODE button twice until you hear a beep sound.
Before start flipping, it is required to test if all 4 motors are working perfectly. To do so, push throttle to max while hovering. The copter should ascend straight upwards without leaning to any direction and without turning in its rudder axis. If the copter does not ascend straight upwards, change the motor (or only the propeller) where the copter is leaning to while at full throttle. Perform this step repeatedly until the copter climbs straight upwards.
How to get started performing your first acrobatic flight maneuver >> SPORT mode flip recommendation: While hovering in about 5 meters height push and hold ‘ACRO button’. Now push the throttle stick to maximum and after approx. 1 second, push the aileron/elevator stick to the desired direction and release it again immediately. Hold throttle at maximum until the copter is stabilized and starts ascending again. ‘ACRO button’ can be released as soon as the copter starts flipping.
11. The first take-off 1. 2. 3. 4. 5. 6. 7. 8. The operation and handling of remote controlled flight models must be learned! If you have never steered such a model, start especially carefully and get used to the reactions of the model to the remote control commands first. Do be patient! Use the information from chapter INFORMATION FOR FIRST TAKE-OFF as reference.
9. Then increase the throttle until the “RC EYE One S” is at least 50 cm above the ground. At this height, you have passed the so-called ground effect and the “RC EYE One S” is more stable in its flight position and can be controlled more easily. Carefully try to correct a gentle drift with the trim levers for rudder, elevator or aileron. Once the “RC EYE One S” is high enough in the sky, decrease the throttle until the “RC EYE One S” hovers. Also observe the notes in chapter INFORMATION FOR FIRST TAKE-OFF.
12. Binding 2.4 GHz TX and RX Before you start binding your TX and RX make sure that you have installed the AAA batteries into the 2.4 GHz transmitter. 1. Install flight battery into your RC EYE One S and connect the battery. The RC EYE’s status LED should go solid green. 2. Press and hold the ‘bind button’ of the RC EYE One S located next to the battery tray until the status LED starts to flash red/green. 3. Make sure that the throttle stick is at full zero.
Resetting the gyro flight leveling sensor In case your ”RC EYE One S” appears to be drifting in one direction, noticeable especially in beginner mode, you may need to reset the sensor calibration. The drift in one direction after a short period of time requiring adjusting the trim to regain stable flight where the ”RC EYE One S”may start to drift again after another short period of time may be related to the following two reasons: 1.
What to do if you experienced your first crash An easy way to maintain the products perfect condition is through visually inspecting the ”RC EYE One S” even after an apparently just slight crash. One of the most common causes is a propeller where the tracking is out of its alignment. The likely cause for this is a bent motor shaft. Even a slightly bent shaft may have serious consequences if not rectified quickly.
2. For reference, put the “RC EYE One S” onto your work surface with the model LED (see arrow) pointing to the front right. 3. The front motors (motor 1 and 2) are at the “front” for this model and must have red propellers. Motor 1 turns counter clockwise, motor 2 turns clockwise. 4. The rear motors (motor 3 and 4) must have black propellers. Motor 3 turns clockwise, motor 4 turns counter clockwise. 5. Do not bend the motor shafts. Bent motor shafts (e.g.
15. Disposal General In order to preserve, protect and improve the quality of environment, protect human health and utilise natural resources prudently and rationally, the user should return unserviceable product to relevant facilities in accordance with statutory regulations. The crossed-out wheeled bin indicates the product needs to be disposed separately and not as municipal waste.
RC EYE OneLINK (for RC EYE ONE) 89036RC >> 1 x RC EYE OneLINK >> 1 x Connecting Cable for Futaba® basic transmitter models >> 1 x Connecting Cable for JR/Spectrum® basic transmitter models >> 1 x USB cable (for firmware upgrade) >> 1 x Operation Manual Main Frame (for RC EYE One) 89037RC >> 1 x Main Frame >> 1 x Battery Tray >> 6 x Dampers >> 7 x Screws RC EYE OneCase (for RC EYE One) 89038RC >> 1 x RC EYE OneCase Parallel Charging Adaptor (for RC EYE One) 89041RC >> 1 x Parallel Charging Adaptor >> 1 x Ope
RC EYE OneCam 5.8GHz RX 89050RC >> 1 x RC EYE OneCam 5.8 GHz RX >> 1 x LiPo rechargeable battery >> 1 x mini USB cable >> 1 x AV cable >> 1 x Operating manual Crash Kit (for RC EYE One S) 89051RC >> 4 x motor with stand (2 x black, 2 x red) Propeller Set (for RC EYE One S) 89052RC >> 8 x Replacement propeller (4 x black, 4 x red) 17.
>> >> >> >> Reorient or relocate the receiving antenna. Increase the separation between the equipment and receiver. Connect the equipment into an outlet on a circuit different from that to which the receiver is connected. Consult the dealer or an experienced radio/TV technician for help. 18. Product support Visit “http://www.rclogger.com/index.php/contact-us” or call +852 2559 2662 for product support. Additionally visit our support forum at “http://rclogger.com/forum”. 19.
20. RC EYE One S Preliminary Release Notes Changes from previous version (from ‘RC EYE One’ to ‘RC EYE One S’): >> TX/RX 2.4 GHz with frequency hopping (Automatic channel selection). >> TX with fixed timer function. >> TX available in Mode 1 and Mode 2. >> New landing gear (Motors are now free above ground). >> Enhanced motor blocking recognition: Motors will be checked and switched off when motor current differs excessive 2 seconds after power-up.