TURBO JETTS™ ELECTRIC HEEL WHEELS OWNER’S MANUAL Read and understand this entire manual before allowing child to use this product! For assistance contact Razor. DO NOT RETURN TO STORE. NOTE: Manual illustrations are for demonstration purposes only. Illustrations may not reflect exact appearance of actual product. Specifications subject to change without notice. Please have your product along with the 19 character product I.D.
CONTENTS Safety Warnings............................................................................................1-2 Before You Begin.............................................................................................. 3 Assembly and Set-Up....................................................................................4-5 Charging the Battery......................................................................................... 6 Pre-Ride Checklist..........................................
SAFETY WARNINGS Never hitch a ride with a vehicle. Do not ride your product in wet or icy weather and never immerse in water, as the electrical and drive components could be damaged by water or create other possibly unsafe conditions. Never risk damaging surfaces, such as carpet or flooring, by use of a Razor Turbo Jetts Electric Heel Wheels indoors.
BEFORE YOU BEGIN Remove contents from box. Remove the separators that protect the components from damage during shipping. Inspect the contents of the box for scratches, or dents that may have occurred during shipping. Because the Razor Turbo Jetts Electric Heel Wheels are assembled and packed at the factory, there should not be any problems, even if the box has a few scars or dents. MAKE SURE POWER SWITCH IS TURNED “OFF” AND BATTERY IS REMOVED BEFORE CONDUCTING ANY ASSEMBLY OR MAINTENANCE PROCEDURES.
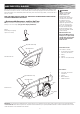
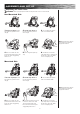
ASSEMBLY AND SET-UP Adjusting the Turbo Jetts WARNING: Failure to properly adjust the Turbo Jetts may cause the user to lose control and fall. Non-Motorized Side B B A A 1 To make strap longer: Pull the inner strap first (A), then the outer strap (B). 2 3 To make strap shorter: Pull the outer strap first (B), then the inner strap (A). Press the button and pull the frame to its maximum width. Note: Adjustment must be done while wearing recommended appropriate footwear.
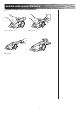
ASSEMBLY AND SET-UP Adding Rubber Heel Insert Peel the back of the adhesive and place in the heel area of the frame. Use the rubber heel inserts to customize the fit between the frame and the shoe. The insert can also help adjust the activation and ride angle.
CHARGING THE BATTERY Your Razor Turbo Jetts Electric Heel Wheels may not have a fully charged battery; therefore you must charge the battery prior to use. Be sure to charge the battery in a clean, dry location away from direct sunlight, flames or sparks. • Initial charge time: 3 hours. • Recharge time: up to 3 hours, even if the light turns green. Recommended maximum charging time is 24 hours. • Always charge the battery immediately after riding.
USAGE How to Ride • Turbo Jetts are electric, motorized heel wheels that are controlled by your foot when you ride them. • The front heel wheel is motorized and pulls you along while the back wheels just trail behind. Turbo Jetts are always used with one foot in front of the other. • The first thing to do is decide which foot will be in front. Most often it is your stronger dominant foot that goes in front. If you skateboard or ride a RipStik you already know this.
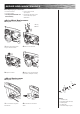
REPAIR AND MAINTENANCE Before beginning repair or maintenance: • Read the instructions • Disconnect charger • Turn the power button OFF and Remove Battery • Exercise caution around exposed parts • Contact Razor Customer Service if unsure about any repair or maintenance Drive Wheel Replacement Tool Required: 2.5 mm Allen Wrench A A A B B A–Long B–Short A B 1 Remove the four (4) hex bolts 2 Remove cover and wheel. 3 Replace new wheel. 4 Replace cover, and reinstall four using 2.
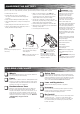
REPAIR AND MAINTENANCE Quick-Change Battery Replacement 1. Press the release button. 2. Pull battery out. 3 Insert battery.
REPAIR AND MAINTENANCE Battery Care and Disposal • To properly maintain your battery and ensure maximum battery life, carefully read the “Charging the Battery” section on page 6 of this owner’s manual. • Battery pack should not be disassembled, crushed, punctured, opened or otherwise mutilated. Li-Ion CONTAINS LITHIUM-ION BATTERY PACK. BATTERIES MUST BE RECYCLED.
TROUBLESHOOTING GUIDE *Product(s) should be turned OFF and fully charged prior to doing any Troubleshooting. NOTE: All troubleshooting steps should be performed by an adult only. Problem Possible Cause Solution Does not work out of the box Product must be traveling at least 3 mph (5 km/h) before motor will engage Razor Turbo Jetts Electric Heel Wheels must be moving at least 3 mph (5 km/h) with the drive wheel engaged with the ground before the motor will start.
RAZOR TURBO JETTS ELECTRIC HEEL WHEELS PARTS Keep your Razor Turbo Jetts Electric Heel Wheels running for years with genuine Razor parts. Visit our website or e-mail us for more information on spare part availability. (Specifications subject to change without notice.) 1. Wheels (X2) 1-1. Axle Bolt (X2) 1-2. Plastic Bushing (Short) (X2) 1-3. Bearing (X4) 1-4. Spacer (X2) 1-5. Plastic Bushing (Long) (x2) 2.
RAZOR TURBO JETTS ELECTRIC HEEL WHEELS PARTS Keep your Razor Turbo Jetts Electric Heel Wheels running for years with genuine Razor parts. Visit our website or e-mail us for more information on spare part availability. (Specifications subject to change without notice.) 1. Wheels (X2) 1-1 Axle Bolt (X2) 1-2 Plastic Bushing (Short) (X2) 1-3 Bearing (X4) 1-4 Spacer (X2) 1-5 Plastic Bushing (Long) (x2) 2. 3. 4.
NOTICE: INSURANCE YOUR INSURANCE POLICIES MAY NOT PROVIDE COVERAGE FOR ACCIDENTS INVOLVING THE USE OF THIS SCOOTER/ELECTRIC RIDE-ON PRODUCT. TO DETERMINE IF COVERAGE IS PROVIDED, YOU SHOULD CONTACT YOUR INSURANCE COMPANY OR AGENT.
FCC COMPLIANCE This device complies with Part 15 of the FCC Rules. Operation is subject to the following two conditions: (1) This device may not cause harmful interference, and (2) this device must accept any interference received, including interference that may cause undesired operation. Note: This equipment has been tested and found to comply with the limits for a Class B digital device, pursuant to part 15 of the FCC Rules.