OWNER’S MANUAL Read and understand this entire manual before allowing child to use this product! For assistance contact Razor. DO NOT RETURN TO STORE. NOTE: Manual illustrations are for demonstration purposes only. Illustrations may not reflect exact appearance of actual product. Specifications subject to change without notice. Please have your product along with the 19 character product I.D. code with you before contacting Razor for warranty assistance and/or replacement parts. Product I.D.
CONTENTS Safety Warnings............................................................................................1-2 Before You Begin.............................................................................................. 3 Assembly and Set-Up....................................................................................4-5 Charging the Battery......................................................................................... 5 Pre-Ride Checklist..........................................
SAFETY WARNINGS PROPER RIDING ATTIRE This product was manufactured for performance and durability, but is not impervious to damage. Bumping into obstacles or other aggressive riding can overstress and damage any product, including the Crazy Cart Shift, and the rider assumes all risks associated with high-stress activity. This product is not a “bumper car.” Always wear proper protective equipment, such as an approved safety helmet (with chin strap securely buckled).
BEFORE YOU BEGIN TURN POWER SWITCH OFF BEFORE CONDUCTING ANY ASSEMBLY OR MAINTENANCE PROCEDURES. Remove contents from box. Remove the separators that protect the components from damage during shipping. Inspect the contents of the box for scratches in the paint, dents or kinked cables that may have occurred during shipping. Because the Crazy Cart Shift was 99 percent assembled and packed at the factory, there should not be any problems, even if the box has a few scars or dents.
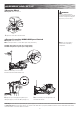
ASSEMBLY AND SET-UP Steering Wheel Tool Required: 6 mm Allen Wrench 1 WARNING: Failure to properly tighten the steering bolt may allow the steering wheel to dislodge while riding and may cause you to lose control. Tighten the screw with 6 mm Allen wrench. Parent Controlled HIGH/LOW Speed Switch Tool Required: 4 mm Allen Wrench Note: The red speed switch is located inside of the battery compartment. Note: The Crazy Cart Shift is set on the HIGH speed setting at the factory.
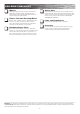
ASSEMBLY AND SET-UP Attaching the Flag 1 2 Assemble flag as shown. Insert flag into fixed hole located on the rear of the frame. CHARGING THE BATTERY Your Crazy Cart Shift may not have a fully charged battery; therefore you must charge the battery prior to use. • Initial charge time: 12 hours. • Recharge time: 12 hours, even if the light turns green Recommended maximum charging time is 24 hours.
PRE-RIDE CHECKLIST Wheels Safety Gear Practice drift riding only in wide open areas clear from curbs, parking blocks and other obstacles. Impacting the wheels against any hard surface can damage the wheels. Wheels are not covered under your limited warranty. Always wear proper protective gear, such as an approved safety helmet. Elbow pads and kneepads are recommended. Always wear athletic shoes (lace-up shoes with rubber soles) and keep shoelaces tied and out of the way of the wheels and motor.
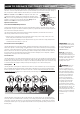
HOW TO OPERATE THE CRAZY CART SHIFT Before you ride this exciting product, take the time to learn about the controls and their effects on how the Crazy Cart Shift moves. Start out slowly. With practice and care, you must familiarize yourself with these riding hints and tips so that your experiences with the Crazy Cart Shift will allow you to maximize fun while keeping in control. Never turn the ON/OFF switch to ON before sitting down in the driver’s seat of the Crazy Cart Shift.
HOW TO OPERATE THE CRAZY CART SHIFT The steering configuration of the Crazy Cart Shift’s integrated drive and steering mechanism is similar to what some might call “bumper car” design. It has no self-correcting camber or castering features (meaning the steering tube goes straight up and down so the wheel doesn’t “align” itself on its own). Such steering might, in certain circumstances, shimmy or vibrate a little -- this is normal. Usually it is the result of an uncoordinated or adverse control condition.
REPAIR AND MAINTENANCE Turn power switch “OFF” before beginning repair or maintenance: Rear Wheel Replacement Tool Required: 5 mm Allen Wrench 1 Remove the flag and carefully turn 2 Remove the wheel and keep 4 Insert new wheel and tighten the Note: Make sure the spacer on wheel is aligned to allow the axle bolt to go through. the product over. Loosen the 5 mm axle bolt. screws with the 5 mm Allen wrench. 3 Insert the axle bolt. axle bolt and the two (2) spacers for reassembly.
REPAIR AND MAINTENANCE Battery Care and Disposal Do not store in freezing or below freezing temperatures! To properly maintain your battery and ensure maximum battery life, carefully read the “Charging the Battery” section on page 5 of this owner’s manual. Pb CONTAINS SEALED LEAD-ACID BATTERY. BATTERY MUST BE RECYCLED. Disposal: Your Razor product uses a sealed lead-acid battery which must be recycled or disposed of in an environmentally safe manner. Do not dispose of a lead-acid battery in a fire.
TROUBLESHOOTING GUIDE *Product(s) should be turned OFF and fully charged prior to doing any Troubleshooting NOTE: All troubleshooting steps should be performed by an adult only Problem Possible Cause Solution Product does not run. Undercharged battery. Charge the battery. A new battery should have been charged for at least 12 hours before using the product for the first time and up to 12 hours after each subsequent use. Check all connectors.
CRAZY CART SHIFT PARTS Keep your product running for years with genuine Razor parts. Visit our website, www.razor.com, for more information on spare part availability. (Specifications subject to change without notice.) 1. Charger Port 7. Battery Strap 14. Rear Caster Wheels (x2) 2. On/Off Switch 8. Control Module 15. Front Fork 3. Steering Bolt 9. Battery 16. Front Wheel w/ Hub Motor 3-1. Wedge 10. Seat 16-1. Motor Cover 4. Battery Cover 11. Stabilizing Posts (x2) 5. Flag 12.
NOTICE: INSURANCE YOUR INSURANCE POLICIES MAY NOT PROVIDE COVERAGE FOR ACCIDENTS INVOLVING THE USE OF THIS SCOOTER/ELECTRIC RIDE-ON PRODUCT. TO DETERMINE IF COVERAGE IS PROVIDED, YOU SHOULD CONTACT YOUR INSURANCE COMPANY OR AGENT.
FCC COMPLIANCE This device complies with Part 15 of the FCC Rules. Operation is subject to the following two conditions: (1) This device may not cause harmful interference, and (2) this device must accept any interference received, including interference that may cause undesired operation. Note: This equipment has been tested and found to comply with the limits for a Class B digital device, pursuant to part 15 of the FCC Rules.