
Owners manual


5
Need Help? Visit our web site for replacement parts, product support, a list of authorized service centers in the US and customer service contact information
at www.razor.com. Please have the product I.D. code (located on the white label of your product) available for better assistance. Additional Customer Service
contact information is listed at the back of this manual.
CHARGING THE BATTERY
Your Lil’ E may not have a fully charged battery; therefore it is a good idea to charge the battery prior to use.
• Initial charge time: 12 hours.
• Recharge time: up to 12 hours. Recommended
maximum charging time is 24 hours.
• Always charge the battery immediately after riding.
• Fully charge battery before storing for extended periods
of time.
• Unplug charger from the wall outlet when not in use.
• Failure to recharge battery periodically may result in a
battery that will not accept a charge.
• Make sure power switch is turned OFF when product
is not in use. If the power switch is left on for an
extended period of time, the battery may reach a stage
at which it will no longer hold a charge.
• To ensure long battery life, never store the product in
freezing or below freezing temperatures! Freezing will
permanently damage the battery.
• Run time: Up to 60 minutes of continuous ride time.
Run time may vary depending on riding conditions, rider
weight, climate and/or proper maintenance.
• Constant stopping and starting may shorten ride time.
• Battery life can vary depending on proper maintenance
and usage of the product.
• Only use the battery specified by Razor.
WARNING: Use ONLY with
the recommended charger. Battery
is only to be charged by an adult.
The charger is not a toy. Always
disconnect the charger before wiping
down and/or cleaning
the Lil’ E with a damp cloth.
The charger supplied with the
Lil’ E should be regularly examined
for damage to the cord, plug,
enclosure and other parts. In the
event of such damage, the Lil’ E must
not be charged until it
has been repaired or replaced.
Note: If the charger gets warm
during regular use, this is a normal
response and is no cause for
concern. If your charger does not get
warm during use, it does not mean
that it is not working properly.
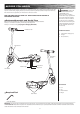
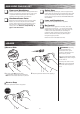
Wall outlet - No Light
Wall outlet and product - Red
(charging)
Wall outlet and product - No Light
(charging complete)
WARNING: Failure to
recharge the battery at least once a
month may result in a battery that
will no longer accept a charge.
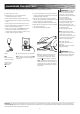
2 Plug the charger into the charger port.
The light on the charger should turn red
during charging. The light on the charger
will turn OFF when charging is completed.
Note: The indicator light located next to the
charger port will turn red when charger is
plugged into the wall outlet and product.
Light will turn OFF when charger is removed
from product.
1 Plug the charger plug into wall outlet.
Note: The light on the charger will NOT
light up until the charger is plugged into
the product.
Charger
Note:
Charger design may
vary from one shown
Make sure power
switch is in the
OFF position.