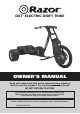
DXT™ ELECTRIC DRIFT TRIKE OWNER’S MANUAL Read and understand this entire manual before allowing child to use this product! For assistance contact Razor. DO NOT RETURN TO STORE. NOTE: Manual illustrations are for demonstration purposes only. Illustrations may not reflect exact appearance of actual product. Specifications subject to change without notice. Please have your product along with the 19 character product I.D. code with you before contacting Razor for warranty assistance and/or replacement parts.
CONTENTS Safety Warnings............................................................................................1-2 Before You Begin.............................................................................................. 3 Assembly and Set-Up....................................................................................4-7 Charging the Battery......................................................................................... 7 Pre-Ride Checklist..........................................
SAFETY WARNINGS ACCEPTABLE RIDING PRACTICES AND CONDITIONS Adult supervision is recommended. Electric drift trike are meant to be used only in controlled environments free of potential traffic hazards. Do not allow rider to ride an electric drift trike in any areas where vehicle traffic is present. Rider must maintain a hold of the handlebars at all times. Never allow more than one rider at a time to ride an electric drift trike.
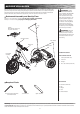
BEFORE YOU BEGIN Remove contents from box and check parts against parts diagram found on page 15. Remove the separators that protect the components from damage during shipping. Inspect the contents of the box for scratches in the paint or dents that may have occurred during shipping. Because the DXT Electric Drift Trike was partially assembled and packed at the factory there should not be any problems, even if the box has a few scars or dents.
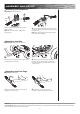
ASSEMBLY AND SET-UP Assembling the Frame Required Tools: Two (2) 5 mm Allen Wrenches B (Longer) A (Shorter) 1 Using two (2) 5 mm 3 2 Re-insert the two (2) longer coupling bolts (B) through downtube and rear frame and tighten securely in place. Connect the downtube to the rear frame and align the holes on the downtube with the holes on the rear frame. Allen wrenches, remove the three (3) coupling bolts from the downtube. Remove and discard the plastic insert.
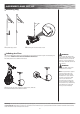
ASSEMBLY AND SET-UP Attaching the Handlebars Required Tool: 6 mm Allen Wrench R L Brake Lever Throttle 1 Place handlebars between the upper and lower handlebar clamps. Note: Make sure brake lever is on the left (from sitting position). 2 Align the handlebars parallel to the front fork. Using a 6 mm Allen wrench, tighten all four (4) bolts securely to the upper crown. Note: When properly tightened, the handlebars should not move forward or backward.
ASSEMBLY AND SET-UP Attaching Flag 1 Assemble flag as shown 2 Insert flag into fixed hole located on seat. Inflating the Tires The tires are inflated when shipped, but will invariably lose some pressure between the point of manufacturing and your purchase. Inflate the tires to the correct PSI before first time use. Periodically check the tires. Reinflate when needed. WARNING: Do not use the DXT Electric Drift Trike for the first time until you have inflated the tire to the correct PSI.
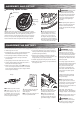
ASSEMBLY AND SET-UP Checking Spoke Tension WARNING: Regularly check the spoke tension and retighten the spokes whenever loose. If you have any doubt, ask an experienced motorcycle or bicycle mechanic to inspect your spokes to determine if the spokes need tightening or adjusting. Spoke Flange Spoke Hub Flange Spke Flange Note: Tightening each nipple more than a 1/2 turn each can cause the wheel to become distorted and wobbly, thus permanently damaging the wheel.
PRE-RIDE CHECKLIST Brake Safety Gear Check the brake for proper function. When you squeeze the lever, the brake should provide positive braking action. Always wear proper protective gear, such as an approved safety helmet. Elbow pads and kneepads are recommended. Always wear closed toe shoes (lace-up with rubber soles) and keep shoelaces tied and out of the way of the wheels. NEVER RIDE BAREFOOTED OR IN SANDALS. Tire/Wheels Periodically inspect the tire/wheels for excess wear and replace as needed.
REPAIR AND MAINTENANCE Turn power switch “OFF” before beginning repair or maintenance: • Read the instructions • Remove charger plug • Turn the power switch off • Secure the unit under repair • Exercise caution around exposed parts • Contact Razor customer service if unsure about any repair or maintenance Adjusting the Brake Tools Required: 5 mm Allen wrench WARNING: The brake is capable of causing the DXT Electric Dift Trike to skid the tire throwing an unsuspecting rider.
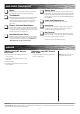
REPAIR AND MAINTENANCE Rear Wheel Replacement Required Tool: 16 mm Socket wrench 1 Loosen the 16 mm locknut and remove rear wheel(s). 15-3 15-2 15-1 Rear Wheel Hardware Sequence 15-1. Locknut 15-2. Spring Washer 15-3. Flat Washer 2 Install replacement wheel(s) and tighten securely in place. Note: the sequence of the hardware. Rear Wheel Sleeve Replacement Groove 1 Deflate tire and remove sleeve. 2 Slide replacement sleeve on to rear wheel.
REPAIR AND MAINTENANCE Front Wheel and Chain Replacement Required Tools: 15 mm Wrench, 19 mm Wrench, Phillips screwdriver 1 Using a Phillips screwdriver, loosen the seven (7) 2 Loosen the tension from the chain tensioner. 3 Remove the chain from around the sprocket on the front 4 Loosen 15mm locknut and remove axle bolt. Remove screws on the chain guard. wheel. front wheel.
REPAIR AND MAINTENANCE Front Wheel and Chain Replacement (Continued) Required Tools: 5 mm Allen Wrench, 15 mm Wrench, 19 mm Wrench 9-3 9-2 9-1 9-5 9-4 5 Re-install axle bolt and tighten front wheel securely to front fork. 6 Re-attach chain around the front wheel and the motor sprocket. Note: Make sure the chain tensioner is resting on the outer side of the chain. 7 Re-attach chain guard. 12 Front Wheel Hardware Sequence 9-3. 15 mm Lock Nut 9-2. Flat Washer Fork 9-1. Large Spacer Front Wheel 9-5.
REPAIR AND MAINTENANCE Battery Care and Disposal Do not store in freezing or below freezing temperatures. To properly maintain your battery and ensure maximum battery life, carefully read the “Charging the Battery” section on page 7 of this owner’s manual. Pb CONTAINS SEALED LEAD ACID BATTERIES. BATTERIES MUST BE RECYCLED. Disposal: Your Razor product uses sealed lead-acid batteries which must be recycled or disposed of in an environmentally safe manner.
DXT ELECTRIC TROUBLESHOOTING *Unit should be turned OFF and fully charged prior to doing any Troubleshooting NOTE: All troubleshooting steps should be performed by an adult only Problem Possible Cause Solution Electric motorbike does not run Undercharged battery Charge the battery. A new battery should have been charged for at least 12 hours before using the electric motorbike for the first time and up to 12 hours after each subsequent use. Check all connectors.
DXT ELECTRIC PARTS Keep your product running for years with genuine Razor parts. Visit our website to purchase replacement parts. (Specifications subject to change without notice.) 1. 2. 3. 4. 5. 6. 7. 8. 9. Handlebar Grips (x2) Twist Grip Throttle Handlebars Brake Lever Handlebar Clamps (Upper/Lower) Front Fork Chain Guard (Right/Left) Chain Front Wheel 9-1. Large Spacer 9-2. Flat Washer 9-3. Locknut 9-4. Axle Bolt 9-5. Small spacer 10. Down Tube 10-1. Steering bolt 10-2. Brushing (x2) 10-3.
NOTICE: INSURANCE YOUR INSURANCE POLICIES MAY NOT PROVIDE COVERAGE FOR ACCIDENTS INVOLVING THE USE OF THIS SCOOTER/ELECTRIC RIDE-ON PRODUCT. TO DETERMINE IF COVERAGE IS PROVIDED, YOU SHOULD CONTACT YOUR INSURANCE COMPANY OR AGENT.
FCC COMPLIANCE This device complies with Part 15 of the FCC Rules. Operation is subject to the following two conditions: (1) This device may not cause harmful interference, and (2) this device must accept any interference received, including interference that may cause undesired operation. Note: This equipment has been tested and found to comply with the limits for a Class B digital device, pursuant to part 15 of the FCC Rules.