Dirt Rocket™ SX500, MX500 and MX650 OWNER’S MANUAL Read and understand this entire manual before allowing child to use this product! For assistance contact Razor. DO NOT RETURN TO STORE. NOTE: Manual illustrations are for demonstration purposes only. Illustrations may not reflect exact appearance of actual product. Specifications subject to change without notice. Please have your 19 character product I.D. code ready before contacting Razor for warranty assistance and/or replacement parts. Product I.D.
CONTENTS Safety Warnings............................................................................................1-2 Before You Begin.............................................................................................. 3 Assembly and Set-Up....................................................................................4-5 Charging the Battery......................................................................................... 6 Pre-Ride Checklist..........................................
SAFETY WARNINGS Never use near steps or swimming pools. Do not allow hands, feet, hair, body parts, clothing, or similar articles to come in contact with moving parts, wheels, or drive train chain while the motor is running. Never use headphones, a cell phone or text when riding. Never hitch a ride with a vehicle.
BEFORE YOU BEGIN Remove contents from box. Remove the separators that protect the components from damage during shipping. Inspect the contents of the box for scratches in the paint, dents or kinked cables that may have occurred during shipping. Because the motor bike was 95 percent assembled and packed at the factory, there should not be any problems, even if the box has a few scars or dents. MAKE SURE POWER SWITCH IS TURNED “OFF” BEFORE CONDUCTING ANY ASSEMBLY OR MAINTENANCE PROCEDURES.
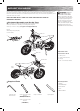
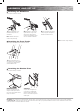
ASSEMBLY AND SET-UP Attaching the Handlebars Tools required: 6 mm Allen wrench 1 Place the handlebars in the handlebar clamps with tools and manual. Note: Handlebar clamps are located in the plastic bag. 3 Adjust the brake lever adjuster 2 Align parallel to the fork and to the proper place and tighten it with the 5 mm Allen wrench. tighten the bolts using a 6 mm Allen wrench. When properly tightened, the handlebars should not move forward or backward.
ASSEMBLY AND SET-UP Installing the Front Wheel WARNING: Failing to properly adjust and tighten the nuts and bolts that affix the fork can cause you to lose control and fall. Tools required: 14 mm wrench and 17 mm wrench (MX500/MX650 Models) 17 mm wrench and 19 mm wrench (SX500 Model) Fork Fork Axle Blot Nut Washer Spacer 1 Position wheel in front fork and slide disk brake into caliper. Spacer Washer Nut 2 Slide axle through fork, spacer and wheel hub.
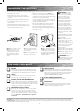
CHARGING THE BATTERY Your electric motor bike may not have a fully charged battery; therefore you must charge the battery prior to use. • Initial charge time: 12 hours. • Recharge time: up to 12 hours, even if the light turns green. Recommended maximum charging time is 24 hours. • Always charge the battery immediately after riding. • Fully charge battery before storing for extended periods of time. • Unplug charger from the wall outlet when not in use.
REPAIR AND MAINTENANCE Turn power switch “OFF” before beginning repair or maintenance: • Read the instructions • Remove charger plug • Turn the power switch off • Secure the unit under repair • Exercise caution around exposed parts • Contact Razor customer service if unsure about any repair or maintenance Adjusting the Brakes Tools required: 5 mm Allen wrench WARNING: The brake is capable of causing the electric motor bike to skid the tire throwing an unsuspecting rider.
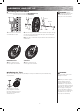
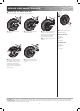
REPAIR AND MAINTENANCE Replacing the Chain and Tire 16-1 16-2 Tools required: Phillips screwdriver and two (2) 19 mm wrenches. 16-3 16-3 16-2 16-1 1 Loosen screws and remove chain guard. 2 Using two 19 mm wrenches, 3 Push the chain tensioner down loosen both axle nuts. to loosen the chain and remove the chain from the wheel sprocket and motor sprocket. Push and remove the wheel downward. Note: Your hands will get greasy doing this.
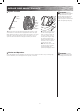
REPAIR AND MAINTENANCE Spoke Tension Spoke Flange Spoke Nipple 27 28 Hub Flange 4 Spoke Flange Rim Nipple 1 Verify the spoke tension by shaking each spoke with your fingers. Spoke 3 2 WARNING: Regularly check the spoke tension and retighten the spokes whenever loose. If you have any doubt, ask an experienced motorcycle or bicycle mechanic to inspect your spokes to determine if the spokes need tightening or adjusting. 1 2 Start with spoke closest to the should not be loose from hub.
REPAIR AND MAINTENANCE Battery Care and Disposal Never store the product in freezing or below freezing temperatures! Freezing will permanently damage the battery. Failure to recharge the battery at least once a month may result in a battery that will no longer accept a charge. CONTAINS SEALED LEAD ACID BATTERIES. BATTERIES MUST BE RECYCLED. Pb Disposal: Your Razor product uses sealed lead-acid batteries which must be recycled or disposed of in an environmentally safe manner.
TROUBLESHOOTING GUIDE Unit should be fully charged prior to doing any troubleshooting and must be done by an adult ONLY. Problem Does not work Possible Cause Battery not fully charged Solution Charge unit for a full 12 hours. Loose connection(s) Check for loose connections/wires. Check power to wall outlet and/or try a different outlet. No longer works The fuse will burn out and automatically shut off the power if the motor is overloaded.
TROUBLESHOOTING GUIDE Problem Runs intermittently Possible Cause Loose connection(s) Solution Check for loose connections/wires. Motor or electrical switch damage Contact your local Razor authorized service center for diagnosis and repair. Motor bike does not stop when applying the brake Brakes are not adjusted properly Refer to “Adjusting the Brakes” on page 7 Motor bike makes loud noises or grinding sounds Chain is too dry Apply a lubricant, such as 3 in 1 or Tri-Flow to the chain.
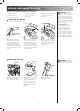
PRODUCT PARTS Keep your motor bike running for years with genuine Razor parts. Visit our website for more information on spare part availability. (Illustrations may not reflect exact appearance of actual product. Specifications subject to change without notice.) 1. Handlebar grip (right/left) 2. Twist grip throttle 02-1 Sleeve 3. 4. 5. 6. 7. 8. 9. 10. 11. 12. 13. 14.
NOTICE: INSURANCE YOUR INSURANCE POLICIES MAY NOT PROVIDE COVERAGE FOR ACCIDENTS INVOLVING THE USE OF THIS SCOOTER/ELECTRIC RIDE-ON PRODUCT. TO DETERMINE IF COVERAGE IS PROVIDED, YOU SHOULD CONTACT YOUR INSURANCE COMPANY OR AGENT.
FCC COMPLIANCE This device complies with Part 15 of the FCC Rules. Operation is subject to the following two conditions: (1) This device may not cause harmful interference, and (2) this device must accept any interference received, including interference that may cause undesired operation. Note: This equipment has been tested and found to comply with the limits for a Class B digital device, pursuant to part 15 of the FCC Rules.