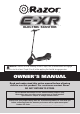
ELECTRIC SCOOTER NOTE: The unit must be traveling at least 3 mph (5 km/h) before motor will engage. Kick to start to at least 3 mph (5 km/h) while applying the throttle to engage motor. OWNER’S MANUAL Read and understand this entire manual before allowing child to use this product! For assistance contact Razor. DO NOT RETURN TO STORE. NOTE: Manual illustrations are for demonstration purposes only. Illustrations may not reflect exact appearance of actual product.
CONTENTS Safety Warnings..............................................................................................1-2 Before You Begin................................................................................................3 Assembly and Set-Up..................................................................................... 4-5 Charging the Battery..........................................................................................5 Pre-Ride Checklist.....................................
SAFETY WARNINGS estimate and can be affected by the rider’s size, weight, or skills – not every rider 18 years old or older will be suited to the product. Certainly, any rider unable to fit comfortably on the E-XR should not attempt to ride it, but a parent’s decision to allow his or her child to ride this product should be based on the child’s maturity, skill, and ability to follow rules.
BEFORE YOU BEGIN Remove contents from box. Remove the separators that protect the components from damage during shipping. Inspect the contents of the box for scratches in the paint, dents that may have occurred during shipping. Because your scooter was partially assembled and packed at the factory, there should not be any problems, even if the box has a few scars or dents. MAKE SURE POWER SWITCH IS TURNED “OFF” BEFORE CONDUCTING ANY ASSEMBLY OR MAINTENANCE PROCEDURES.
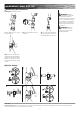
ASSEMBLY AND SET-UP Attaching the Handlebars Tool Required: 5 mm Allen Wrench WARNING: Failure to properly tighten the collar clamp may allow the handlebars to dislodge while riding and may cause you to lose control and fall. When correctly tightened, the handlebars will not rotate out of alignment with the front wheel under normal circumstances. 1 Slide rubber protectors out from front fork and t-bar. 2 Remove both rubber protectors and discard. 3 1 2 Loosen the collar clamp.
ASSEMBLY AND SET-UP Inflating the Tire Tire is inflated when shipped, but it invariably loses some pressure between the point of manufacturing and your purchase. Always inflate tire to the correct PSI before first time use. Lower air pressure can result in a shorter ride time. Periodically check front tire. Reinflate when needed. WARNING: Do not use the electric scooter for the first time until you have inflated the tire to the correct PSI.
PRE-RIDE CHECKLIST Lights Hardware/Loose Parts Check the head- and tail-lights for proper function. When you activate the lights (reference “How To Ride” on page 7 of this manual), the headlight and taillight should illuminate. Before every ride, check all parts, such as nuts, bolts, fasteners, etc., to ensure they are secure and assembled correctly. There should not be any unusual rattles or sounds from loose parts or broken components. If the product is damaged, do not ride.
USAGE How to Operate Do not activate the thumb throttle unless you are on the E-XR and in a safe, outdoor environment suitable for riding. How to Ride Once you have charged the battery (see page 5 for charging information): 1. Power ON: Put up kickstand and turn the power ON by pressing and holding power button (A) down for 3 seconds. Power is ON when the indicator light next to power button turns a solid green.
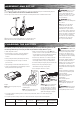
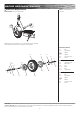
REPAIR AND MAINTENANCE Front Tire Replacement Note: Front wheel hardware sequence Tools Required: Two (2) 16 mm Wrenches 1 Using two (2) 16 mm wrenches, loosen the axle bolt. Remove wheel and install replacement wheel.
REPAIR AND MAINTENANCE Cleaning Your Scooter Wipe with a damp cloth to remove dirt and dust. Do not use industrial cleaners or solvents as they may damage the surfaces. Do not use alcohol, alcohol-based or ammonia-based cleaners as they may damage or dissolve the plastic components or soften the decals or decal adhesive. Battery Care and Disposal • Do not store in freezing or below freezing temperatures.
TROUBLESHOOTING GUIDE *Product(s) should be turned OFF and fully charged prior to doing any Troubleshooting. NOTE: All troubleshooting steps should be performed by an adult only. Problem Possible Cause Solution Does not work out of the box Unit must be traveling at least 3 mph (5 km/h) before motor will engage Kick to start to at least 3 mph (5 km/h) while engaging throttle to engage motor.
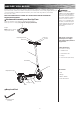
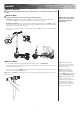
E-XR ELECTRIC SCOOTER PARTS Keep your E-XR running for years with genuine Razor parts. Visit our website or e-mail us for more information on spare part availability. (Specifications subject to change without notice.) 1. Handlebar Grips (x2) 8. Front Wheel Complete 15. Battery Tray 2. Throttle 9. Front Fender 3. Head Light Complete 10. Front Fork 16. Charger Port 16-1 Charger Port Cover 4. Brake Lever Assembly 11. Kickstand 17. Battery 5. Handlebar Stem 12. Caliper Brake 18.
FCC COMPLIANCE This device complies with Part 15 of the FCC Rules. Operation is subject to the following two conditions: (1) This device may not cause harmful interference, and (2) this device must accept any interference received, including interference that may cause undesired operation. Note: This equipment has been tested and found to comply with the limits for a Class B digital device, pursuant to part 15 of the FCC Rules.
NOTICE: INSURANCE YOUR INSURANCE POLICIES MAY NOT PROVIDE COVERAGE FOR ACCIDENTS INVOLVING THE USE OF THIS SCOOTER/ELECTRIC RIDE-ON PRODUCT. TO DETERMINE IF COVERAGE IS PROVIDED, YOU SHOULD CONTACT YOUR INSURANCE COMPANY OR AGENT.
CUSTOMER SERVICE CONTACT INFORMATION Need Help? Visit our website for replacement parts, product support, a list of authorized service centers in the US and customer service contact information at www.razor.com. Please have the product I.D. code (located on the white label of your product) available for better assistance. Additional Customer Service contact information is listed below: AMERICAS EUROPE, MIDDLE EAST, AFRICA ASIA Razor USA LLC P.O.