SERIES OWNER’S MANUAL Read and understand this entire manual before allowing child to use this product! For assistance contact Razor. DO NOT RETURN TO STORE. NOTE: Manual illustrations are for demonstration purposes only. Illustrations may not reflect exact appearance of actual product. Specifications subject to change without notice. Please have your 19 character product I.D. code ready before contacting Razor for warranty assistance and/or replacement parts. Product I.D.
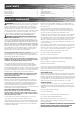
CONTENTS Safety Warnings............................................................................................... 1 Before You Begin.............................................................................................. 2 Assembly and Set-Up....................................................................................3-4 Charging the Battery......................................................................................... 5 Pre-Ride Checklist........................................
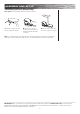
BEFORE YOU BEGIN Remove contents from box. Remove the separators that protect the components from damage during shipping. Inspect the contents of the box for scratches in the paint, dents or kinked cables that may have occurred during shipping. Because the scooter was 95 percent assembled and packed at the factory, there should not be any problems, even if the box has a few scars or dents. MAKE SURE POWER SWITCH IS TURNED “OFF” BEFORE CONDUCTING ANY ASSEMBLY OR MAINTENANCE PROCEDURES.
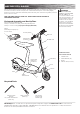
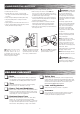
ASSEMBLY AND SET-UP q Attaching the Handlebars Note: Make sure any cables/wires are out of the way before inserting the stem into the fork. Tools Required: 5 mm Allen wrench WARNING: Failure to properly tighten the collar clamp may allow the handlebars to dislodge while riding and may cause you to lose control and fall. When correctly tightened, the handlebars will not rotate out of alignment with the front wheel under normal circumstances. 1 Loosen the collar clamp and slide it upward.
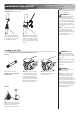
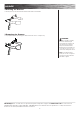
ASSEMBLY AND SET-UP q Attaching the Seat (E200S Only) Tools required: Two (2) 4 mm Allen wrenches and Phillips screwdriver. 1 Attach the seat to the seat post with two (2) 4mm Allen wrenches. 2 Remove the four screws on the middle of the deck with the 4 mm Allen wrench and the Phillips screwdriver. 3 Place the seat post on the deck and secure using the same 4 screws. Note: Do not completely tighten at this time.
CHARGING THE BATTERY Your electric scooter may not have a fully charged battery; therefore you must charge the battery prior to use. • Initial charge time: 12 hours. • Recharge time: up to 12 hours, even if the light turns green. Recommended maximum charging time is 24 hours. • Always charge the battery immediately after riding. • Fully charge battery before storing for extended periods of time. • Unplug charger from the wall outlet when not in use.
USAGE q Starting the Scooter To start unit, turn on power switch and twist throttle with both hands on handlebar. q Stopping the Scooter To stop unit, release the throttle and apply the brake until the unit comes to a complete stop. WARNING: The brake is capable of skidding the rear tire and throwing an unsuspecting rider. Practice in an open area free from obstacles until you are familiar with the brake function. Avoid skidding to a stop as this can cause you to lose control and/or damage the rear tire.
REPAIR AND MAINTENANCE Turn power switch “OFF” before beginning repair or maintenance: • Read the instructions • Remove charger plug • Turn the power switch off • Secure the unit under repair • Exercise caution around exposed parts • Contact Razor customer service if unsure about any repair or maintenance q Adjusting the Brakes Tools required: 10 mm wrench 1 To adjust the brake cable tension, thread the brake lever adjuster in or out 1/4 to 1/2 turn until the desired brake adjustment is attained.
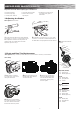
REPAIR AND MAINTENANCE e ce nc n e ue u q eq Nut e N Frame Spacer O e s re s I Note: Front wheel hardware S r R wa wa sequence. E V rd ard 9-1 S a 9-2 U l h el hWasherBolt e 9-5 XX he he 2 Brake Plate w E -w t -- on Fr Cable Guide Bracket Reassembly 5 6 Verify chain is properly installed on each sprocket and tensioner is correctly positioned at the bottom of the chain. Install the chain onto the rear wheel sprocket. Slip wheel axle into the frame slots. See rear wheel hardware sequence on prior page.
REPAIR AND MAINTENANCE q Battery Care and Disposal Do not store in freezing or below freezing temperatures. To properly maintain your battery and ensure maximum battery life, carefully read the “Charging the Battery” section on page 5 of this owner’s manual. CONTAINS SEALED LEAD ACID BATTERIES. BATTERIES MUST BE RECYCLED. Disposal: Your Razor product uses sealed lead-acid batteries which must be recycled or disposed of in an environmentally safe manner. Do not dispose of a lead-acid battery in a fire.
TROUBLESHOOTING GUIDE Unit should be fully charged prior to doing any troubleshooting and must be done by an adult ONLY. Problem Possible Cause Solution Does not work out of the box Loose connection(s) Check for loose connections/wires. No longer works Loose connection(s) Check for loose connections/wires.
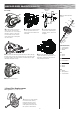
E200/E200S ELECTRIC SCOOTER PARTS Keep your scooter running for years with genuine Razor parts. Visit our website or e-mail us for more information on spare part availability. (Specifications subject to change without notice.) 1. Handlebar Grip (right/left 1-1 Handlebar End Cap 1-2 Valve Extender 2. Single Speed Twist Grip Throttle 2-1 Sleeve 3. Handlebar Stem 4. Brake Lever Assembly 5. Collar Clamp 6. Headset (upper/lower) 7. Limiter and Cover 8. Front Fork 18. 19. 20. 21. 22. 23. 24. 9.
NOTICE: INSURANCE YOUR INSURANCE POLICIES MAY NOT PROVIDE COVERAGE FOR ACCIDENTS INVOLVING THE USE OF THIS SCOOTER/ELECTRIC RIDE-ON PRODUCT. TO DETERMINE IF COVERAGE IS PROVIDED, YOU SHOULD CONTACT YOUR INSURANCE COMPANY OR AGENT.
FCC COMPLIANCE This device complies with Part 15 of the FCC Rules. Operation is subject to the following two conditions: (1) This device may not cause harmful interference, and (2) this device must accept any interference received, including interference that may cause undesired operation. Note: This equipment has been tested and found to comply with the limits for a Class B digital device, pursuant to part 15 of the FCC Rules.