ELECTRIC HUB MOTOR SCOOTER NOTE: The unit must be traveling at least 3 mph (5 kmh) before motor will engage. Kick start to at least 3 mph (5 kmh) while applying the push button throttle to engage motor. OWNER’S MANUAL Read and understand this entire manual before allowing child to use this product! For assistance contact Razor. DO NOT RETURN TO STORE. NOTE: Manual illustrations are for demonstration purposes only. Illustrations may not reflect exact appearance of actual product.
CONTENTS Safety Warnings .............................................................................................. 1 Before You Begin.............................................................................................. 2 Assembly and Set-Up....................................................................................... 3 Charging the Battery ........................................................................................ 3 Pre-Ride Checklist .....................................
BEFORE YOU BEGIN Remove contents from box. Remove the separators that protect the components from damage during shipping. Inspect the contents of the box for scratches in the paint, dents or kinked cables that may have occurred during shipping. Because the scooter was 95 percent assembled and packed at the factory, there should not be any problems, even if the box has a few scars or dents. MAKE SURE POWER SWITCH IS TURNED “OFF” BEFORE CONDUCTING ANY ASSEMBLY OR MAINTENANCE PROCEDURES.
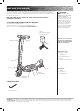
ASSEMBLY AND SET-UP Attaching the Handlebars WARNING: Do not attempt to thread the stem into the front fork thread. Tool Required: 5 mm Allen Wrench Note: Make sure any cables/wires are out of the way before inserting the stem into the fork. 1 Loosen the collar clamp. With a side to side twisting motion, push and twist to slide the stem onto the fork until it bottoms out on the headset locknut.
PRE-RIDE CHECKLIST Safety Gear Brake Always wear proper protective gear, such as an approved safety helmet. Elbow pads and kneepads are recommended. Always wear athletic shoes (lace-up shoes with rubber soles) and keep shoelaces tied and out of the way of the wheels, motor and drive system. NEVER RIDE BAREFOOTED OR IN SANDALS. Check the brake for proper function. When you squeeze the lever, the brake should provide positive braking action.
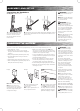
REPAIR AND MAINTENANCE Turn power switch “OFF” before beginning repair or maintenance: • Read the instructions • Remove charger plug • Turn the power switch OFF • Secure the unit under repair • Exercise caution around exposed parts Note: Front wheel hardware sequence • Contact Razor customer service if unsure about any repair or maintenance Right Side 8-2 Spacer 8-3 Bearing 8-4 Big Spacer Front Wheel Replacement Tool Required: Two (2) 5 mm Allen Wrenches Fork 8-1 Coupling Bolt 8-2 8-3 8-1 8-4 8-3
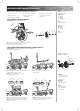
REPAIR AND MAINTENANCE Rear Wheel/Hub Motor/Battery Replacement Cont’d Tool Required: Phillips Screwdriver and Two (2) 13 mm Wrenches Note: When re-inserting the motor wires into the connector, make sure the red wire connects to the blue wire and the black wire connects to the brown wire. Red Black Note: 5 Using a pointed object carefully depress the tabs on the metal pins inside of the motor wire connector and remove the wires. Carefully pull wires out from battery tray.
TROUBLESHOOTING GUIDE *Unit(s) should be turned OFF and fully charged prior to doing any Troubleshooting. NOTE: All troubleshooting steps should be performed by an adult only. Problem Possible Cause Solution Does not work out of the box Unit must be traveling at least 3 mph (5 kmh) before motor will engage Kick start to at least 3 mph (5 kmh) while pressing the push button throttle to engage motor. Loose connection(s) Check for loose connections/wires underneath the deck plate.
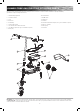
POWER CORE E90 ELECTRIC SCOOTER PARTS Keep your scooter running for years with genuine Razor parts. Visit our web site or e-mail us for more information on spare part availability. (Specifications subject to change without notice.) 1. 2. 3. 4. 5. 6. 7. 8. 9. Handlebar Grips (Right/Left) Push Button Throttle Stem Brake Lever Collar Clamp Headset (Upper/Lower) Front Fork with Limiter And Fender Brake Front Wheel Complete (See Pg. 5 For Hardware Sequence) Battery Tray 10. 11. 12. 13. 14. 15. 16. 17.
NOTICE: INSURANCE YOUR INSURANCE POLICIES MAY NOT PROVIDE COVERAGE FOR ACCIDENTS INVOLVING THE USE OF THIS SCOOTER/ELECTRIC RIDE-ON PRODUCT. TO DETERMINE IF COVERAGE IS PROVIDED, YOU SHOULD CONTACT YOUR INSURANCE COMPANY OR AGENT.
FCC COMPLIANCE This device complies with Part 15 of the FCC Rules. Operation is subject to the following two conditions: (1) This device may not cause harmful interference, and (2) this device must accept any interference received, including interference that may cause undesired operation. Note: This equipment has been tested and found to comply with the limits for a Class B digital device, pursuant to part 15 of the FCC Rules.