
Data Sheet


V-MOTION LITE - User Guide
13
USING THE V-MOTION LITE
Now that you have assembled the mechanical parts of your kit, you just need to:
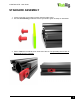
- Connect your motor’s cable to the V-Motion Lite Controller, using the socket on the top
right, labeled with a cog symbol.
- Connect your Battery Pack‘s cable to the V-Motion Lite Controller, using the socket
on the top left, labeled with a lightning symbol. You can also connect any third-party
power source, as long as it is rated at 12V DC and has a standard DC barrel jack. If you
use an AC adapter make sure it is rated at 2A or more.
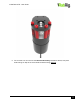
And you’re ready to go. Controls on the V-Motion Lite Controller are pretty simple, there’s only
one knob:
- Central position: motor OFF
- Rotate clockwise to move the motor in one direction, counter-clockwise to move in the
opposite direction
- The further you turn the knob, the faster the carriage will move
CAUTION
Avoid letting your motor reach the end of the slider. If it
happens, turn the power off immediately or reverse the
direction. Running power through a stalled motor may
damage the electric components of your V-Motion Lite.
Manually resetting your carriage’s position
If you’re using the Timelapse Motor, the top speed is still very slow. If you want to move your
carriage to a different position and can’t afford to wait for the motor to get there, follow the steps
below:
- Slightly loosen one of the Knobs holding the Belt, just enough so you can move the T-
Nut towards the center of the slider. This will decrease tension, allowing you to
disengage the belt from the Toothed Pulley on the motor’s shaft.
- Manually move the carriage to the desired position, re-engage the Belt on the Toothed
Pulley.
- Re-adjust tension by moving the T-Nut towards the end of the rail, and screw the Knob
until the T-Nut is locked in place. Do not exert excessive force when screwing the knob,
as it’s unnecessary and may damage your belt.