V-MOTION LITE USER GUIDE © Rat Rig 2017. All rights reserved.
V-MOTION LITE - User Guide PACKAGE CONTENTS 1 2 3 4 5 6 7 1x V-Motion Motor 1x Belt 1x 3mm Hex Key 1x AA Battery Pack (for 8x AA batteries)* 1x V-Motion Controller 2x Knob 2x T-Nut The parts below are only required if you use the reversed assembly: 8 9 10 11 1x 2.5mm Hex Key 1x 1.5mm Hex Key 4x 25mm screws 4x Black Spacers *Batteries not included.
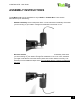
V-MOTION LITE - User Guide ASSEMBLY INSTRUCTIONS The V-Motion Lite can be assembled on any V-Slider or V-Slider Mini. There are two alternative ways of assembling: - Standard assembly: motor shaft points down. You should use this assembly if the head you’re mounting on your slider’s carriage has a diameter of less than 10 cm. - Reversed assembly: motor shaft points up.
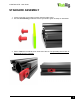
V-MOTION LITE - User Guide STANDARD ASSEMBLY 1. Lock the carriage of your slider in place using the brake screw. 2. Use the 3mm Hex Key provided to remove your slider’s green endcaps on both sides. 3. Slide a T-Nut into the lateral slot on each end of the rail. The protruding side of each TNut should be facing outwards.
V-MOTION LITE - User Guide 4. Reinstall the green endcaps on both sides using the 3mm Hex Key. 5. Remove your slider’s brake plate by unscrewing the 2 screws that hold it in place, using the 3mm Hex Key.
V-MOTION LITE - User Guide 6. Mount the V-Motion Motor where the brake plate was, using the same screws. The motor shaft should be facing downwards. 7. Slide one tip of the Belt behind one of the T-Nuts, making sure the T-Nut is close to the end of the rail. The toothed side of the Belt should be facing inwards(touching the rail).
V-MOTION LITE - User Guide 8. Screw a Knob on the T-Nut until it locks the Belt in place. Excessive force is unnecessary and may damage the belt. 9. Slide the opposite tip of the Belt through the gap between the rail and the wheel of your slider’s carriage. Pick the tip on the opposite side and while holding the carriage in place, pull it until the Belt is tense and neatly lodged inside the lateral slot.
V-MOTION LITE - User Guide 10. Carefully loop the Belt around the toothed pulley of the motor, keeping tension. 11. Slide the tip of the Belt through the gap between the rail and the opposite wheel of the carriage. 12. Pick up the tip of the Belt on the opposite side and slide it behind the other T-Nut, which should be placed near the end of the rail. Pull from the opposite side until the belt is snug against the rail. 13. Screw the remaining Knob on the T-Nut.
V-MOTION LITE - User Guide REVERSED ASSEMBLY For this assembly you will first need to disassemble your V-Motion Motor and reassemble it with a different configuration: 1. Pick up your V-Motion Motor and use the 1.5mm Hex Key to loosen both set screws on the Toothed Pulley. The set screws are inside the small holes between the teeth. Remove the pulley from the motor’s shaft. 2. Use the 2.5mm Hex Key to remove the 4 screws on the Motor Plate.
V-MOTION LITE - User Guide 3. Remove the plate and replace the Toothed Pulley on the motor’s shaft. Don’t let it slide all the way to the bottom of the shaft, leave a margin of around 2mm from the bottom. Use the 1.5mm Hex Key to tighten both set screws inside the pulley, locking it in place. Important: Make sure one of the set screws is aligned with the flat part of the motor shaft. 4.
V-MOTION LITE - User Guide 5. You’re done! You can now use the Standard Assembly instructions above, with just a small change on step 6: the motor shaft should be facing upwards.
V-MOTION LITE - User Guide MOTOR OPTIONS Rat Rig offers 3 different motor options, each with its own range of speeds, so you can choose the one best suited for each situation: - - - Timelapse motor - motion is almost unnoticeable in real time - Top speed: 1 meter in 18 minutes - Lowest speed: 1 meter in 3 hours Standard motor - adequate for timelapses in its slowest setting, adequate for real time action in its fastest - Top speed: 1 meter in 38 seconds - Lowest speed: 1 meter in 9 minutes Fast motor -
V-MOTION LITE - User Guide USING THE V-MOTION LITE Now that you have assembled the mechanical parts of your kit, you just need to: - Connect your motor’s cable to the V-Motion Lite Controller, using the socket on the top right, labeled with a cog symbol. Connect your Battery Pack‘s cable to the V-Motion Lite Controller, using the socket on the top left, labeled with a lightning symbol. You can also connect any third-party power source, as long as it is rated at 12V DC and has a standard DC barrel jack.