
User`s manual


5-39
5
Functions
5. Functions
(2) When initializing with the TOP software on the PC
All parameters can be reset to their default values (default values in the robot driver)
by using the tool bar or the pull-down menu on the TOP software screen.
Start up the TOP software to make connection with the robot driver.
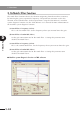
1. Click
on the toolbar on the parameter setup screen.
(You can also use the pull-down menu.)
2. The "Initialization setup" screen then appears as shown below. In the "Initialization
mode" drop-down list select the item you want to initialize.
The following items can be selected in the "Initialization mode" drop-down list.
Trip history clear: Clears only the tripped alarm log.
Data initialization: Clears only the parameter data.
3. Click the [Initialization start] button. Initializing then begins.
During initializing, the LED indicator on the robot driver shows:
"HC"
→
during alarm log clear
"JP"
→
during data initialization
Note: Do not shut down the control power for the robot driver during
initialization.
Shutting off the power while data is being written may destroy the EEPROM
data (stored data) within the robot driver, and the robot driver may fail to
operate correctly.
4. After initializing, the data is automatically loaded into the PC from the robot driver,
and the initializing then ends.
5. After initializing the parameter data, perform generation.
Note: After initializing the parameters, you must perform generation before
operating the robot.
If the robot is operated in the initialized state, it might malfunction or be
damaged.