3 LCD Display 20x4 with Buttons Ausgabe 10.11.
3 LCD Display 20x4 with Buttons Index 1. Connecting the Display 2. Installing the System 3. Usage & Example-Code 4. Support Ausgabe 10.11.
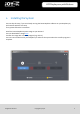
LCD Display 20x4 with Buttons Dear customer thank you for purchasing our product. Please find our instructions below. 1. Connecting the Display Plug the display onto the pin header of your Raspberry Pi so that the display is placed over your Raspberry Pi. As soon as you power your Raspberry Pi, the displays backlight should start to light. Ausgabe 10.11.
3 2. LCD Display 20x4 with Buttons Installing the System You can skip this step, if you are already running the latest Raspbian software on your Raspberry Pi, and continue with the next step. If not, please follow the instructions. Install the latest Raspbian-System-Image to your SD-Card. You can download the image here. Transfer the image with a suitable program (e.g. Etcher). You can insert the SD-Card to your Raspberry Pi and start the system when the transfer progress is complete. Ausgabe 10.11.
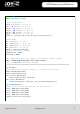
3 3. LCD Display 20x4 with Buttons Usage & Example-Code Your display is ready to use. No further installations are required. It may appear that you manually need to adjust the contrast before you are able to read anything on the display. Adjust the contrast by rotating the screw with a small screw-driver until the contrast is fine. To use the display, you can either download the example-code or create a new file and insert the code. To create a new file, enter the following command: sudo nano lcd20x4.
3 LCD Display 20x4 with Buttons import time import RPi.
3 LCD Display 20x4 with Buttons def PulseEnableLine(): #Pulse the LCD Enable line; used for clocking in data mSec = 0.0005 #use half-millisecond delay time.sleep(mSec) #give time for inputs to settle GPIO.output(LCD_E, GPIO.HIGH) #pulse E high time.sleep(mSec) GPIO.output(LCD_E, GPIO.LOW) #return E low time.sleep(mSec) #wait before doing anything else def SendNibble(data): #sends upper 4 bits of data byte to LCD data pins D4-D7 GPIO.output(LCD_D4, bool(data & 0x10)) GPIO.
3 LCD Display 20x4 with Buttons def GotoLine(row): #Moves cursor to the given row #Expects row values 0-1 for 16x2 display; 0-3 for 20x4 display addr = LINE[row] SendByte(SETCURSOR+addr) ######################################################################## # Main Program print "LCD program starting. Press CTRL+C to stop.
3 4. LCD Display 20x4 with Buttons Support We also support you after your purchase. If there are any questions left or if you encounter any problems, please feel free to contact us by mail, phone or by our ticket-supportsystem on our website. E-Mail: service@joy-it.net Ticket-System: http://support.joy-it.net Phone: +49 (0)2845 98469 – 66 (11- 18 Uhr) Please visit our website for more informations: www.joy-it.net Ausgabe 10.11.