
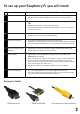
User Manual

The SD card contains the Raspberry Pi’s operang system (the OS is the soware that makes it work,
like Windows on a PC or OSX on a Mac). This is very dierent from most computers and it is what many
people nd the most daunng part of seng up their Raspberry Pi. It is actually very straighorward—
just dierent!
The following instrucons are for Windows users. Linux and Mac users can nd instrucons at
www.raspberrypi.org/downloads
1. Download the Raspberry Pi operating system
The recommended OS is called Raspbian. Download it here:
hp://downloads.raspberrypi.org/images/raspbian/2012-12-16-wheezy-raspbian/2012-12-16-wheezy-raspbian.zip
a) Right click on the le and choose “Extract all”.
b) Follow the instrucons—you will end up with a le ending in .img
This .img le can only be wrien to your SD card by special disk imaging soware, so…
3. Download the Win32DiskImager software
a) Download win32diskimager-binary.zip (currently version 0.6) from:
hps://launchpad.net/win32-image-writer/+download
b) Unzip it in the same way you did the Raspbian .zip le
c) You now have a new folder called win32diskimager-binary
You are now ready to write the Raspbian image to your SD card.
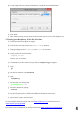
4. Writing Raspbian to the SD card
a) Plug your SD card into your PC
b) In the folder you made in step 3(b), run the le named Win32DiskImager.exe
(in Windows Vista, 7 and 8 we recommend that you right-click this le and choose “Run as
administrator”). You will see something like this:
c) If the SD card (Device) you are using isn’t found automacally then click on the drop down box
and select it
Preparing your SD card for the Raspberry Pi
3