
User Manual


49
showing the voltage from an analogue input such as a potentiometer. First you need to put this sketch
in the right place. You should have a directory called sketchbook in your home directory. Make a
subdirectory beneath that called LEDmeter, and copy LEDmeter.ino into that directory. To do
this, you can type the following from your gertboard_sw directory:
mkdir ~/sketchbook/LEDmeter
cp LEDmeter.ino ~/sketchbook/LEDmeter
When that is done, the sketch will now be in the File > Sketchbook menu on the Arduino IDE. You
can bring it up to inspect the code. In this example, we created two extra functions, turn_on_leds
and turn_off_leds, mostly to demonstrate that you can use ordinary C code (including functions)
in sketches. The pin numbers are stored in an array to make it easy to turn on or off a specific LED. If
you want to access LED 4, use Arduino pin led_pins[4]. In order to do this, we put a 0 into the
first location of the array, because there is no LED 0. One feature of C that you may not be familiar
with is the use of static in the definition:
static int old_max_led = 0;
The keyword static means that the value of the variable should be kept the same between function
calls. So if we assign it a value at the end of one call to loop(), the next time loop()is called
old_max_led will still have that value. The initial value, 0, is only assigned once, before loop()
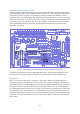
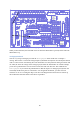
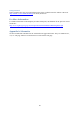
is called the first time, not every time loop() is called. The wiring diagram for LEDmeter is
below.
Figure 34: Wiring diagram for the LEDmeter sketch
Upload it the usual way, and the LEDs will respond to the position of the potentiometer.