
User Manual

39
Potmot Test in C
The main routine for this is in potmot.c. Functions from gb_spi.c and gb_pwm.c are used to
control the SPI bus (for reading the A/D) and the pulse width modulator (for controlling the speed of
the motor).
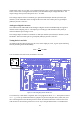
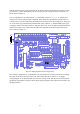
In the main routine for potmot, first we print to the terminal the connections that need to be made
on the Gertboard to run this example, then we call setup_io to set up the GPIO ready for use. Then
we call setup_gpio to set the GPIO pins the way we want them. In this, we set up GPIO8 to
GPIO11 to use the SPI bus using INP_GPIO and SET_GPIO_ALT as described in the section on the
converters (D/A and A/D tests in C, page 35). GPIO17 is set up as an output (using INP_GPIO and
OUT_GPIO), and GPIO18 is set up as a PWM using as INP_GPIO and SET_GPIO_ALT as
described in the section on the motor controller (Motor Test in C, page 29). Back in main, we call
setup_spi and setup_pwm to get the SPI bus and PWM ready for use and get the motor ready to
go.
Then we repeatedly read the A/D and set the direction and speed of the motor depending on the value
we read. Lower A/D values (up to 511 – recall that the A/D chip used returns a 10 bit value so the
maximum will be 1023) result in the motor B input being set high, and thus the motor goes in the
“rotate one way” as in the motor controller table (Table 3, page 27). Confusingly, this motor direction
is called “backwards” in the comments of the program! Higher A/D values (512 to 1023) result in the
motor B input being set low, and the motor goes in the “rotate opposite way” direction. This is called
“forwards” in the comments of the program. Simple arithmetic is used to translate A/D values near
511 to slow motor speeds and A/D values near the endpoints of the range (0 and 1023) to fast motor
speeds by varying the value sent to the PWM.
Potmot test in Python
This program, potmot-wp.py, uses spidev to control the A/D and WiringPi for Python to control
the motor with the hardware PWM. Essentially potmot is a simplified combination of the atod.py
and motor-wp.py programs. It is simplified in that there is no on-screen display of the A/D reading
or motor direction.
The potentiometer position (read by the ADC) determines motor direction and speed (PWM value) as
follows: middle value (511) results in no movement, 1023 results in max speed one way, 0 results in
max speed the other way.
First the program imports the required modules, spidev and wiringpi, then sets up GPIO ports 17 and
18 as digital output and PWM output respectively. Then two functions are defined; get_adc()
reads the voltage at the potentiometer using the A/D; reset_ports() ensures we can safely exit
the program with the ports switched off. Then the initial values of variables are set and the wiring
instructions are printed out on the screen. The program then waits for user input before proceeding.
Once the user hits enter, the SPI port is opened to read the potentiometer voltage using the A/D. The
A/D value is read and if above 511 we set port 17 to 0, which sets motor direction one way. Otherwise
direction is set the other way. Then the PWM value sent to port 18 is calculated, based on the value
read from the ADC. This determines how fast the motor will spin. After the PWM value is written to
port 18, the program waits 0.05 seconds and then repeats the main loop, reading the A/D value again.
This occurs 600 times, so the program runs for about 30 seconds.