
User Manual
30
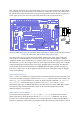
details about alternative functions of the GPIO pins. For a summary of the alternate function of GPIO
pins used on the Gertboard, see Table 1 on page 11.)
We set the output of GPIO17 low (to make sure that the motor doesn‟t turn) and then initialize the
PWM by calling setup_pwm. We enable the PWM by setting the mode to PWM0_ENABLE using
force_pwm0. Since GPIO17 (motor controller B input) is set low, when the duty cycle on the PWM
(motor controller A input) is high enough, the motor will turn the „opposite way‟ as described in the
motor table on page 27.
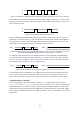
A loop now starts where the PWM is started, first with a very low duty cycle (because the value
passed to set_pwm0 is low), then gradually increasing this to the maximum (which is set to 0x400 –
1024 – in setup_pwm). Then the value sent to the PWM is decreased to slow the motor down. Then
GPIO17 is set high, so that the motor will get power on the low phase of the PWM signal. The PWM
is re-enabled with the mode PWM0_ENABLE|PWM0_REVPOLAR. The reverse polarization flag flips
the PWM signal, so that a low value sent to the PWM results in a signal that is high most of the time
(rather than low most of the time). That way the same code can be used to slowly ramp up the speed
of the motor (but in the „one way‟ direction as in the table on page 27), then slow it down again.
Finally the PWM is switched off, and the GPIO interface is closed down.
Motor Tests in Python
The motor-rg.py and motor-wp.py programs are rather different because the RPi.GPIO
package does not yet support hardware pulse-width modulation (PWM), but WiringPi for Python does
(it works, although it's still undocumented). Thus motor-rg.py (the RPi.GPIO version) uses
software PWM, which is found in the function run_motor(). If you try both programs, you'll
probably get smoother results with motor-wp.py (the WiringPi for Python version).
Both versions use the Python 3 print() function, which is imported like this
from __future__ import print_function
Without this function, it would be difficult to prevent line-breaks and spaces in the on-screen output.
It means that all print statements need to be written as print() instead of just print because they
are now function calls and not statements.
motor-rg.py (software PWM)
After importing the required modules, we define which ports to use (18 and 17), how many times to
run each loop (Reps), PWM cycle time (Hertz), frequency for motor loop time period (Freq).
Then the ports are set up as outputs and set to OFF (0).
Next the function
run_motor(Reps, pulse_width, port_num, time_period)
is defined. This controls the GPIO port switching on and off for precise periods of time. The port
port_num is switched on for time pulse_width, then switched off for time time_period, and
all of that is repeated Reps times (400 in this case). The main loop in run_motor()is inside a
try: except: block. This is an important safety precaution to ensure the motor is switched off on
keyboard interrupt. (This is even more important with hardware PWM in the other version). The
run_motor() function is called many times from the run_loop() function. Each loop of 400