Pi Supply The Maker Emporium https://www.pi-supply.com Flick Quick Start and FAQ Getting started The Flick boards are an add on boards for the Raspberry Pi which bring 3D tracking and gesture board that lets you control your I2C enabled devices as if by magic! Flick uses technology that enables the PCB to detect your gestures from up to 15cm away in 3D space. This guide will show you how to assemble the Flick boards, set them up in their cases and discuss some of the most common issues and questions.
Pi Supply The Maker Emporium https://www.pi-supply.
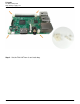
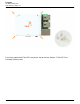
Pi Supply The Maker Emporium https://www.pi-supply.com 3 Stickers 2 Info card Board Assembly Step 1 - Unpack your Raspberry Pi. Step 2 - Install the spacers on the Raspberry Pi as shown here holding them with 4 plastic bolts from underneath the Pi. The bolts should be screwed in with a PH0 screwdriver.
Pi Supply The Maker Emporium https://www.pi-supply.com Step 3 - Get the Flick HAT from its anti-static bag.
Pi Supply The Maker Emporium https://www.pi-supply.com Step 4 - Place the Flick HAT on top of the Raspberry Pi by gently pushing the female header onto the Raspberry Pi male header.
Pi Supply The Maker Emporium https://www.pi-supply.com Step 5 - Screw the last 4 plastic bolts to hold the Flick HAT in place.
Pi Supply The Maker Emporium https://www.pi-supply.com If you have acquired the Flick HAT case please skip to the next Section – Flick HAT Case assembly (Coming soon).
Pi Supply The Maker Emporium https://www.pi-supply.
Pi Supply The Maker Emporium https://www.pi-supply.
Pi Supply The Maker Emporium https://www.pi-supply.com 3 Stickers 2 Info card Board Assembly Step 1 - Unpack your Raspberry Pi. Step 2 - Install the spacers on the Raspberry Pi as shown here holding them with 4 plastic bolts from underneath the Pi. The bolts should be screwed in with a PH0 screwdriver.
Pi Supply The Maker Emporium https://www.pi-supply.com Step 3 - Get the Flick Zero from its anti-static bag.
Pi Supply The Maker Emporium https://www.pi-supply.com Step 4 - Place the Flick Zero on top of the Raspberry Pi by gently pushing the female header onto the Raspberry Pi male header.
Pi Supply The Maker Emporium https://www.pi-supply.com Step 5 - Screw the last 4 plastic bolts to hold the Flick Zero in place.
Pi Supply The Maker Emporium https://www.pi-supply.com If you have acquired the Flick Zero case please skip to the next Section – Flick Zero Case.
Pi Supply The Maker Emporium https://www.pi-supply.
Pi Supply The Maker Emporium https://www.pi-supply.
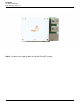
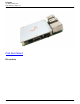
Pi Supply The Maker Emporium https://www.pi-supply.com 3 Stickers 2 Info card Board Assembly Use the female to female jumper cable provided to connect the Flick large to the Raspberry Pi as shown in the picture.
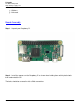
Pi Supply The Maker Emporium https://www.pi-supply.com If you have acquired the Flick Large case please skip to the next Section – Flick Large Case assembly (Coming soon). FAQ Which pins are used by Flick? Click to enlarge 18 / 18 Powered by TCPDF (www.tcpdf.