
User Manual


2/12/2018 PiJuice/Software at master · PiSupply/PiJuice · GitHub
https://github.com/PiSupply/PiJuice/tree/master/Software 7/18
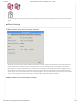
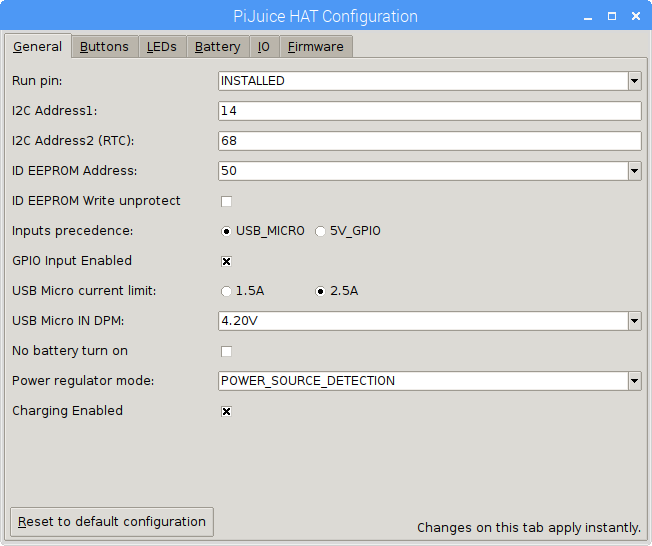
In the first config menu screenshot, we mentioned a button in the image that said "Configure HAT" - if you were to click on
that button it would bring you to this PiJuice HAT general configuration menu. It allows you to configure a lot of hardware
settings on the PiJuice HAT itself (as opposed to the previous menus which were actually configuring the software -
hopefully that is not too confusing!)
This is the general tab, which allows you to select whether you have installed the spring pin / run pin and also the I2C
addresses of the HAT and the RTC as well as changing the write protect on the eeprom and changing the actual physical I2C
address of the eeprom. These eeprom features can be very useful if you want to stack another HAT on top of the PiJuice but
still have that other HAT auto-configure itself.
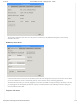
Inputs precedence: Selects what power input will have precedence for charging and supplying VSYS output when both
are present, HAT USB Micro Input, GPIO 5V Input. 5V_GPIO selected by default.
GPIO Input Enabled: Enables/disables powering HAT from 5V GPIO Input. Enabled by default.
USB Micro current limit: Selects maximum current that HAT can take from USB Micro connected power source. 2.5A
selected by default.
USB Micro IN DPM: Selects minimum voltage at USB Micro power input for Dynamic Power Management Loop. 4.2V
set by default.
No battery turn on: If enabled pijuice will automatically power on 5V rail and trigger wake-up as soon as power appears
at USB Micro Input and there is no battery. Disabled by default.
Power regulator mode: Selects power regulator mode. POWER_SOURCE_DETECTION by default.
Note: Using the "Reset to default configuration" will restore the board to its default settings and for a short while the GUI will
report "COMMUNICATION_ERROR"
PiJuice HAT Config Buttons Menu